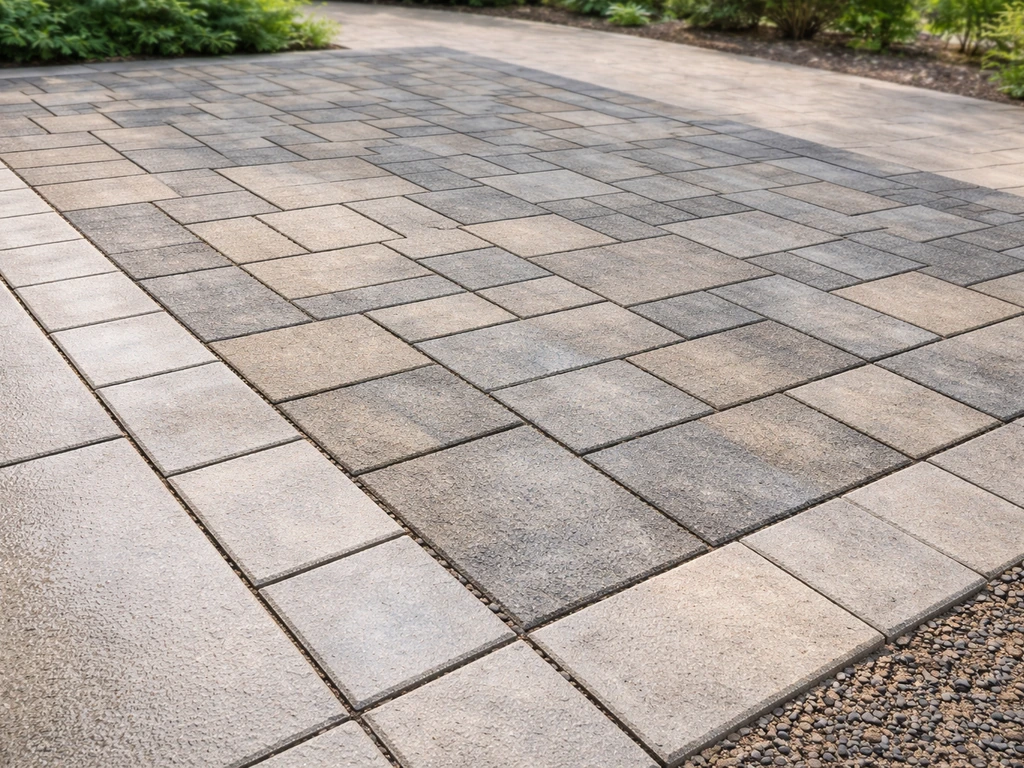
The most effective patio maintenance comes down to four repeating habits: clean on a schedule before grime builds up, keep joints packed so weeds and water can't take hold, seal surfaces at the right time with the right product, and fix small damage before freeze-thaw cycles or pooling water turn it into a big problem. Do those four things consistently and your patio will stay looking sharp for decades with very little drama or cost.
Patio Maintenance Tips: Do This Today and Year-Round Routine

Miles Sutton
2 Jul 2026
Seasonal cleaning routines that actually work
The single biggest mistake homeowners make is waiting until the patio looks terrible before cleaning it. By then you're dealing with embedded stains, established moss, and cracked joints. A seasonal rhythm prevents all of that.
Spring: your most important cleaning day of the year
Spring is when you do the heavy lifting. Sweep the entire surface thoroughly, then check every joint for gaps, crumbling sand, or early weed sprouting. If you had a hard winter, look for spalling or frost-heaved pavers before you do anything else. Once you've assessed the damage, wet the surface and scrub with a neutral cleaner or oxygen bleach (sodium percarbonate works well for mold, mildew, and algae). Rinse well and let it dry completely before deciding whether it needs sealing. A pressure washer set around 1,200 to 1,500 PSI is enough for most residential patios without blasting joint sand out of the gaps.
Summer: quick maintenance between uses
Summer maintenance is light if you did spring right. Sweep weekly, spot-treat any weeds that push through joints, and rinse off BBQ grease or food spills before they set. Keep an eye on drainage after heavy rain and note any areas where water sits longer than 30 minutes. That's a sign of a grading or joint issue that will worsen in winter.
Fall: prep before the freeze
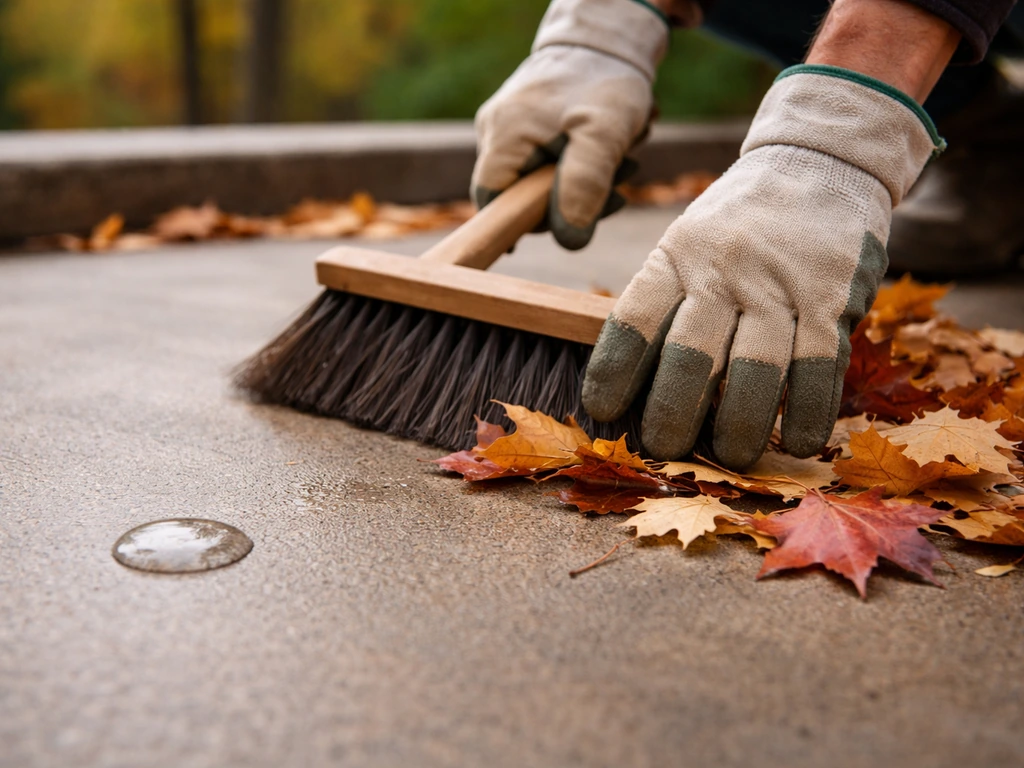
Fall prep is about protecting your investment through winter. Sweep off leaves before they decompose and stain the surface. Check sealer performance using a simple water-drop test: drip water on the patio and watch what it does. If it beads up, your sealer is still working. If it soaks in within a minute or two, reseal before cold weather hits. Remove any standing furniture cushions and covers that trap moisture. If you're in a freeze-thaw climate, this is also the time to top up polymeric joint sand in any depleted joints.
Winter: mostly leave it alone
The main winter rule is to avoid deicing salts on concrete and stone patios. Chloride-based deicers accelerate freeze-thaw spalling dramatically, especially on concrete that isn't air-entrained. Use sand for traction instead, or a magnesium chloride product sparingly. Don't chip at ice with metal tools on pavers or stone. Plastic snow shovels only.
Getting rid of weeds, moss, and algae (and keeping them out)
Weeds, moss, and algae are really three different problems, and they each need a slightly different approach.
Weeds between pavers and in cracks
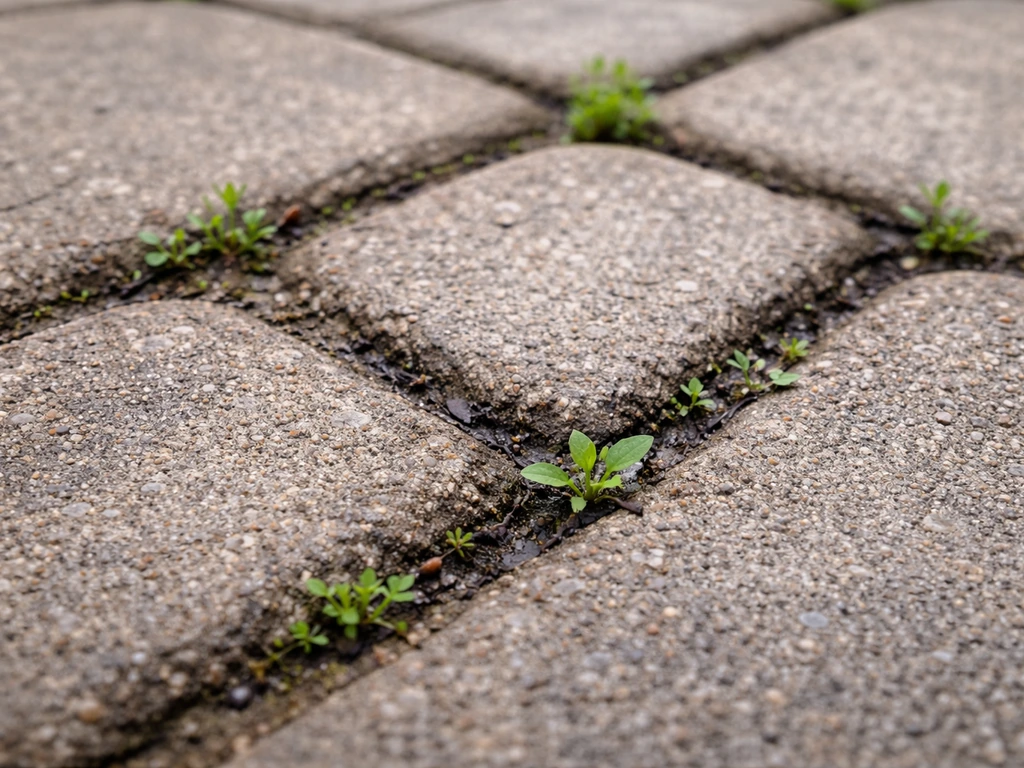
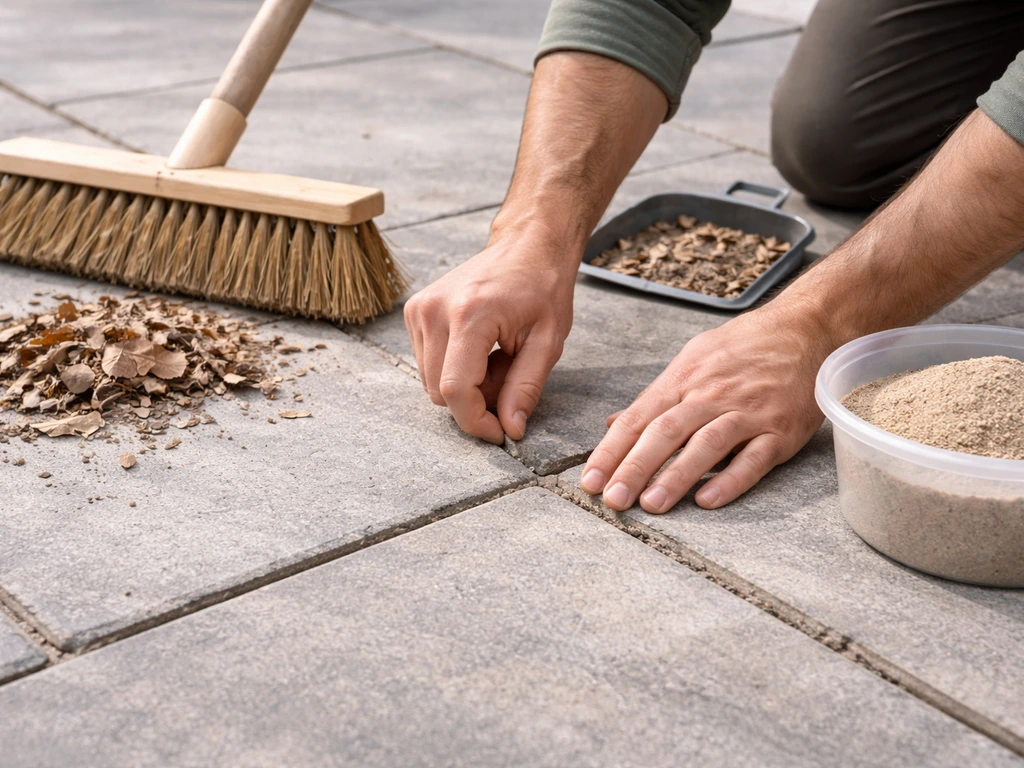
Weeds in joints are a joint-sand problem as much as a weed problem. When joint sand depletes, it creates open channels where seeds germinate and roots anchor. The long-term fix is polymeric jointing sand, like Sakrete PermaSand or similar products. Polymeric sand hardens when activated with water, resists washout from rain and pressure washing, and significantly reduces organic intrusion including weeds and ants. For weeds that are already there, pull them by hand or use a selective herbicide applied directly to the weed, not broadcast across the whole surface. Spot-applying limits chemical exposure and protects surrounding plants. After removing weeds, sweep in fresh polymeric sand, compact it with a hand tamper across the whole surface, then mist it to activate the binder. Foot traffic is typically safe after about 24 hours, and light vehicle traffic after about 72 hours.
Moss and algae on paver and concrete surfaces
Moss and algae love shaded, damp surfaces. Oxygen bleach (sodium percarbonate) is the go-to cleaner here. It's effective on mold, mildew, and algae on exterior masonry without the corrosive hazards of chlorine bleach. Mix it per the product directions, apply to the wet surface, let it dwell for 10 to 15 minutes, scrub, and rinse. Chlorine bleach will also kill algae, but it's harsher, it can irritate skin and eyes, and it's not the right choice for natural stone. If your patio sits under a dense tree canopy, no amount of cleaning will permanently stop moss without improving light or airflow. Trimming overhanging branches makes a bigger difference than any chemical treatment.
Repairing pavers, concrete, and stone
The right repair approach depends entirely on your surface material. Using the wrong method, like patching natural stone with concrete filler, looks terrible and fails quickly.
Paver repair
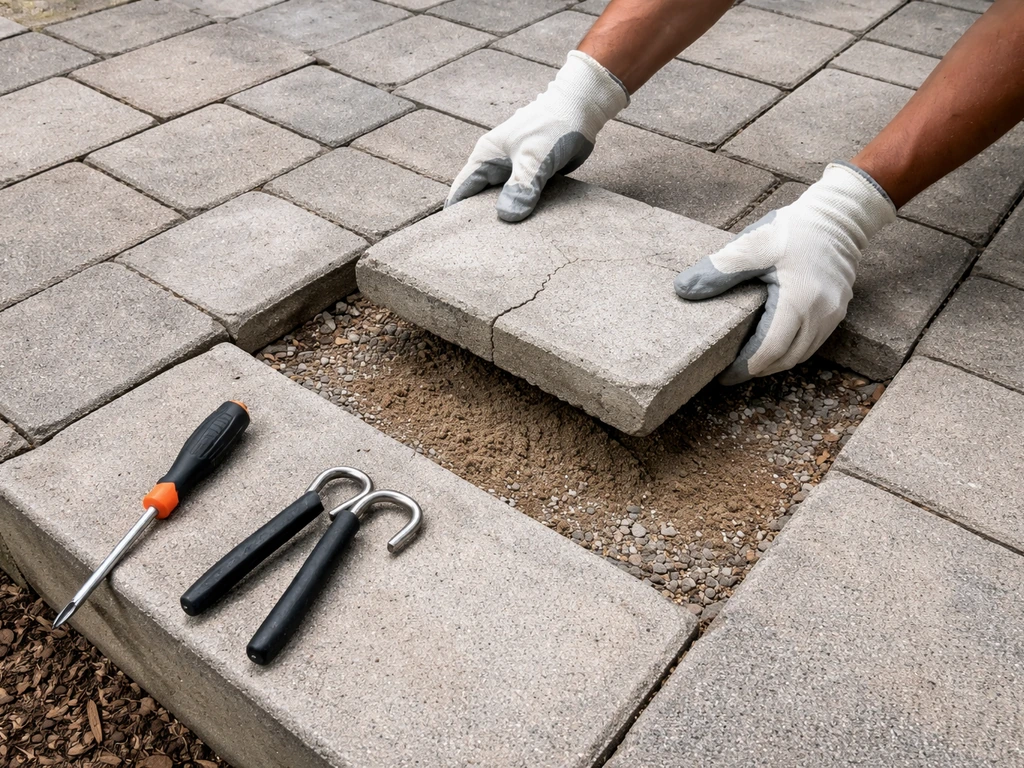
Individual pavers that are cracked, sunken, or frost-heaved can usually be pulled up and reset without disturbing the rest of the patio. Use a flathead screwdriver or paver puller to lift the affected unit, re-level the base material underneath, and set the paver back in place. Compact it flush with the surrounding surface. Refill the joints around it with polymeric sand and activate with water. This is one of the clearest advantages of a paver patio over poured concrete: individual unit repair without patching visible seams.
Concrete repair: spalling and cracks
Concrete spalling, where the surface flakes, pits, or scales, is most commonly caused by freeze-thaw cycling and deicing salt exposure. Minor spalling can be patched with a vinyl concrete patcher or similar resurfacing compound. For larger areas, a thin concrete overlay or resurfacing product applied over the cleaned, profiled surface is a reasonable DIY option. Deep structural cracking or widespread spalling across a large area is a different story, and that usually warrants a call to a concrete contractor. Patching over structurally compromised concrete rarely lasts.
Natural stone repair
Natural stone is the most repair-sensitive material on this list. Chipped or cracked flagstone usually means replacing the individual stone rather than patching it, because most fillers don't match the color or texture well. For reset work, the process is similar to pavers: pull the stone, level the base, reset, and re-grout or re-sand the joints. Keep the stone dry before resetting and use a filler or mortar compatible with natural materials. blank" rel="noopener noreferrer">Never use anything acidic near calcareous stones like limestone or marble, including standard vinegar-based cleaners.
Staining, sealing, and finishing: what actually matters
Sealing is one of the most misunderstood parts of patio maintenance. Done right, it protects the surface and enhances appearance. Done wrong, it traps moisture, causes haze, or peels within a season.
What to seal and what to skip
Concrete patios, especially stamped or decorative ones, benefit significantly from sealing. It protects the surface layer, enhances color, and reduces moisture absorption. Pavers also benefit from sealing, particularly with a paver-specific sealer that doesn't alter the joint sand chemistry. Natural stone is best treated with an impregnator sealer, which penetrates the stone and repels liquids without sitting on the surface as a film. Some dense stones like granite are naturally low-absorption and may not need sealing at all. Test first with the water-drop method before you buy a sealer.
The rules around timing and application
Never apply sealer to a wet or damp surface. Stamped concrete should air-dry for at least 24 hours after cleaning, and using a leaf blower to speed drying is a legitimate trick recommended by concrete professionals. If you apply to a damp surface, the sealer will trap moisture underneath and cloud or peel. For paver sealers, allow the first coat to become tack-free before applying a second coat, and keep vehicle traffic off for at least 48 hours after application. After using polymeric sand in joints, wait for the full dry-and-cure window (typically 24 to 48 hours depending on weather) before sealing over it.
What to avoid on natural stone
Never use cleaners containing vinegar, lemon juice, or other acids on calcareous stone like limestone, travertine, or marble. These etch and dull the surface permanently. Ammonia-based cleaners and chlorine bleach are also off the list for natural stone. Stick to neutral pH cleaners, mild dish soap in warm water, or stone-specific products. When in doubt, call the stone supplier and ask what they recommend.
| Surface | Best Cleaner | Sealer Type | Avoid |
|---|---|---|---|
| Concrete (stamped/plain) | Oxygen bleach or neutral cleaner | Acrylic or penetrating concrete sealer | Deicing salts, acid cleaners |
| Brick or concrete pavers | Oxygen bleach or paver cleaner | Paver-specific sealer | High-pressure blast at joints |
| Natural stone (limestone, travertine) | Neutral pH cleaner or mild dish soap | Impregnator/penetrating sealer | Vinegar, acids, bleach, ammonia |
| Natural stone (granite, slate) | Neutral cleaner | Impregnator sealer (test first) | Abrasive scrubbers, acid cleaners |
Drainage and stopping standing water from wrecking your patio
Water is the primary cause of long-term patio deterioration. It undermines base material, accelerates freeze-thaw cracking, grows algae and moss, and heaves pavers. Getting drainage right is more important than almost anything else in this guide.
A properly installed patio should have a slope of at least 1/8 inch per foot (roughly 1%) away from the house. If you notice water consistently pooling in the same spot after rain, that's either a grading issue, a base settlement issue, or a blocked drainage path. If it's a settled area with pavers, you can lift and re-level that section yourself. If it's a grading problem across a poured concrete patio, that's harder to fix without resurfacing or installing a channel drain.
Channel drains or strip drains installed at the low edge of a patio are a highly effective solution when grading can't fully solve the problem. They intercept runoff before it pools. For patios adjacent to the house, make sure downspout extensions are directing roof runoff well away from the patio area. A downspout dumping directly onto a paved surface erodes joint sand, stains concrete, and undermines base material over time.
On the prevention side, keeping joints filled with polymeric sand also helps. Stable, intact joints reduce the rate at which water infiltrates the base layer and causes differential settling. Think of your patio as a system: surface, joints, base, and drainage all work together. Neglect one and the others compensate until they can't.
Pest control and keeping cleaners safe around kids and pets
Insects in joints and cracks
Ants are the most common patio pest. They excavate joint sand to build colonies, which destabilizes pavers and creates the gaps weeds then colonize. Polymeric jointing sand reduces ant intrusion significantly because hardened joints are much harder to excavate than loose sand. For existing infestations, treat with an ant bait or perimeter spray before refilling joints with polymeric sand, otherwise you're just refilling over the colony.
Rodents near the patio
Patios with gaps in skirting, raised decking sections, or adjacent compost and firewood piles can attract rodents looking for shelter. If you're dealing with rodents, use tamper-resistant bait stations that meet EPA standards and are tested to resist access by young children. Place bait stations out of reach of pets. Follow label directions exactly, including when to check and replace bait, and keep children and pets away from treated areas during use. If trapping and bait stations don't resolve the problem within a few weeks, call a licensed pest control professional rather than escalating chemical use on your own.
Keeping cleaners and weed killers safe
Read the label on every cleaning product and herbicide before use. This isn't just a liability disclaimer: labels tell you actual drying and re-entry times for pets and kids, and those times vary widely. Chlorine bleach, for example, is corrosive and can burn skin and eyes on contact, so gloves and eye protection are non-negotiable. Spot-applying herbicide directly on target weeds rather than broadcasting across the whole surface reduces the amount of chemical on your patio and limits exposure. Once a treated area is fully dry and any required waiting period has passed per the product label, it's generally safe for foot traffic. When in doubt, give it an extra few hours.
Your long-term maintenance schedule and where to save money
Most patio maintenance problems are the result of neglect compounding over time. A cracked paver that costs $8 to replace becomes a sunken section requiring base repair if left for two winters. A depleted joint that needs $30 of polymeric sand becomes an ant colony and a weed garden. The math strongly favors staying ahead of problems.
| Frequency | Task | DIY or Pro | Estimated Cost |
|---|---|---|---|
| Weekly (summer) | Sweep surface, spot-treat weeds | DIY | Minimal |
| Spring (annual) | Deep clean, inspect joints, check drainage, assess sealer | DIY | $20–$60 in supplies |
| Every 1–3 years | Reseal concrete or pavers | DIY or Pro | $50–$200 DIY / $300–$800 Pro |
| As needed | Refill polymeric joint sand in depleted areas | DIY | $30–$80 per bag |
| As needed | Reset sunken or cracked individual pavers | DIY | $10–$50 per paver |
| As needed (spring) | Patch concrete spalling | DIY for minor / Pro for major | $20–$60 DIY / $500+ Pro |
| Fall (annual) | Test sealer performance, check grading, clear downspouts | DIY | Minimal |
What's worth DIYing vs. calling a pro
Most routine patio maintenance is genuinely DIY-friendly. Cleaning, joint sand refills, resealing, and resetting individual pavers are all well within the skill range of a careful homeowner with basic tools. If you plan your patio design budget tips carefully, DIY-friendly tasks like cleaning and joint sand refills can keep costs under control. Where it makes sense to call a pro: widespread concrete spalling over a large slab, significant drainage grading issues requiring rework of the base, large sections of sunken or unstable pavers (which suggest base failure, not surface wear), and persistent pest infestations. Getting a pro assessment early on structural or drainage problems almost always costs less than repairing the compounded damage later.
The cost-saving moves that matter most
- Use polymeric sand in joints from the start, or switch to it on your next resand. It dramatically reduces weed, ant, and washout maintenance.
- Seal before winter, not after spring damage shows up. Resealing a clean, intact surface costs a fraction of resealing after patching.
- Fix one lifted paver immediately rather than waiting until three are lifted and the base has washed out.
- Skip deicing salts entirely on concrete and stone. The repair costs from freeze-thaw spalling far exceed any convenience.
- Do the water-drop sealer test every fall. It takes 30 seconds and tells you whether you actually need to reseal that year.
- Keep downspout extensions at least 4 to 6 feet from the patio edge to prevent base erosion.
If you're still in the planning or building phase of your patio project, many of these maintenance challenges are much easier to prevent during construction than to fix afterward. Getting the base depth, drainage slope, and joint sand right from day one dramatically reduces the upkeep you'll deal with for the next 20 years. Avoid these patio design mistakes by focusing on proper drainage slope and well-packed, jointed bases during construction.
FAQ
Can I use a pressure washer every season, or will it damage my patio?
A safe target is to use the gentlest method that still cleans. Start with sweeping, then a neutral cleaner or oxygen bleach, and only step up to a pressure washer after checking joint integrity. If your joints are already crumbling or missing sand, blasting too early can wash out the base material. Wait until after joints are repaired if you see sand loss or voids.
When is the right time to reseal, and can I seal over polymeric joint sand right away?
For most patios, you should not seal on a calendar alone. Use the water-drop test, then apply sealer only when the surface is fully dry. Also, polymeric joint sand can look dry while still curing, so avoid sealing over fresh joints until the full cure window (often 24 to 48 hours, weather dependent) has passed.
What should I do if my patio pools water after heavy rain?
Yes, but treat it as a targeted problem. If water pools after rain, first confirm whether the issue is slope away from the house or a blocked drainage path. For pavers, you can lift and re-level a settled section, but if the grading is wrong across poured concrete, a DIY fix usually turns into rework. Consider installing a strip or channel drain at the low edge if water repeatedly remains longer than about 30 minutes.
Is it okay to patch cracks with whatever outdoor filler I have on hand?
Mixing repair products can cause failure because patches do not bond or match expansion movement. For example, using concrete filler on natural stone is likely to look wrong and break down quickly. Match the repair approach to the material, and for concrete spalling use a patch compound or resurfacing system designed for exterior, freeze-thaw exposure.
Why do weeds come back even after I pull them?
You can reduce weed returns by maintaining the joint system, not just removing plants. Keep polymeric joints intact, and after spot-weeding, refresh with fresh polymeric sand and mist to activate the binder. If you skip the sand refill, weeds often regrow because seeds keep access to water and anchoring channels.
What deicer can I use during winter if I live in a freeze-thaw climate?
Deicing choice depends on concrete condition and climate. If you must use something beyond traction sand, use a magnesium chloride product sparingly and avoid frequent, heavy application. The bigger rule is to stop using chloride-based deicers on concrete and stone, since they can dramatically accelerate freeze-thaw spalling.
Can I use vinegar or lemon-based cleaner on limestone or travertine patio tiles?
For calcareous stones like limestone and marble, yes, vinegar and other acids are a hard no because they etch and dull the surface. Even if the area looks cleaner right away, the etching is permanent and can’t be “sealed away.” Stick with neutral, stone-approved cleaners and rinse thoroughly.
What if moss returns every spring no matter how I clean it?
If moss is in a shaded zone under dense canopy, cleaning will only provide temporary relief. Improve light and airflow by trimming overhanging branches and removing leaf debris that keeps surfaces damp. If the area stays chronically wet, expect recurring moss until the moisture source changes, not just until the surface looks clean.
How can I tell whether sunken pavers are a joint issue or a base problem?
Signs you may have base failure include pavers that stay sunken after you reset them, wide movement across multiple units, or joints that continue to wash out. If sunken sections are widespread or you find unstable material under pavers, treat it as base repair rather than a surface-only maintenance task, and consider a professional assessment.
How do I avoid streaks, haze, or peeling when applying patio sealer?
Start by using the label-required mixing ratio and apply when temperatures and wind conditions are suitable for curing. Avoid sealing on damp surfaces, and do not apply when rain is likely before the product’s cure time. Also, keep vehicles off during the full no-traffic window, since tire movement can create cloudy patches or imprinting while the sealer is still curing.