The best Portland patio plan starts with accepting two realities: the ground here is often clay, and the sky is often gray. Build for those two facts first, and everything else falls into place. That means a properly compacted gravel base with good drainage, materials that shrug off moisture and shade, and a layout that accounts for where the sun actually hits your yard versus where it doesn't. Do those things right and you get a patio that stays level, stays clean, and stays usable for 20-plus years. Skip them and you get puddles, moss, and a slab that rocks underfoot by year three.
Portland Patio Guide: Plan, Build, and Maintain a Patio

Miles Sutton
4 Jul 2026
Start with your goals and constraints in Portland
Before you sketch anything out, get honest about what you're working with. Portland yards vary a lot: some are flat, some slope toward the house, some are perpetually shaded by mature Doug firs or a neighbor's fence. Your patio's success depends more on reading those site conditions accurately than on picking the right pavers.
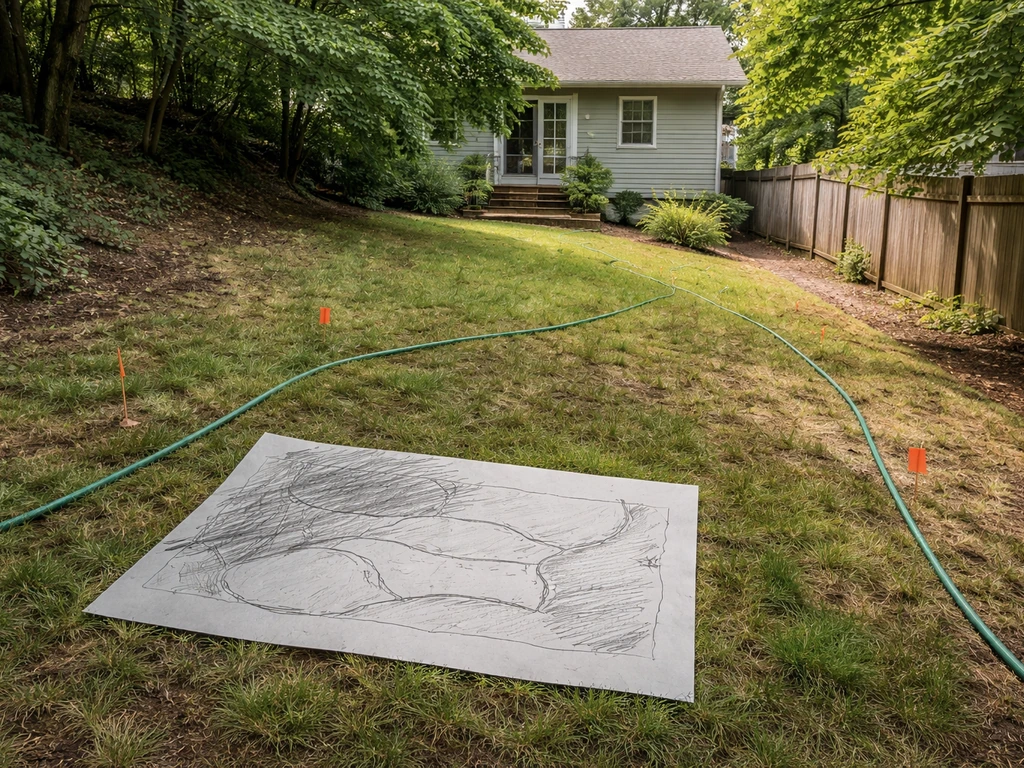
Start by answering these questions. How do you actually want to use the space? A dining area for six needs at least 12x14 feet. A lounging area with a couple of chairs can work in 10x10. Do you entertain, or is this mostly a quiet morning coffee spot? Will you add a fire pit, a grill, a hot tub? Each use has a footprint requirement, and layering them together without enough square footage makes a patio feel cramped and frustrating.
Then look at your constraints. Does water pool anywhere in your yard after rain? That tells you about drainage and subgrade issues you'll need to solve, not just design around. Is most of the yard shaded for the majority of the day? That affects both your material choice and your moss management plan. Does the yard slope? A slope of more than 2 percent toward the house is a drainage problem waiting to happen, and anything steeper than that will require some grading work before you lay a single paver.
- Note which parts of the yard get sun from 10am to 3pm — that's your usable outdoor living window most of the year
- Check where water flows during a heavy rain (grab a coffee and watch your yard during a storm)
- Identify any mature trees whose roots could interfere with excavation or base compaction
- Measure your yard accurately — sketch it on paper with real dimensions before doing anything else
- Look up your property's setback requirements at PortlandMaps.com before finalizing placement
Choosing the right patio layout and location
The most common mistake Portland homeowners make is defaulting to whatever spot is directly behind the back door without thinking it through. That spot might get zero sun, drain poorly, or be too close to the property line. It might also be perfect. The point is to check before you commit.
Door access matters a lot. Your patio should connect cleanly to your interior, ideally through a door that opens without creating a trip hazard. The finished patio surface should sit about an inch below your door threshold to prevent water from wicking inside. If you have sliding glass doors, think about traffic flow when the door is open, you don't want patio furniture blocking the path.
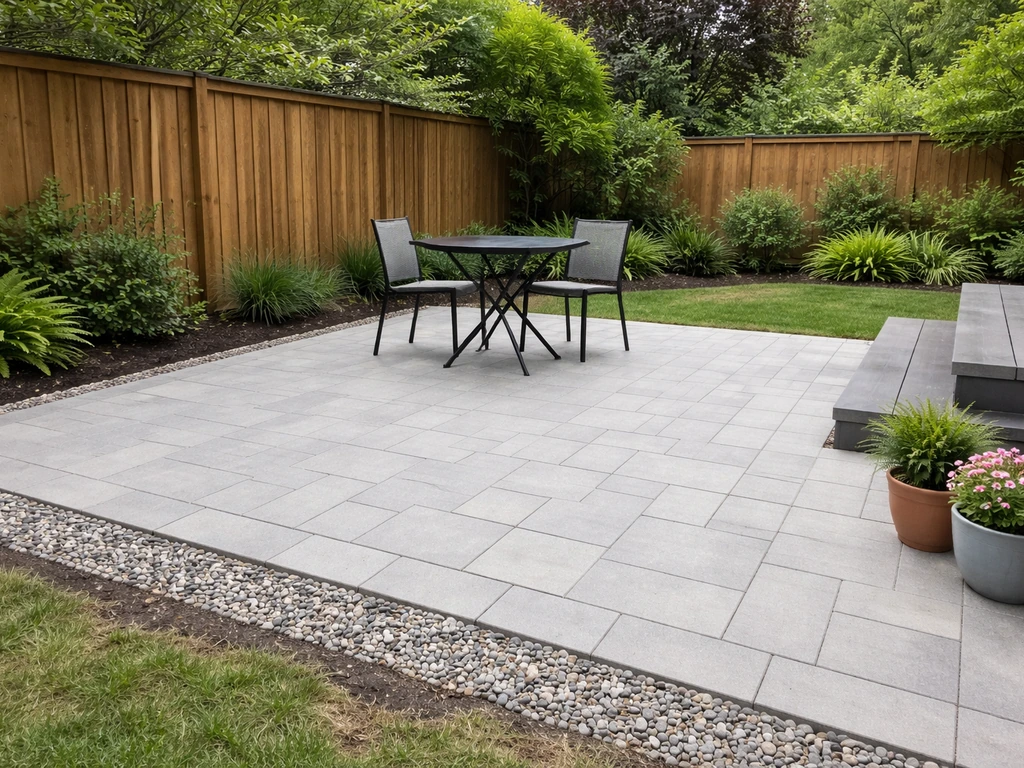
For layout, a rectangular patio is the easiest to build and usually the most space-efficient. An L-shape works well if you want to separate a dining zone from a lounge or grill area without building two separate patios. Circular and curved patios look great but require more cutting on materials like pavers or flagstone, which adds labor time and cost. If you are interested in shaping the layout, circular patios can be a standout option, and the right inspiration makes planning easier. If a curved design appeals to you, it's worth looking at circular patio examples to see what realistic projects look like before committing.
Think about privacy and sun exposure together. If your neighbor's second-story window looks directly down at your yard, a pergola or privacy screen becomes part of the design, not an afterthought. Orienting your seating toward the south or southwest captures the most usable afternoon light in Portland, which is valuable given how few truly sunny days you get between October and June.
On sizing: a common rule is to allow at least 36 inches of clearance around outdoor furniture for comfortable movement. A dining table for four needs roughly 10x12 feet just for the table and chairs with enough room to pull them out. Add a grill with clearance and you're looking at 14x16 as a minimum for a functional outdoor dining and cooking setup. Smaller yards can absolutely work with a well-designed small patio, the key is choosing furniture scaled to the space, not trying to shrink a full-sized layout into a tight area.
Materials that hold up in Portland weather
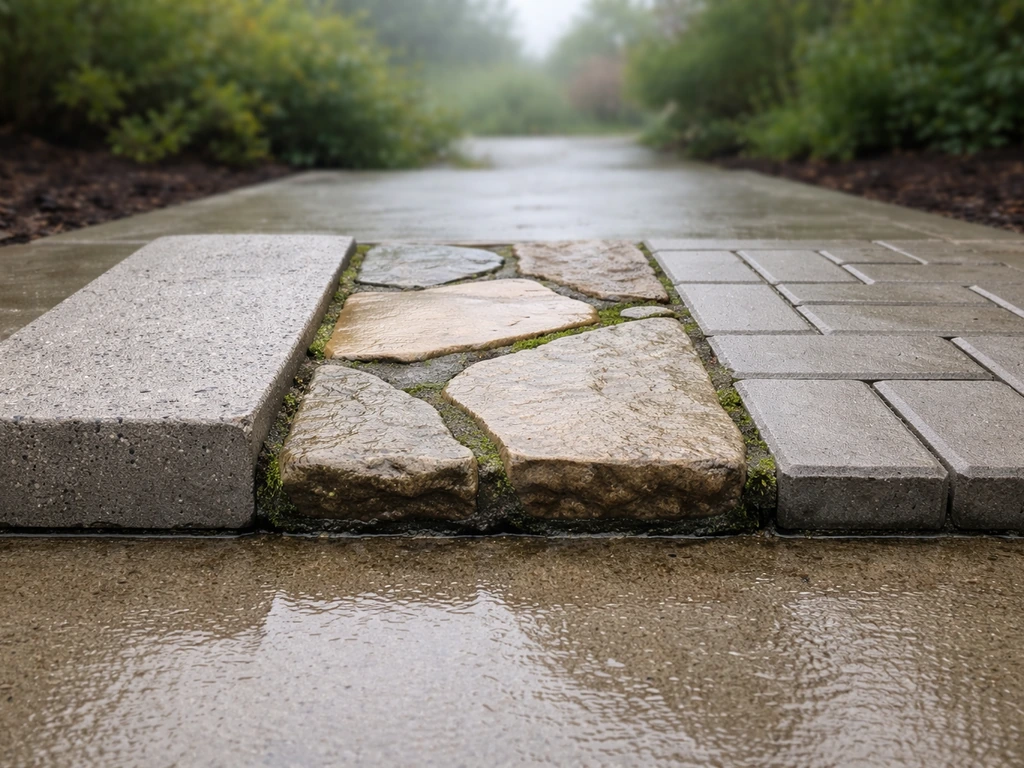
Portland gets roughly 36 to 40 inches of rain annually, and while hard freezes are not as extreme as colder climates, you do get enough freeze-thaw cycles each winter to damage porous or improperly installed materials. Add persistent shade and you have ideal conditions for moss and algae. A Portland roofing contractor also points to the city’s wet, shaded conditions as conducive to moss growth blank" rel="noopener noreferrer">ideal conditions for moss and algae. Seattle’s IPM fact sheet also notes that moss grows in shady, damp spots and that excess moisture and related conditions drive moss growth on surfaces blank" rel="noopener noreferrer">persistent shade and excess moisture are ideal conditions for moss. Your material choice is one of the most important decisions you'll make.
| Material | Durability in PNW | Moss/Algae Risk | DIY Friendliness | Approx. Installed Cost (per sq ft) |
|---|---|---|---|---|
| Concrete pavers | Excellent | Moderate — sealed pavers resist better | High | $15–$25 |
| Poured concrete | Good | Moderate — textured finishes trap more | Low (unless experienced) | $8–$18 |
| Natural flagstone | Good if sealed | Higher in shade | Moderate | $20–$35 |
| Porcelain tile pavers | Excellent | Low — dense, non-porous surface | Moderate | $25–$45 |
| Decomposed granite / gravel | Fair | Low | High | $5–$12 |
| Composite/wood decking | Good if maintained | Low-moderate | Moderate | $25–$50 |
Concrete pavers are the most practical all-around choice for Portland. They handle freeze-thaw well, individual pavers can be lifted and reset if settling occurs, and sealing them every two to three years dramatically cuts down on moss and algae colonization. Porcelain pavers are even more resistant to moisture and biological growth because their surface is essentially non-porous, but they cost more and require a very flat, stable base since they can crack if there's any flex underneath.
Natural flagstone looks beautiful in Pacific Northwest gardens and integrates well with native plantings, but the irregular surface and open joints are more moss-friendly. If you go this route, use polymeric sand in the joints, keep up with annual sealing, and expect to do more maintenance than with pavers. Poured concrete is affordable but harder to repair if settling happens, and textured or broom-finished surfaces can trap moisture and grow algae faster than smooth or sealed surfaces.
One material worth considering more seriously in Portland is gravel or decomposed granite for informal areas. It's permeable by nature, so drainage is never an issue, and it's easy and inexpensive to install yourself. It's not right for a primary entertaining area where you need a stable surface for furniture, but for a fire pit surround or a transition zone it works well and adds texture to a yard.
Site prep, base, drainage, and preventing puddling and settling
This is where Portland patios succeed or fail. The local soil is predominantly heavy clay, and clay does not drain well. When it gets saturated, it shifts. When it dries out, it contracts. If your base doesn't account for this, your patio will settle unevenly, pool water, and start to heave within a few years. Portland hardscapers consistently point to subsurface grading and drainage as the single most important factor in a patio's long-term performance, not the surface material.
Excavation and grading
For a standard paver patio, you'll excavate 8 to 10 inches deep: roughly 6 inches of compacted gravel base, 1 inch of bedding sand, and then the paver thickness (usually 2 to 3 inches). The subgrade itself needs to be graded away from the house at a slope of at least 1 to 2 percent, which works out to about 1/8 inch per foot. That slope is not optional. It's what moves water away from your foundation and prevents it from sitting on the patio surface. Even on flat-looking yards, you need to verify and establish that slope during excavation.
Base material and compaction
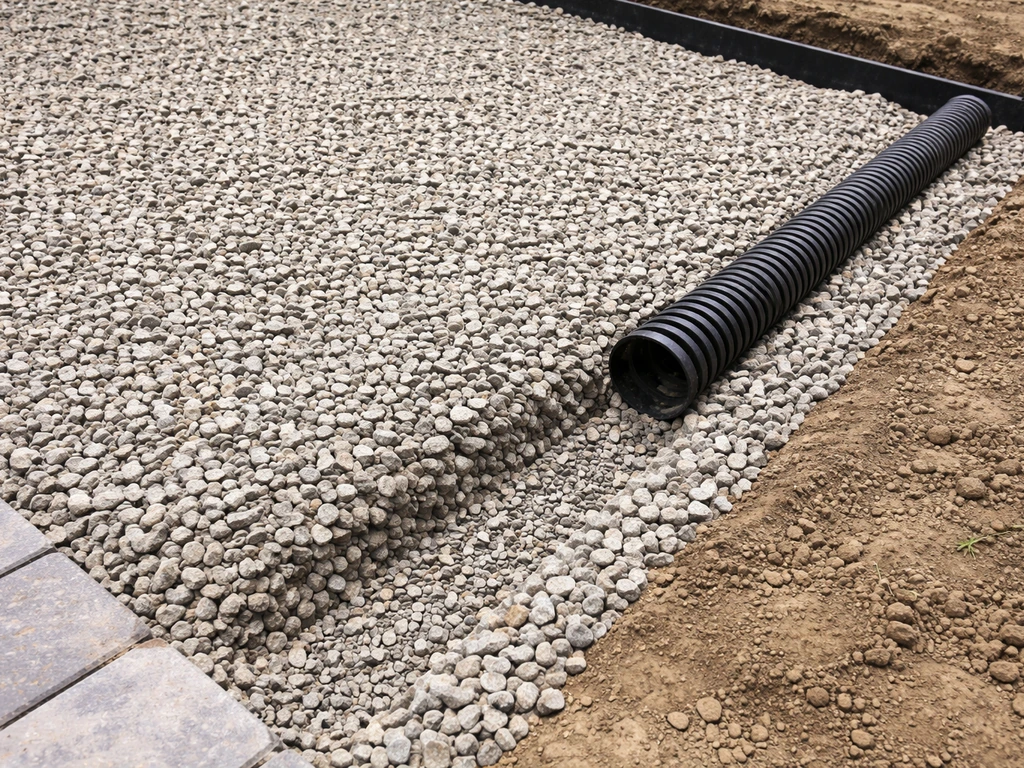
Use 3/4-inch crushed angular gravel, not rounded pea gravel. Angular gravel locks together when compacted; round gravel shifts. Add it in 2 to 3 inch lifts and compact each layer with a plate compactor before adding the next. Skipping compaction lifts is the most common DIY mistake, and it leads directly to the settled, rocking patio look you're trying to avoid. Rent a plate compactor, it takes about an hour to do this properly and saves years of headaches.
Drainage details
If your yard has significant water management challenges, a simple gravel base may not be enough. A French drain running along the edge or perimeter of the patio can carry excess water away to a dry well or daylight outlet at the property edge. The City of Portland's stormwater management guidelines encourage permeable paving systems precisely because they reduce runoff and manage water at the source. If you're paving a large area, consider using permeable pavers with open-jointed sand fill, which allows water to pass through rather than routing it all as surface runoff.
The feedback loop you're trying to break is this: poor drainage leads to saturated subgrade, which erodes and creates voids under slabs, which leads to settling and cracking, which lets in more water, which worsens the problem while also giving moss a foothold to widen cracks further. Getting the base and drainage right the first time breaks that cycle before it starts.
DIY vs hiring a pro: what to decide and how
This decision comes down to three things: the complexity of your site, the scale of the project, and your comfort with physical labor and tool use. There's no shame in either direction, but being honest with yourself here saves money and stress.
When DIY makes sense
A flat yard, good existing drainage, a patio under 200 square feet, and a straightforward rectangular layout are all green lights for a capable DIYer. Concrete pavers on a well-compacted gravel base are genuinely manageable with a weekend of labor, a rented plate compactor, a wet saw for cuts, and a helper. The material costs run $15 to $25 per square foot for decent pavers plus base materials, so a 12x14 patio might cost $2,500 to $4,000 in materials doing it yourself. If you want to budget accurately, use this patio price guide to estimate typical material and installation costs for your layout. The same patio installed by a contractor typically runs $4,500 to $8,000 or more depending on the crew and scope.
When a pro is worth it
Hire a professional if your yard slopes significantly toward the house, if you have known drainage problems, if the project is larger than 300 square feet, or if you're using materials like porcelain tile that require precise, level installation. A sloped yard that needs regrading before a patio can go in is not a beginner project. Getting it wrong means water runs toward your foundation, which is a much more expensive problem than the patio itself. A licensed contractor will also pull any required permits, which protects you when you sell the house.
When interviewing contractors, ask specifically about their base preparation process. Any contractor who talks primarily about the surface material and doesn't mention compaction lifts, subgrade slope, or drainage is a red flag. Ask for local references and go look at patios they installed three to five years ago, that's when settling and drainage problems become visible if they exist.
A quick decision guide
| Situation | Recommended Approach |
|---|---|
| Flat yard, under 200 sq ft, simple rectangle, good drainage | Strong DIY candidate |
| Flat yard, 200–400 sq ft, simple design | DIY if comfortable with tools, or hire for base work only |
| Sloped yard or known drainage issues | Hire a pro, at minimum for grading and base |
| Complex design (curves, multiple levels, steps) | Hire a pro |
| Porcelain or large-format tile surface | Hire a pro |
| Budget under $3,000 total | DIY or limit scope to smaller area |
Cost, permits, and project planning next steps
Permitting in Portland depends on the size and type of structure. An at-grade patio surface (pavers, concrete, flagstone) under 200 square feet generally does not require a building permit, but you should verify with the City of Portland Bureau of Development Services before starting, especially if you're adding a pergola, roof, or any electrical. Covered structures almost always require permits. Unpermitted covered structures can become a problem at resale or when you try to get homeowner's insurance to cover damage.
For project budgeting, here's a realistic framework. Material costs for a 12x16 paver patio run roughly $2,800 to $5,000 for mid-range concrete pavers plus base materials. Add $300 to $600 for tool rentals if you're doing it yourself. Professional installation of the same patio typically runs $5,000 to $10,000 depending on site conditions and contractor. If you need significant drainage work or grading, budget an additional $1,500 to $4,000 on top of the patio itself. These numbers reflect Portland-area labor and material costs as of mid-2026.
Before you get quotes or buy materials, do a measurement checklist. Measure the total area, note the slope direction and approximate gradient, identify where downspouts discharge relative to your patio location, and confirm setback distances from property lines and structures. Having all of this written down before you talk to a contractor or visit a supplier saves you at least one extra trip and gives you a much clearer basis for comparing quotes. Detailed patio cost examples can help you sanity-check any quote you receive. If you're looking for ideas to match your yard and budget, these patio design examples can help you narrow down the right layout and materials.
For timeline planning: a DIY patio weekend typically stretches to two full weekends once you account for material delivery, excavation, base compaction, and allowing the bedding sand to settle before laying the final surface. A contractor can often complete a straightforward patio in one to three days of on-site work, but scheduling lead times in Portland's busy spring and summer season can mean six to ten weeks from first contact to project start.
Maintenance and long-term care for Portland patios
A patio in Portland that gets no maintenance will grow moss within a year or two, especially in any shaded area. That's not a scare tactic, it's just the climate. Portland's rainfall, persistent cloud cover, and organic debris from trees create near-perfect moss and algae conditions. OSU Extension research confirms that moss thrives in shady, damp spots and that the only lasting solution is managing the environmental conditions driving growth, not just killing what's already there.
Sealing your surface

Seal concrete pavers, natural stone, and poured concrete surfaces every two to three years with a penetrating sealer appropriate for the material. Sealing reduces the porosity of the surface, which means less moisture absorption, which means fewer moss and algae starts. It also makes cleaning much easier. Apply sealer in dry weather when the forecast shows at least 48 hours without rain, which in Portland means scheduling this for July or August.
Moss and algae control
For existing moss, a dilute solution of iron sulfate or a commercial moss control product applied in early spring before growth peaks is effective. OSU notes that preventive measures for moss also work for algae, so you're solving both problems at once. Pressure washing removes the dead material but should be done carefully on mortared joints or flagstone, high pressure can erode joint sand or mortar. After cleaning, reapply polymeric sand to paver joints if it's been washed out, since open joints are a primary moss entry point.
Long-term moss control comes down to reducing moisture and shade where possible. Trim back overhanging branches to let more light hit the surface. Make sure gutters are clean and downspouts direct water away from the patio. These environmental changes do more lasting work than any single chemical treatment, which is exactly what OSU Extension's guidance recommends.
Weeds and joint maintenance
Weeds in paver joints are a maintenance reality. Polymeric sand (the kind that hardens when wet) dramatically reduces weed germination compared to regular jointing sand. Reapply it every three to five years or whenever joints start to look depleted. For spot weeds, boiling water or a propane weed torch is effective and avoids chemical use near garden beds. Avoid bleach-based products on pavers, they can discolor some materials and damage nearby plants.
Annual check-in routine
- Every spring, walk the patio and check for any pavers that rock or feel uneven — these can usually be pulled up, base material added, and reset the same afternoon
- Check joint sand levels and top up any depleted areas with polymeric sand before moss establishes
- Inspect the perimeter edge restraints to make sure they haven't shifted — loose edges let pavers migrate outward over time
- Clear any organic debris from the surface promptly, especially under trees — leaf and needle decomposition feeds moss
- Every two to three years, clean the surface thoroughly and reseal before fall rains begin (late August is ideal timing in Portland)
- Check that the surface still drains away from the house — over time, soil can build up along edges and reverse the slope slightly
A well-built patio in Portland with consistent basic maintenance will stay flat, clean, and moss-free for decades. The work per year is maybe two to four hours once everything is properly set up. Compare that to the alternative, a neglected patio that needs leveling, cleaning, and potentially full replacement in 8 to 10 years, and the maintenance math is obvious. Start with the right base, pick materials that fit the climate, and stay on top of the annual routine, and your patio will be one of the best investments you make in your property.
FAQ
Can I build a Portland patio directly over existing grass or old base material?
Yes, but only if you use a drainage-first approach and understand soil movement. On clay, a patio on top of existing ground without excavation and a compacted gravel base is much more likely to settle and heave during freeze-thaw. If you must minimize digging, limit it to small areas (like a repair zone) and still install a properly sloped base system underneath any pavers or stone.
How low should the patio surface sit relative to my door threshold and entry steps?
For pavers, aim for about 1 inch below the interior door threshold, maintain the same concept at other doors and steps, and keep the patio surface slightly lower than any finished interior floor to prevent wicking. Also confirm the path is smooth when the door is open, check for swing clearance, and avoid designs that put a step down immediately after exiting.
What bedding-sand mistakes cause pavers to rock or settle in a Portland climate?
It depends on the paving system, but most Portland patios are vulnerable when bedding sand is too thick, too loose, or not leveled correctly. If you place pavers on a thick cushion without compacted base, you can get rocking, uneven contact, and faster moss development at lippage points. A good rule is to target the specified bedding sand thickness and then level it carefully, using a screed and straightedge.
How do I know when it is time to reapply polymeric sand in patio joints?
Replace polymeric sand when it is washed out, depleted, or not hardening properly. A common trigger is after heavy rain, power washing, or any joint-sand erosion you can see at the edges. In Portland, many homeowners find they need to reapply every few years even on well-built patios, especially in shaded corners.
What should I do if a downspout discharges toward my patio?
Yes. If the patio is near a downspout, design the discharge so it lands beyond the patio edge and cannot saturate the subgrade. If you route downspouts toward the patio, even with good base work, you can end up with localized settlement and algae growth. The simplest fix is extending the downspout discharge, or using a drain connection that daylights away from the patio area.
If my patio needs slope for drainage, will it feel uneven underfoot?
You generally should not rely on a “perfectly flat” patio surface. The patio needs a slight slope away from the house, but the paver plane itself should still be level enough for comfort. Use the slope for drainage in the subgrade, then set bedding sand to achieve a consistent finished surface height.
Why is porcelain harder to install than concrete pavers in clay soil areas like Portland?
Porcelain can crack if the base is not stable, especially if there is any flex or unevenness. The safer approach is to confirm the subgrade is properly graded away from the house, fully compacted in lifts, and that bedding and leveling are done with tight tolerances. If you are not confident in achieving flatness, stick with concrete pavers for a first-time DIY build.
Can permeable pavers solve Portland drainage issues even when my yard has heavy clay?
Permeable systems can reduce runoff, but they still need correct underdrain planning and the right base layers for the intended use. If your soil holds water, permeable pavers may clog over time unless the system is built to handle filtration and water movement. Consider professional design if you have persistent pooling or high clay saturation.
Why does moss keep coming back in the same spot even after I sealed and cleaned?
Even with the right base, you can get staining and algae buildup if water runs across the patio during storms. To reduce this, keep the slope away from the house, clear debris from corners and joints, and consider redirecting roof runoff. If staining persists, treat it as an access and moisture problem first, then use moss control or cleaning as a follow-up.
How should my maintenance routine differ between pavers, flagstone, and broom-finished concrete?
Expect different maintenance schedules by material and surface finish. Smoother, non-porous surfaces usually need less moss management than textured or broom-finished concrete. Flagstone with open joints typically requires more joint-sand upkeep, and it often benefits from more frequent sealing to reduce biological growth.
What signs tell me my patio base or drainage is failing, not just needing cleaning?
For freeze-thaw resilience, the key is that the base and drainage prevent water from sitting underneath and that joints are filled properly. If water is pooling, the surface will likely show moss first, then settlement and heaving later. If you see rocking stones, uneven edges, or gaps opening up, address drainage and base stability before adding more sand or cleaning.