Yes, you can place a fire pit on top of a paver patio, and it's one of the most popular ways to add a fire feature to an existing outdoor space. But you can't just drop any fire pit anywhere on your pavers and call it done.
Fire Pit on Top of Patio: Safe Paver Installation Guide

Miles Sutton
22 Jun 2026
The surface needs to be structurally sound, you need a heat-protective layer between the pit and the pavers, clearances from structures and combustibles have to be respected, and the type of fire pit you choose changes almost every decision. Get those things right, and a paver patio is actually one of the best surfaces for a fire pit. Get them wrong, and you're looking at cracked or discolored pavers, a shifting unit, or a genuine fire hazard.
Is a fire pit on pavers actually safe? Quick eligibility check
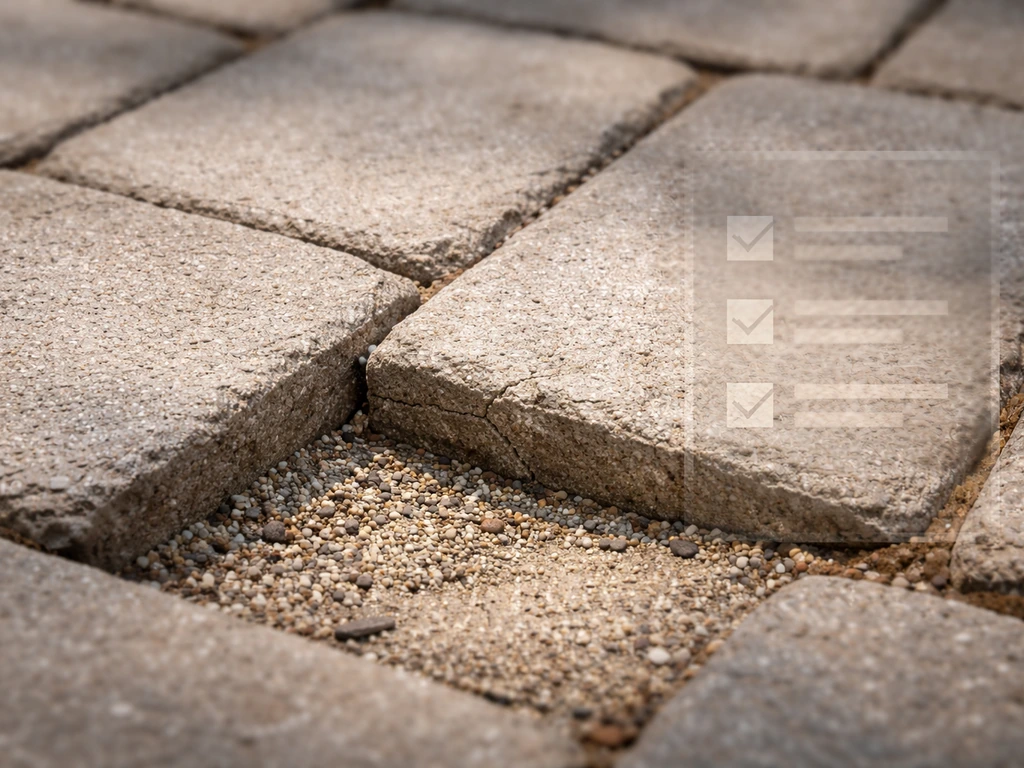
Before you buy anything, spend five minutes evaluating whether your existing patio is ready for a fire pit. A paver patio is a layered system, and the stability of that system matters. A typical residential paver installation sits on roughly 4 to 6 inches of compacted gravel base, then about 1 to 1.5 inches of bedding sand, then the pavers themselves. If any of those layers were under-compacted or improperly installed, you'll see the result: pavers that rock, joints that have opened up, areas that have settled unevenly. A fire pit adds a concentrated load on top of that system, so an already-soft or unlevel area will get worse.
Walk your patio and look for these red flags before placing a fire pit:
- Pavers that rock or wobble underfoot, which signals inadequate compaction or a thin sand bed
- Noticeable low spots, dips, or humps where the surface has settled unevenly
- Open or eroded joints where sand has washed out, leaving instability between pavers
- Cracks in existing pavers, especially radiating cracks that suggest base failure underneath
- Poor drainage, meaning water pools on the surface or drains toward a structure instead of away from it
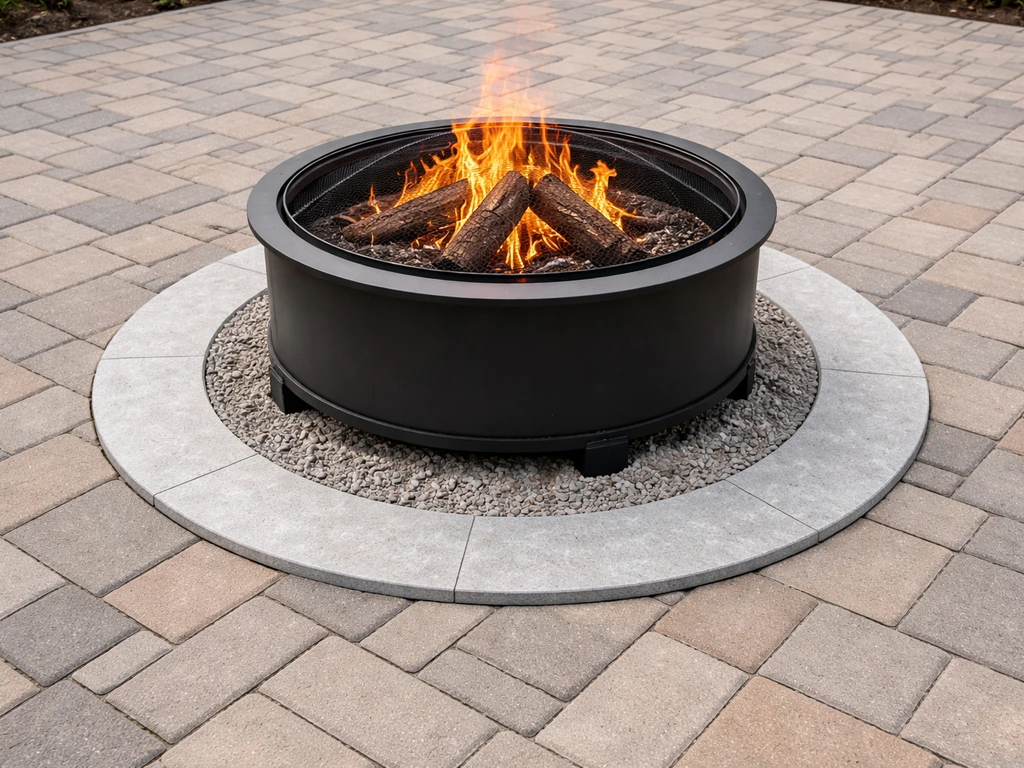
If your patio passes that visual check, the material itself also needs scrutiny. Standard concrete pavers handle fire pit placement well because they're dense, non-combustible, and dimensionally stable under moderate heat. Thin natural stone veneer pavers or highly polished slabs can be more vulnerable to thermal shock from repeated heating and cooling. If your pavers are thinner than about 2 inches or feel brittle or porous, plan to use a generous heat shield underneath the fire pit rather than letting the unit sit directly on the surface.
One more thing to check before you move forward: local codes. Some municipalities, including many cities with specific outdoor fire ordinances, require a minimum 10-foot setback between a fire pit and any structure. Permit requirements vary widely. A quick call to your local building or fire department takes five minutes and could save you from having to move the whole setup later.
Choosing the right fire pit type and size for a paver patio
The type of fire pit you choose is the biggest single decision you'll make, and it directly affects heat output, spark risk, cleanup, and how much surface protection you need. Here's how the main options compare on a paver patio:
| Fire Pit Type | Heat Output | Spark/Ember Risk | Patio Surface Risk | Best For Patios? |
|---|---|---|---|---|
| Wood-burning bowl | High (varies) | High — open sparks and embers | Highest — radiant and ember heat can crack/scorch pavers | Possible with proper protection, but most demanding |
| Propane/natural gas | Moderate to high (e.g., 22,000+ BTU tabletop models) | Very low — no flying embers | Moderate — radiant heat below the burner | Yes — best overall choice for a paver patio |
| Smokeless pellet | Moderate to high | Low — bottom-to-top airflow reduces ember scatter | Moderate — less radiant downward heat than wood bowls | Good option, especially near seating areas |
| Gel fuel | Low (roughly 3,000–9,000 BTU) | Very low | Low — minimal heat reaching the surface | Yes — great for smaller patios or tighter spaces |
For most paver patios, a propane or natural gas fire pit is the easiest and safest choice. There are no flying embers to land on your pavers or nearby furniture, heat output is consistent and controllable, and cleanup is minimal. If you prefer the experience of a real wood fire, a smokeless pellet fire pit is a strong middle ground since the internal airflow design significantly reduces the amount of embers that escape from the top.
Size matters for two reasons: footprint and heat output. A larger fire pit produces more radiant heat downward and outward, which means more protection needed below and more clearance needed around it. For a standard residential paver patio, a fire pit or fire table with a burner diameter of 12 to 20 inches is a practical range that balances visual presence with manageable heat output.
If you want a balanced view of your setup, you can also plan around a patio table top view to place and protect the fire feature properly fire table. Larger units (30 inches or more) are fine on a large, open patio but can feel overwhelming on a smaller one and may require more aggressive surface protection.
Whatever size you choose, confirm that you can meet the minimum clearances to combustibles that the manufacturer specifies, because those numbers are non-negotiable.
Location, clearance, and wind/spark planning on patio spaces
Placement is where most people make their first mistake, and it's usually by prioritizing aesthetics over safety clearances. The clearance distances you need to maintain are measured from the edge of the flame, not the edge of the fire pit shell. That distinction matters because burners often extend several inches inside a larger pit frame, but the flame plume itself determines where the heat actually goes.
Gas fire pits certified under ANSI Z21.97 are tested with specific clearance-to-combustible requirements that vary by model and BTU rating. Always pull out the manufacturer's manual for the exact numbers, but as a general working guideline, most residential gas fire pits require at least 36 inches of clearance on all sides from combustible materials (patio furniture with fabric cushions, wood pergola posts, vinyl siding, fences) and at least 80 inches of overhead clearance from the flame edge to any overhead structure. Wood-burning units often require even more. Your local jurisdiction may require a minimum 10-foot setback from any structure regardless of what the manual says, so always check both and follow whichever is stricter.
Wind planning is something people routinely skip until they've already had a problem. On a paver patio, you're often in a more sheltered environment than an open yard, but wind can still redirect flames toward seating or structures. Before finalizing your location:
- Spend a few evenings on the patio noting which direction prevailing wind comes from at the time of day you'll use the fire pit
- Position the fire pit so the downwind side faces open space rather than seating, structures, or overhangs
- Avoid placing the pit directly under a pergola or canopy even if the vertical clearance technically meets minimums, since heat and smoke accumulate in enclosed overhead spaces
- For wood-burning or pellet units, factor in which direction sparks will travel and keep combustible furniture clear of that zone
- Leave yourself room to walk completely around the fire pit without stepping within 3 feet of the flame edge
If your patio has a canopy or pergola overhead, check the clearances carefully. A patio canopy top structure is a combustible overhead element that affects where on the patio you can safely position any fire feature.
Surface protection and foundation options for paver patios
Even though pavers are non-combustible, they still need protection from the sustained radiant heat a fire pit produces. Using the right patio top coat can add an extra layer of protection against heat and staining. Without a buffer layer, you risk thermal discoloration (dark scorch marks that are permanent), thermal cycling cracks as the paver heats and cools repeatedly, and destabilized bedding sand in the zone directly under the pit.
Here are your main protection options, from minimal to most robust:
- Fire pit mat: A fire-resistant mat rated for high heat, with some products certified to NFPA 701 and UL94 V-0 standards and rated to withstand temperatures up to 2,000°F. These are the easiest solution and work well under gas or gel fuel fire pits with moderate heat output. Look for a mat large enough to extend at least 12 inches beyond the base of the fire pit on all sides.
- Paver or stone pad: A layer of natural stone, concrete pavers, or fire brick set directly under the fire pit. This creates a sacrificial surface that takes the heat instead of your finished patio. This is a good DIY option and looks intentional as a design element.
- UL-listed floor protector: For higher-BTU gas units or wood-burning pits, look for a UL-listed floor protector. These products are specifically tested and certified for use under heat-producing appliances and give you the most reliable protection spec.
- Non-combustible base platform: For a built-in or semi-permanent fire pit, constructing a small platform of concrete block, fire brick, or poured concrete directly on top of the paver surface distributes the load and provides complete thermal separation. This is the right move for any high-output or wood-burning unit intended to stay in one spot permanently.
One product category worth knowing about is multi-layer heat barrier mats designed originally for composite decks. These use volcanic rock fiber layers to block conducted and radiant heat. They work on paver patios too, not just decks, and are a good middle-ground option if you want something more capable than a basic mat but don't want to build a full stone platform.
For gas fire pits specifically, the LP tank or connection point is a separate consideration. The tank itself should rest on a firm, level, non-combustible surface, and propane storage follows clearance rules under NFPA 58 that your local jurisdiction may supplement with additional requirements. Keep the tank out of the immediate heat zone of the burner and in a well-ventilated area.
Step-by-step installation and setup on a paver patio

Once you've confirmed your patio is sound, chosen your fire pit type, identified your location, and selected a protection layer, setup is relatively straightforward. Here's how to do it right:
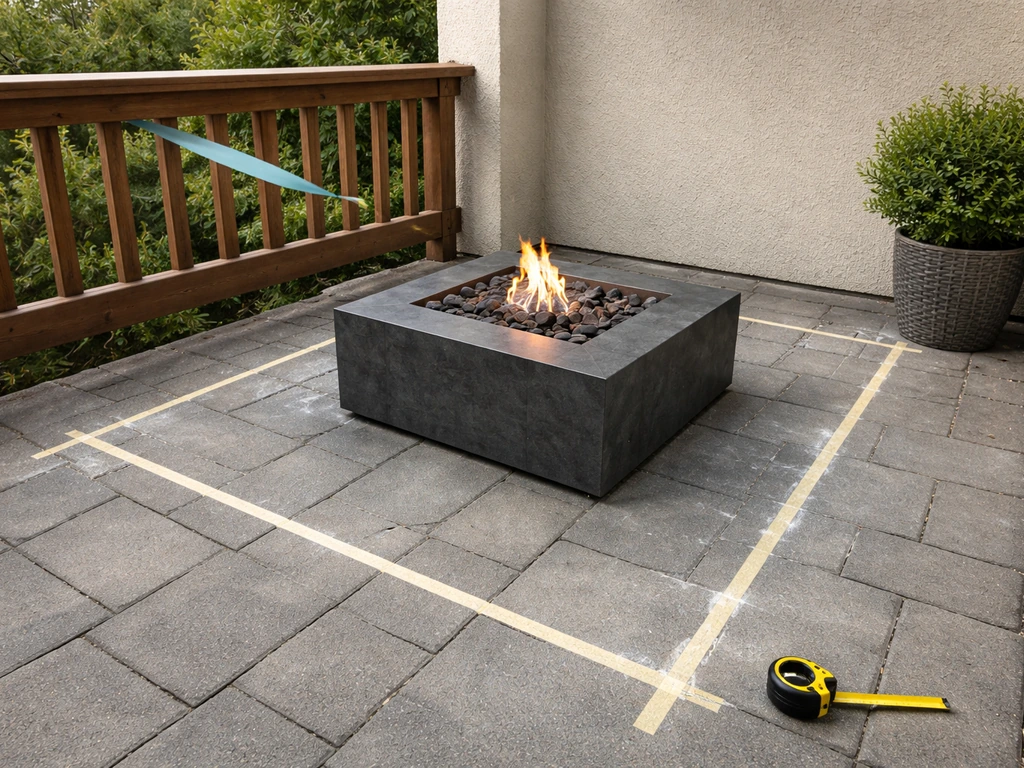
- Mark your position: Use chalk or painter's tape to outline the fire pit footprint plus the required clearance radius on the patio surface. Step back and verify it clears all structures, furniture, and overhead elements before you commit.
- Inspect and repair the base zone: In the specific area where the fire pit will sit, press down on each paver and check for movement. If any rock, pull them up, add or re-compact bedding sand (aiming for a consistent 1 to 1.5 inch bed), and reset them level. This is the time to fix problems, not after the fire pit is in place.
- Lay your protection layer: Place your fire pit mat, stone pad, or pre-built platform centered on your marked location. Make sure it's flat, level, and stable before anything goes on top. For a stone pad, use a level tool and adjust the pavers beneath if needed.
- Position the fire pit: Set the fire pit on the protection layer. For a standalone bowl or fire table, this is simply placement. For a gas unit, leave the gas connection accessible and confirm the unit sits level using a bubble level placed across the rim.
- Connect gas if applicable: For propane, connect the hose and regulator to the LP tank following the manufacturer's instructions, then do a leak check using soapy water on all fittings before the first use. For natural gas, this step requires a licensed gas technician, full stop.
- Perform a clearance verification: With the unit in its final position, physically measure clearances from the flame edge (estimated, since the unit isn't lit yet) to the nearest combustibles. If anything is too close, move the unit now.
- First test fire: Run the fire pit at low output for a short session to verify everything works correctly, check that the surface underneath doesn't get excessively hot, and confirm smoke direction relative to seating.
If you're installing a built paver block fire pit on top of your existing patio (as opposed to a freestanding unit), the process involves laying a non-combustible base layer directly on the patio, then stacking fire pit block courses on top. Manufacturers like FireGear and Techo-Bloc publish kit-specific instructions that walk through block orientation, ventilation openings, and burner pan placement. Follow those instructions for your specific kit and don't improvise the structural details.
Operating safely and avoiding heat damage to pavers
How you use the fire pit matters just as much as how you set it up. Even with good surface protection in place, operational habits determine whether your pavers stay looking great or slowly accumulate damage.
- Never remove the protective mat or pad to 'just use it once without it.' Heat damage to pavers is cumulative and permanent.
- Keep wood fires appropriately sized. An overfilled wood-burning bowl produces more radiant heat in all directions, including downward, than the protection layer may be rated for.
- Don't use accelerants (lighter fluid, gasoline) to start wood or charcoal fires. They produce sudden high-heat flares that can shock the paver surface.
- Keep a fire extinguisher or a bucket of sand within reach, not stored somewhere inconvenient inside.
- Never leave a fire unattended, even briefly. Wind can shift sparks toward combustibles faster than you'd expect.
- Allow the fire pit to cool completely before covering it or moving it. Covering a hot unit traps heat against both the unit and the paver surface.
- For gas units, shut off the gas at the source (the tank valve or shutoff) rather than relying only on the burner controls, especially when the unit won't be used for an extended period.
Heat discoloration in pavers is the most common cosmetic damage. It shows up as dark gray or brownish staining in the zone directly under or near the fire pit. Once a paver is thermally stained, it generally can't be restored to its original color through cleaning alone. The best fix is prevention, meaning the protective layer stays in place every single time. If you do get heat staining, a concrete cleaner or mild acid wash can lighten it somewhat, but manage expectations.
Cracked pavers directly under or near the fire pit usually mean one of two things: the protection layer wasn't adequate for the heat output, or the base beneath those pavers was already marginal and thermal cycling accelerated the failure. In an r/DIY thread about putting a fire pit on existing pavers, the builder described drainage or water infiltration and long-term cracking or scorching concerns when using that setup without polymeric sand in the area base was already marginal and thermal cycling accelerated the failure. Either way, the crack is telling you something that needs to be addressed, not just cosmetically patched.
Maintenance, cleaning, and what to monitor over time
A fire pit on a paver patio is a long-term installation that rewards a little routine attention. Because it sits directly on the grass, a patio on top of grass needs extra attention to drainage and stability before you add a fire feature. Here's what to monitor and how often:
| Task | Frequency | What to Look For |
|---|---|---|
| Check pavers under and around fire pit for shifting or rocking | Monthly / after heavy rain | Any movement, new gaps in joints, or uneven settlement |
| Inspect joint sand in the fire pit zone | Seasonally | Eroded or missing sand, especially if drainage in that zone is poor |
| Clean fire pit mat or stone pad | After every few uses | Ash buildup, debris, or signs of heat degradation on the mat material |
| Ash removal (wood/pellet units) | After every use | Remove ash when cool and dispose in a metal container — never in trash bags |
| Gas connection inspection | Start of each season | Check hose for cracking, fittings for corrosion, and perform a soapy water leak test |
| Inspect burner pan and media (gas units) | Seasonally | Clean debris, check for corrosion, reposition fire glass or lava rock as needed |
| Check paver surface for heat discoloration or cracks | Seasonally | Early detection lets you improve protection before damage worsens |
| Inspect fire pit structure (for block-built units) | Annually | Check for mortar cracks, shifted blocks, or deteriorated fire brick in the fire box |
Ash handling deserves a specific note. Wood and pellet fire pits produce ash that retains heat far longer than it appears to. Always wait at least 24 hours after the last fire before removing ash, use a metal scoop, and transfer it to a metal container with a lid kept away from combustibles. Ash dumped into a plastic bag or compost bin while still holding internal heat has started plenty of accidental fires.
For gas fire pits specifically, the start of each season is the right time to check the venturi tubes for spider or insect nests, which can block airflow and cause dangerous gas buildup. A quick inspection with a flashlight before the first light of the year is a habit worth building.
Troubleshooting common problems
Even when you've done everything right, a few issues come up regularly with fire pits on paver patios. Here's how to address the most common ones:
- Fire pit wobbles or leans: The pavers beneath have shifted. Remove the fire pit, pull up the affected pavers, re-level the bedding sand, reset the pavers, and confirm level before replacing the pit.
- Water pooling under or around the fire pit after rain: Poor drainage in that zone, often because the fire pit and its mat are interrupting the patio's drainage pattern. Reposition the fire pit slightly so water can flow around it, or improve the overall patio slope in that area.
- Pavers cracking after heat exposure: Either the protection layer is inadequate for the BTU output of the unit, or the base beneath those pavers was already compromised. Upgrade to a more robust protection option (UL-listed floor protector or stone platform) and replace cracked pavers after addressing the base.
- Polymeric sand in joints turning dark or eroding in the fire pit zone: Sustained heat and thermal cycling break down polymeric sand binders. For the joint area directly under a high-output fire pit, non-polymeric joint sand may be more durable, or better surface protection can reduce the heat reaching the joints.
- Gas burner producing uneven flame: Usually a sign of debris in the burner ports or a partially blocked venturi. Clean the burner following the manufacturer's instructions before each season.
- Smoke blowing toward seating consistently: Reposition the fire pit so the downwind side faces away from where you sit, or shift your seating arrangement relative to prevailing wind direction.
When to call a professional instead of DIYing it
Most freestanding gas or propane fire pit setups on an existing paver patio are well within DIY reach, especially if the patio is already in good condition. But a few situations genuinely call for professional help. If your patio has significant base issues (large settled areas, widespread cracking, poor drainage), a hardscape contractor should assess and repair the base before you add any fire feature.
If you're running a natural gas line to the patio for a fixed fire table or built-in fire pit, that work requires a licensed gas technician. If you're building a permanent masonry fire pit on top of the patio (block, stone, or poured concrete) and the combined weight will be substantial, it's worth having a contractor evaluate whether the existing base can handle it or whether the sub-base needs reinforcement before you build.
The honest bottom line: a well-prepared paver patio with the right fire pit type, a quality protective layer, and respected clearances is a genuinely safe and excellent setup. If you're planning roof top patios in Calgary, make sure your fire pit location also follows local clearance and wind-spark guidance right fire pit type. The projects that run into trouble are almost always ones where someone skipped the base inspection, went without any surface protection, or ignored the clearance specs in the manual. Take 30 minutes to evaluate your patio condition today using the checklist above, pick a fire pit that matches your patio's size and your patience for maintenance, and you'll have a fire feature that works well for years.
FAQ
Can I put a fire pit on sealed pavers, or does the sealant matter for heat staining and cracking?
Sealed pavers can help reduce dirt and minor staining, but they do not eliminate thermal discoloration under a fire pit. Heat can still darken the paver surface and accelerate bedding-sand movement, especially if the protective layer is thin or missing. If your patio is freshly sealed, avoid using the fire pit until the sealer fully cures per the product directions, then start with the lowest heat setting to confirm discoloration patterns.
What if my patio has a slope or low spots, will a fire pit still be safe on top of pavers?
A moderate slope is not automatically a dealbreaker, but a fire pit needs a stable, level support area so the burner and protective layer do not shift as the sand beds redistribute. If you see rocking pavers, open joints, or a localized dip, fix the base and bedding first. For many gas units, even small tilt can affect flame behavior and increase soot deposition on the nearby pavers.
How thick should the heat barrier be, and is one layer of mat enough?
It depends on the fire pit type and output, but most single mats sold for decks are designed as a protection layer, not a full heat-stop system. If you have a high-output burner, choose a system with enough air gap and insulation coverage to match the mat manufacturer’s rating, not just the pad thickness. A common mistake is placing a mat but letting the fire pit’s edge overhang uncovered pavers, which concentrates radiant heat outside the protected footprint.
Do I need to protect only the area under the fire pit, or also the surrounding pavers?
You should protect at least the area within the manufacturer’s required “footprint” of heat influence, not only the direct center. Radiant heat and hot convection can discolor pavers near the perimeter, especially with larger burners or wind. A practical approach is to extend your protective layer beyond the expected flame edge zone, then verify clearance distances are still met for furniture and combustibles.
Can I use a wood-burning fire pit on pavers if I keep embers under control?
Wood-burning units generally increase risk because of embers, higher heat cycling, and longer periods where materials remain hot. Even if embers are contained, pavers can still discolor and bedding sand can degrade from sustained radiant heat. If you choose wood, use a more robust barrier system, plan for greater clearance, and expect more frequent inspection of paver stability and joint filling.
How far should the gas tank or propane connections be from the burner on a paver patio?
The burner area is not the only hot zone to consider. Keep the LP tank and any hoses out of the immediate radiant heat area and ensure the tank rests on a level, non-combustible surface. Also confirm the venting and hose routing do not dip toward the hot zone. Local rules may add clearance requirements beyond what the fire pit manual states.
Is it safe to place a fire pit directly on pavers if I have a heat pad, but no leveling sand adjustments?
Often it is not ideal. Heat concentrates on the support area and can cause bedding sand to shift, leading to rocking or uneven flame. If your pavers are not uniformly supported already, a heat pad will not correct that structural issue. Before installing, check for voids under pavers and ensure the surface is firm and stable, especially where the fire pit will sit.
What should I check in the first week after installation to catch problems early?
After a few initial burn cycles, inspect for new rocking, joint opening, and changes in the bedding sand around the edges of the protective layer. Look for dark scorch zones expanding beyond your protected footprint, and verify the unit has not loosened or shifted. If you see widening cracks or escalating discoloration, stop using it until the base or barrier system is upgraded.
If my pavers crack, can I just replace the cracked stones and continue using the fire pit?
Replacing surface pavers alone usually is not enough. Cracking under a fire pit often indicates either inadequate heat protection or an already marginal base that the additional concentrated load worsened. You should identify and correct the root cause by upgrading the heat barrier, improving base compaction, and addressing drainage, then only continue once the area is stable and level.
How often should I inspect a gas fire pit for spiders or airflow issues on a paver patio?
A seasonal check at minimum is recommended, especially before the first ignition of the year. If your patio is near tall grasses, eaves, or vents, do a quick visual check more frequently, and listen for unusual ignition delays or changes in flame shape. If you notice persistent sooting or a weak flame, inspect the venturi tubes promptly rather than continuing to use the unit.
What is the correct way to handle ash or leftover pellets if the fire pit is on pavers?
Ash can stay hot for a long time, so don’t rely on appearance. Wait at least 24 hours after the last burn before emptying ash, use a metal scoop, and place it in a lidded metal container kept away from combustibles. Avoid storing ash in plastic bins or letting it contact paver edges near joints, because residual heat can re-ignite smoldering materials.
When do I need professional help even if the patio looks fine?
Get an assessment if you have widespread settling, poor drainage, extensive cracking across the patio field, or you plan a heavy built-in fire pit that adds substantial mass. Also involve a licensed gas technician if you are running natural gas to the patio. Even for DIY-friendly freestanding units, professional evaluation is worth it if the paver area under the future pit cannot be made firm, level, and well-supported.