
Patio on a Pallet kits from Nantucket Pavers are a legitimate, cost-effective way to get a good-looking concrete paver patio without ordering materials from a stone yard. For straightforward rectangular layouts on stable, well-drained soil, a motivated DIYer can pull off a solid 100 sq ft patio over a long weekend for roughly $900–$1,200 in materials and tool rentals. That said, the kits are not foolproof: shipping damage is a recurring complaint, installation is more involved than marketing implies, and the lifetime warranty has real exclusions that matter. Here is an honest, detail-forward look at everything you need to decide whether this product is right for your project.
patio on a pallet reviews: honest kit evaluation & guide

Miles Sutton
7 Aug 2026
Quick summary and who this review is for
This review is aimed at homeowners, renters with usable outdoor spaces, and DIYers actively planning a patio who have come across Patio on a Pallet kits at The Home Depot and want to know if they are worth buying. It is also useful for property owners comparing this approach against pedestal patio systems or a fully contracted install. I have gone through the manufacturer's installation manual, warranty document, retailer listings, and a large sample of customer reviews so you do not have to piece that together yourself.
If you are researching broader patio system options beyond this product, the comparison section later in this article touches on pedestal patio systems and other modular approaches, which are worth looking into depending on your surface type and install context. For a broader comparison of pedestal systems, modular tiles, and other options, see our patio systems reviews.
What comes in the box (or on the pallet)
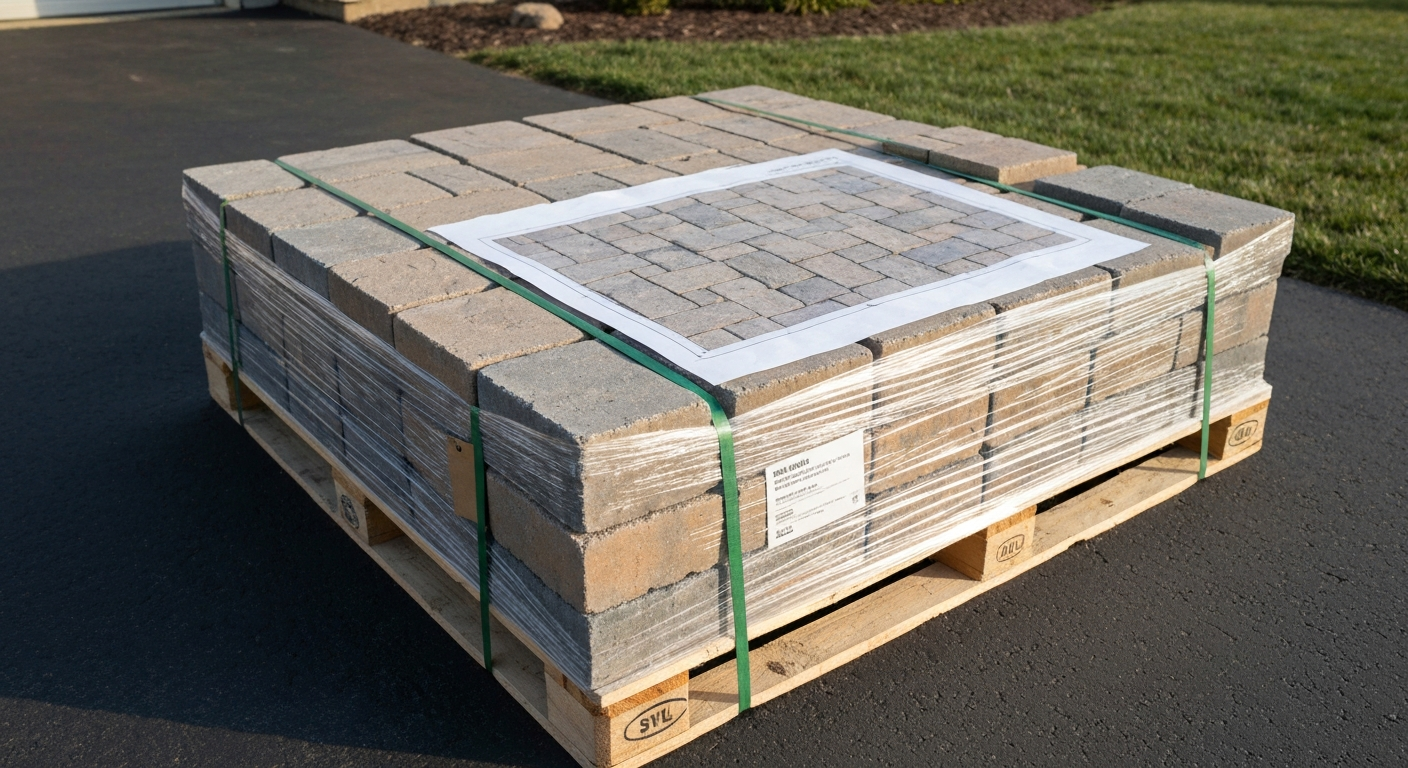
Each kit ships pre-selected and pre-counted to cover a specific square footage, all loaded on one pallet. The 10x10 (100 sq ft) basket-weave kit, for example, includes 24 pieces at 12x24 inches and 13 pieces at 24x24 inches, totaling 37 pavers. The 12x12 (144 sq ft) kit scales up proportionally, and Nantucket Pavers offers smaller starter sizes as well. What makes this convenient is that the pattern layout diagram comes printed with the pallet, so you are not guessing about which piece goes where.
Finish and color options vary by SKU and availability at your local Home Depot. Common finishes include textured surfaces designed to mimic natural flagstone or travertine. The kits are sold purely as paver material, so edge restraints, bedding sand, base gravel, polymeric sand for joints, and any sealer are all sold separately. Budget for those additions upfront.
| Kit Size | Coverage | Approx. Pallet Weight | Typical Home Depot Price (2026) |
|---|---|---|---|
| Small variant | ~60–80 sq ft | ~900–1,100 lb | Varies by SKU |
| 10x10 standard | 100 sq ft | ~1,600–1,750 lb | ~$878 |
| 12x12 standard | 144 sq ft | ~1,750+ lb | Higher, varies by SKU |
| Larger variants | 200+ sq ft | Multiple pallets | Per pallet pricing |
Materials and build quality
The pavers are cast concrete, not natural stone. Nominal thickness is 1.57 inches across most Patio on a Pallet SKUs. Nantucket Pavers states the products are tested to meet or exceed ASTM C-1194 and ASTM C-1195 standards, which relate to compressive strength and absorption for architectural cast concrete products. No independent third-party lab reports for specific Patio on a Pallet SKUs appear to be publicly available, so you are relying on the manufacturer's claim, which is standard for this retail category.
In terms of aesthetics, the texture and color variation do a decent job of approximating natural stone from a normal viewing distance. Customers frequently mention this as a positive, especially compared to plain concrete pavers. The negative side of the build quality picture is dimensional consistency: multiple reviewers report that piece thickness and color tone can vary noticeably between pallets, which matters if you are mixing two pallets for a larger project. For a single-pallet install, this is much less of an issue.
Edge durability is worth flagging. A recurring theme in customer reviews is corner and edge chipping, both during freight delivery and during installation if pieces are handled carelessly. The pavers are not fragile, but they are cast concrete at 1.57 inches thick, not quarried granite. Setting them with a rubber mallet and using care when moving individual pieces will reduce breakage substantially.
Performance: durability, weather resistance, drainage and load capacity
For pedestrian residential use, which is the only application the manufacturer warrants, these pavers perform well over time when properly installed. The concrete formulation handles freeze-thaw cycles reasonably well, though the warranty explicitly excludes damage from de-icing salts, so if you live somewhere that gets heavy winter ice, plan to use sand or a calcium-magnesium acetate product instead.
Drainage is handled by the installation base, not the pavers themselves. The manufacturer is explicit: a free-draining, open-graded crushed stone base is required. Stone dust, quarry dust, or rubber paver base panels are all prohibited under the warranty. Standing water under the pavers leads to settlement, freeze-thaw heave, and a voided warranty. Get the base right and drainage is not a problem. Skip the base work and you will likely have sunken, tilted pavers within a couple of seasons.
Load capacity is not formally stated in units of PSI on the product page, but the product is rated for pedestrian and non-vehicular residential use only. Do not use these as a driveway apron or park any vehicle on them. For patio furniture, grills, planters, and normal foot traffic, they are more than adequate.
Efflorescence (a white salt bloom on the surface) is listed in the warranty as a normal characteristic of concrete products. It is cleanable and fades over time, but it is not a defect the manufacturer will replace material for. A concrete sealer applied after installation can reduce its appearance significantly.
Installation overview: how hard is it and how long does it take
Let me be direct: installing these pavers is more involved than many people expect. The pavers themselves are easy to lay once the base is ready, but building a proper base is real physical work. A well-prepared DIYer working alone on a 100 sq ft rectangular patio should plan for 2–4 days total: 1–2 days for excavation, gravel delivery, base compaction, and screeding; and 1–2 days for paver laying, cutting borders, and finishing joints. Having a helper cuts that time meaningfully.
Step-by-step walkthrough
- Plan your layout and mark the perimeter with stakes and string lines. Confirm your slope: you need at least a 1-inch drop per 5 feet of run, directed away from any structure.
- Excavate to the required depth. For most residential patios on stable soil, that means removing 6–8 inches of material (4–6 inches for compacted gravel base plus 1 inch of bedding sand plus 1.57 inches of paver thickness, with some margin).
- On clay or expansive soils, go deeper on the gravel base (up to 8 inches) and consider a geotextile fabric layer at the bottom of the excavation to separate soil from aggregate.
- Deliver and spread 3/4-inch processed gravel or crusher run in 2–3 inch lifts, compacting each lift with a plate compactor (rental: roughly $60–$100/day). Total compacted gravel depth: 4–6 inches minimum.
- Install edge restraints along all sides before adding bedding sand. Plastic paver edge restraints with spikes work well and are inexpensive.
- Spread and screed 1 inch of coarse bedding sand (not stone dust). Use screed rails and a screed board to get a flat, even surface at the correct elevation.
- Lay pavers following the pattern diagram that came with the pallet. Work from one corner outward. Do not walk on screeded sand before placing pavers.
- Set each paver with firm hand pressure plus a rubber mallet tap. Check level frequently with a long straightedge or level. Adjust individual pieces by adding or removing sand beneath them.
- Cut border pieces as needed using a wet diamond blade saw or rented paver splitter. The "no cutting required" claim on some kit descriptions applies only if your layout fits perfectly, which is rare in real-world installs.
- Sweep polymeric joint sand into all joints, compact the surface lightly by walking over it with a flat board, then sweep again and activate polymeric sand with a light mist of water per product instructions.
- Optionally apply a concrete paver sealer once the surface is dry and joints are fully cured (typically 24–48 hours after polymeric sand activation).
Tools, site prep and pre-installation checklist
Having the right tools before you start saves a lot of frustration. The plate compactor is the one rental you cannot skip. Manufacturer installation advice about compaction/setting: do not plate‑compact paver faces to seat them (plate compactor is for base compaction and final joint‑locking; manufacturer installation notes advise careful setting and to use a rubber mallet when needed) Manufacturer installation notes advise not to plate‑compact paver faces and recommend using a plate compactor for base compaction and final joint‑locking, and a rubber mallet for seating individual pavers.. Everything else on this list is either common or cheap.
- Plate compactor (rental, required for base compaction and final joint locking)
- Diamond blade wet saw or paver splitter (rental or borrow for cuts)
- Screed rails and screed board (2x4 lumber works fine for screed board)
- Rubber mallet
- 4-foot or longer level and a long straightedge
- String lines and stakes for layout
- Tape measure
- Broom and/or push brush for joint sand
- Garden hose with misting nozzle for activating polymeric sand
- Safety glasses and work gloves
- Wheelbarrow for moving gravel and sand
On the site prep side, check these things before you order your pallet: confirm your delivery area can accommodate a 1,600–1,750 lb pallet via forklift or pallet jack (curbside delivery is standard; the pallet will not be carried to your backyard). Make sure you have a clear path to the project site, and plan to move individual pavers by hand or with a hand truck. Also call 811 (or your country's equivalent utility locate service) before you dig, especially for excavations deeper than 6 inches.
Common installation problems and how to fix them
Most Patio on a Pallet failures trace back to one of a small number of root causes. Knowing them in advance means you can avoid them rather than fix them later.
| Problem | Root Cause | Fix or Prevention |
|---|---|---|
| Pavers settling or sinking unevenly | Under-compacted gravel base or insufficient base depth on clay soils | Compact base in lifts; use 6+ inches on clay; do not skip the plate compactor |
| Joint sand washing away | Regular sand used instead of polymeric sand, or sand not properly activated | Use polymeric joint sand; mist per product instructions; re-apply if washed out in first season |
| Pavers shifting or spreading outward | No edge restraints installed, or restraints placed after base without being properly spiked | Always install edge restraints before adding bedding sand; spike every 12 inches |
| Surface settling near a building | Slope not established or water draining toward the structure | Re-establish 1" per 5' slope during base work; cannot easily fix post-install without resetting |
| Chipped or cracked pavers during install | Heavy tools dropped on surface, plate compactor run directly over pavers | Move pieces by hand gently; never run a plate compactor directly on paver faces |
| Shading mismatch across sections | Two or more pallets from different production runs | Order all material at once from the same batch; blend pieces from both pallets during install |
| Efflorescence (white haze on surface) | Normal concrete off-gassing, accelerated by moisture | Clean with concrete efflorescence cleaner; apply sealer to reduce recurrence; not a defect |
Maintenance and seasonal care
Once installed correctly, these pavers need relatively little ongoing attention. Here is what actually matters by season.
Spring
Walk the patio after the first freeze-thaw cycle of the year and check for any heaved or settled pieces. A small section that has moved can usually be reset by carefully lifting the affected pavers, adjusting the sand level beneath, and resetting. Check joint sand and top up with polymeric sand where winter frost or rain has eroded it.
Summer
Regular sweeping and occasional rinsing with a garden hose keeps the surface looking clean. For tougher stains (grease from grills, tannin from leaves), a concrete paver cleaner works well. Avoid pressure washing at high intensity directly into joints as it can displace polymeric sand.
Fall
Clear leaves promptly to prevent tannin staining and organic buildup in joints. If you have not yet applied a sealer and want to protect color heading into winter, fall (after a dry stretch) is a good time to do it.
Winter
Do not use rock salt or sodium chloride de-icers on these pavers. The manufacturer's warranty explicitly excludes damage from de-icing salts, and this is a real risk that will cause surface spalling over time. Use sand for traction, or a calcium magnesium acetate (CMA) product if you need a chemical de-icer.
Replacement pieces
Individual paver replacement is possible but has a practical catch: you need to find a matching piece from the same SKU. The Home Depot carries individual pavers in some sizes, but color matching across production runs is imperfect, and the kit-specific mixed sizes may not all be stocked individually. If you anticipate needing replacements, buy one or two extra pieces when you purchase the original kit and store them. Several reviewers wished they had done this.
Warranty, after-sales support and replacement parts
Nantucket Pavers offers a lifetime warranty to the original homeowner for residential, non-vehicular use, covering defects in material and workmanship for as long as the original purchaser owns the property. That is a genuinely strong warranty on paper. The practical limitations are important to understand though.
- Remedy is replacement material only. Freight and labor to remove and reinstall are not covered.
- Warranty is void if stone dust, quarry dust, or rubber paver base panels are used instead of the specified crushed stone and sand base.
- Damage from de-icing salts is excluded.
- Efflorescence is explicitly excluded as a normal concrete characteristic.
- Damage from standing water (resulting from improper installation) is excluded.
- The warranty does not transfer to a future owner if you sell the home.
For claims and support, Nantucket Pavers is the manufacturer contact. The Home Depot handles returns for recent purchases but returning a full damaged pallet is logistically cumbersome, and several customers in reviews noted frustration with the return process for large, heavy pallet orders. If your pallet arrives with damaged pieces, document it immediately at delivery, photograph everything, and contact both the retailer and manufacturer before accepting the shipment as complete.
How the cost actually stacks up
At roughly $878 for a 100 sq ft kit, the material cost works out to about $8.78 per square foot for pavers alone. Add gravel base (roughly $0.50–$1.50/sq ft), bedding sand, edge restraints, polymeric sand, and tool rentals, and realistic total material plus rental costs for a DIY install land in the $1,100–$1,500 range for a 100 sq ft patio. That translates to $11–$15 per square foot all-in for a DIY project, which is competitive.
A professionally installed paver patio in the U.S. in 2026 typically runs $12–$25 per square foot for common residential work, with complex grading, drainage, or premium materials pushing costs toward $30 or higher. So the DIY savings are real, roughly $300–$1,200 on a 100 sq ft project depending on your contractor market, but so is the labor investment of 2–4 days of physical work.
Patio on a Pallet vs other patio system options
This product sits in a specific niche: ground-level, sand-set, concrete paver patios for standard residential use. It is worth comparing against two other common approaches before you commit.
| Feature | Patio on a Pallet (Nantucket Pavers) | Pedestal Patio System | Loose-lay Modular Tile (e.g., deck tiles) |
|---|---|---|---|
| Base requirement | Excavation + compacted gravel + bedding sand | Existing flat hard surface (deck, concrete slab, rooftop) | Relatively flat surface; some can go on gravel or grass |
| Installation difficulty | Moderate to high (base work intensive) | Low to moderate (no base excavation needed) | Low (snap-together or gravity-set) |
| Paver thickness | 1.57 inches cast concrete | Varies; pedestal adjusts height to accommodate slope | Typically 1–1.25 inches composite or wood |
| Load capacity | Pedestrian residential use | Depends on pedestal rating; higher-end for rooftop applications | Pedestrian use; lower load tolerance generally |
| Drainage approach | Free-draining base; slope away from structures | Open drainage between pedestals to underlying surface | Gaps between tiles; surface drainage |
| Reversibility | Semi-permanent; pavers can be lifted but base remains | Fully reversible with no damage to deck or slab | Fully reversible; no base work involved |
| Approximate material cost | ~$8–$9/sq ft (kit only) | Higher upfront per sq ft including pedestals | Lower to mid-range; varies by material |
| Best for | Ground-level residential patios on native soil | Decks, rooftops, existing concrete slabs | Renters, small balconies, very simple ground-level use |
If your patio sits on an existing deck or concrete slab, or if you are on a rooftop or balcony, a pedestal patio system is almost certainly a better fit than Patio on a Pallet because you skip the base excavation entirely and the installation is reversible. For more on when those make sense, see pedestal patio system reviews. If you are a renter or want something truly temporary, loose-lay modular tiles make more sense. Patio on a Pallet wins on aesthetics and permanence for standard ground-level installs where you are comfortable doing (or hiring out) proper base work.
When to DIY and when to hire a pro
This is the question most people are really asking. Here is my honest take based on what the research shows and what consistently goes wrong.
DIY makes sense when:
- Your patio is under 200 sq ft and roughly rectangular
- You have stable, well-drained soil (not heavy clay or expansive soils)
- The site has reasonable access for a pallet delivery and material handling
- You are comfortable renting and operating a plate compactor
- The patio is not adjacent to a foundation where drainage errors could cause structural damage
- Your layout does not require complex cuts or unusual shapes
Hire a pro when:
- You have heavy clay, expansive soils, or poor natural drainage near the installation area
- The patio is immediately adjacent to a foundation or below-grade structure
- You need grading, retaining walls, or a drainage swale integrated into the project
- Your local municipality requires a permit (which typically requires a licensed contractor)
- The project is large enough that the labor cost savings of DIY are outweighed by the risk of a poor base that requires redoing
- You want the install to comply with ICPI standards for warranty and resale purposes
One middle path worth considering: hire a contractor for excavation and base work only (the hardest and most consequential part), then do the paver laying yourself. See Paver cost & DIY vs contractor guidance plus ICPI/installation risk data (cost aggregator & industry installation guidance) for national installed paver cost ranges and ICPI guidance on when to hire a certified installer. This splits the labor cost while keeping the most technically demanding work in professional hands.
What real customers are saying
Aggregated Home Depot reviews across Patio on a Pallet SKUs reveal consistent patterns on both sides of the ledger. The positives are genuine: the natural flagstone look lands well, the layout diagram takes the guesswork out of the pattern, and the price-to-appearance ratio is competitive. For people who follow the installation instructions, the finished result draws consistent compliments.
The negatives are also consistent enough to take seriously. Shipping damage is the most common complaint. The pallet weighs up to 1,750 pounds and gets handled by freight carriers who are not always gentle. Arriving pieces with chipped corners or cracked faces are a recurring issue. The manufacturer's warranty covers defective material, but getting replacement pieces for a damaged-in-transit situation can be slow and logistically annoying. A minority of customers also report color variation between pallets, which matters most on projects requiring more than one pallet.
One pattern I found particularly useful: the reviews that complain about durability or movement almost always, on closer reading, describe a base that was under-compacted or skipped altogether. The product holds up well when installed correctly. The reviews that highlight poor results from poor installation are a reminder that this is not a product you can throw on unprepared ground.
How this review was put together
The evaluation here is based on the official Nantucket Pavers installation guide and warranty document (both available via The Home Depot product page), the product specification sheets, aggregated customer reviews across multiple Patio on a Pallet SKUs at The Home Depot, DIY forum threads and Reddit discussions from verified users, and published 2026 paver installation cost data from market aggregators. ASTM performance claims are reported as stated by the manufacturer since no independent third-party lab reports for specific Patio on a Pallet SKUs were found in publicly available sources. Pricing reflects Home Depot listing data from mid-2026 and is subject to change by SKU and region.
Where to buy and what to check before ordering
Patio on a Pallet kits are primarily sold through The Home Depot, both in-store and online. Availability varies by region and by specific SKU, and some patterns and colors sell out seasonally. Before placing an order, check a few things:
- Confirm the SKU ships to your zip code and check whether a forklift delivery truck can reach your property
- Read the product specifications tab for exact paver count, individual piece dimensions, and pallet weight for your specific kit
- Check in-store availability if you want to see the actual finish and color in person before committing
- If your project requires more than one pallet, buy both at the same time and request matching lot numbers if the retailer can provide that
- Price in edge restraints, base gravel (typically sold by the ton at home improvement stores or local stone yards), coarse bedding sand, and polymeric joint sand separately
- Factor in tool rentals: plate compactor ($60–$100/day) and wet saw or paver splitter if needed ($50–$80/day)
Final take: is it worth it?
Yes, with clear-eyed expectations. Patio on a Pallet is a well-priced, genuinely attractive concrete paver kit that works reliably for ground-level residential patios when the base is done correctly. The lifetime warranty is a real differentiator in this product category, even with its exclusions. The main risks are shipping damage (inspect your delivery carefully) and installation shortcuts (do not skip the compacted gravel base). If you are comparing this against pedestal patio systems or other modular options and need help thinking through what suits your specific surface or setup, reviewing those alternatives side by side with your site conditions in mind is time well spent before you finalize your choice. For hands-on comparisons of alternative modular systems and user installation notes, see patio playhouse reviews. For a broader comparison of patio systems, see patio essentials reviews for side-by-side evaluations and buying guidance. For help visualizing layouts and experimenting with patterns before you buy, see patio design software reviews.
For a weekend DIYer with a flat, stable backyard and a rectangular space to fill, this is one of the more practical material kits on the market at its price point. For anyone dealing with drainage challenges, clay soils, or a complex layout, plan your base work carefully or bring in a pro for that part of the job. The pavers themselves are the easy part.
FAQ
What exactly comes in a 'Patio‑on‑a‑Pallet' kit and how much area does one pallet cover?
Typical kits ship a pre‑selected mix of concrete paver pieces arranged to form a repeatable pattern. Common pallet sizes cover ~100 sq ft (10'×10') or 144 sq ft (12'×12') with a printed layout on the pallet. Pieces vary by kit/pattern (multiple sizes per pallet) and nominal thickness is about 1.5–1.57 in. Pallet gross weight is ~1,500–1,750 lb.
What are the material and build‑quality expectations for these kits?
Kits use cast concrete pavers made to meet the manufacturer's stated ASTM designations for architectural concrete. In practice they offer good aesthetic value and are intended for pedestrian/non‑vehicular residential patios. Quality is generally acceptable for typical patio use, but customer reports show occasional shipment damage, shade/size variance between pallets, and edge chipping during cutting/handling.
How do 'Patio‑on‑a‑Pallet' pavers perform for durability, drainage, load capacity and weather resistance?
When installed per manufacturer/industry guidance they perform well for residential pedestrian use: adequate compressive strength for typical furniture and foot traffic, reasonable freeze/thaw resistance if drainage is correct. Proper drainage (open graded base) is critical — poor drainage or standing water leads to settlement/failure. They are not rated for vehicular loads or structural rooftop/podium use.
What does a correct installation require (base, slope, edge restraints)?
Manufacturer and ICPI guidance: excavate to remove organic/topsoil, install 4–6 in of open‑graded crushed aggregate (more in poor/expansive soils), compact base, screed ~1 in bedding sand, set pavers to a slope away from structures (minimum ~1" drop per 5'), use edge restraints, compact joints with plate compactor using a protective pad, and fill joints with polymeric or regular joint sand. Do not use stone dust/quarry dust as the base.
How difficult is DIY installation and how long will it take?
Difficulty is moderate. A competent DIYer with access to a plate compactor and cutting tools can complete a small, simple 100 sq ft patio in a weekend for the laying phase, but base excavation, compaction, and curing can add 1–3 additional days depending on soil and site access. Cutting/edging and fine joint work add time. Single‑person installs are possible but physically demanding.
What tools and site prep will I need to DIY one of these kits?
Essential tools: plate compactor (rental), screed rails and board, 3/4" processed gravel or crusher run, bedding sand, rubber mallet, level, masonry saw or wet diamond blade for cuts (or paver splitter), edging restraint materials, measuring tools, broom and joint sand (polymeric recommended). Plan for delivery placement/unloading due to pallet weight.