If your patio cover drains poorly, leaks at the house connection, or sits at a frustratingly flat angle, a patio roof riser is the fix you're looking for. These are engineered steel brackets that physically lift the attachment point of your patio roof above the house's main roof surface, creating more pitch for drainage without tearing apart your existing structure. The two most-reviewed systems you'll run into are Patio Roof Riser (PRR) and SkyLift Hardware, and both are legitimate structural products with real engineering behind them. What separates a good buy from a frustrating one comes down to matching the riser's mounting style, height range, and load rating to your specific setup.
Patio Roof Riser Reviews: How to Choose and Install

Miles Sutton
6 Jun 2026
What a patio roof riser actually is and what it does
A patio roof riser is not a shim or a spacer. It's a structural bracket assembly designed to elevate the inner edge of a patio cover or pergola roof above the point where it meets the house. That elevation creates slope, and slope means water drains away from the wall instead of pooling at the flashing line. Without enough pitch, water collects right where the patio roof meets the house roof, which is exactly where you don't want standing water. It can back up under shingles, saturate flashing, and eventually work its way into the wall.
Patio Roof Riser's system, for example, mounts directly on top of existing roofing material and uses two steel-alloy pins plus a grade 8 bolt to lock the adjusted pitch in place. SkyLift Hardware works similarly: their brackets mount to the top plate of a wall and extend above the house roof surface, with the riser itself standing 12 inches tall and flashed with standard vent pipe flashing. Both are engineered systems, not off-the-shelf hardware store parts, and both are meant to be integrated into a proper structural assembly rather than just wedged in as a patch.
When you actually need a riser
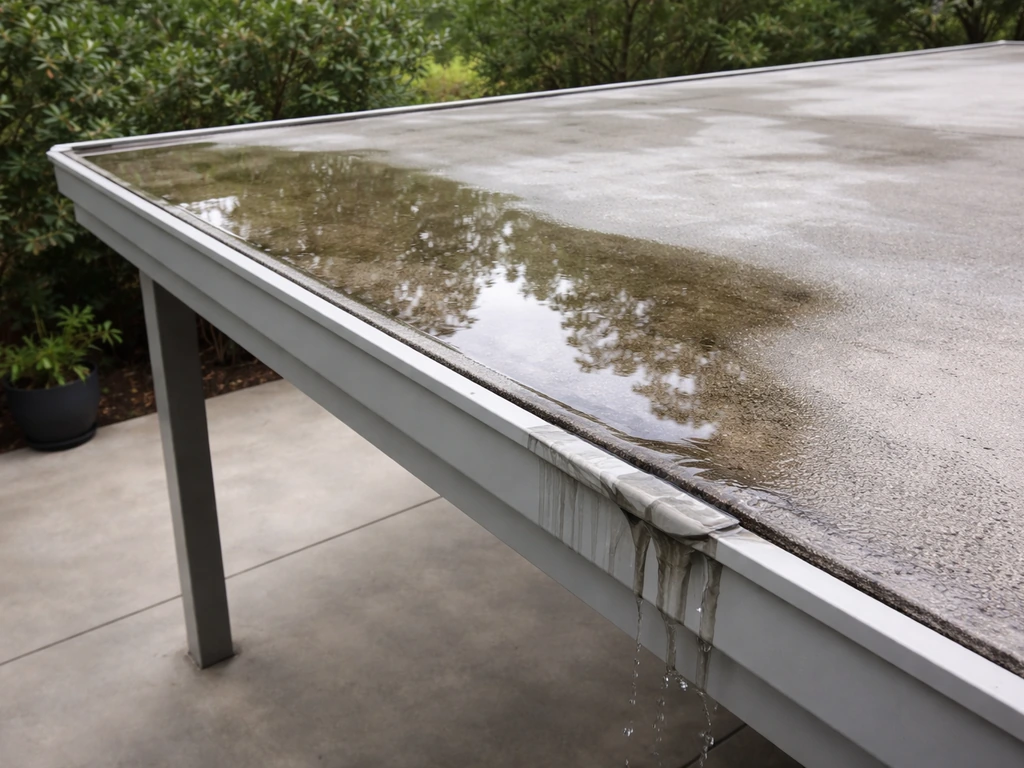
The most common reason people start searching for riser reviews is water. If your patio cover is nearly flat or barely sloped, rainwater lingers instead of running off. That slow drainage causes splash-back along the wall, speeds up material degradation, and leads to the classic complaint: my patio cover leaks right where it meets the house. The root cause is usually that the original installation didn't account for adequate pitch, or the pitch was fine until the main house roof was redone and the attachment point shifted.
Re-roofing is actually one of the most common triggers for needing a riser. When a new layer of shingles goes on, the surface height changes, and a patio roof that was previously level or pitched correctly can suddenly sit wrong. That realignment problem is exactly what risers are engineered to solve. Other scenarios include matching roof heights between two patio sections that don't line up, correcting posts that were cut too short, and simply wanting more headroom under the cover without rebuilding the posts.
- Patio cover pitch is too flat for proper drainage (standing water, slow runoff)
- Water pools between the patio cover flashing and the house roof, working under shingles
- House was re-roofed and the patio attachment point is now misaligned
- Two sections of patio roof don't match in height and need to be leveled
- Posts were cut short and the roof sits too low, reducing headroom
- You want more slope without tearing out the entire structure
Riser materials and styles: what's actually out there
Most structural patio roof risers on the market today are steel, and that's the right call for anything load-bearing. Generic adjustable bracket-style risers (think the kind sold on Amazon or Walmart in the pergola/patio hardware category) are often heavy-duty carbon steel with a black powder-coat finish and adjustable angle ranges of 0 to 180 degrees. These work fine for light pergola trellis applications but shouldn't be confused with engineered structural systems.
Beam mount risers (LO-PRO style)
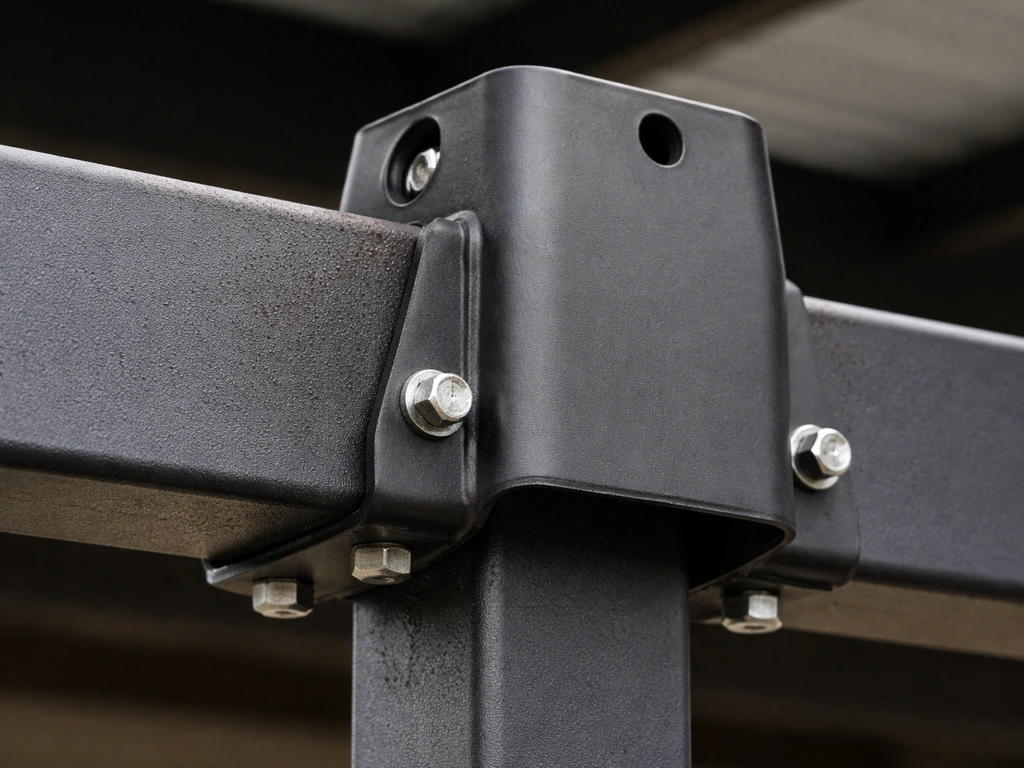
Patio Roof Riser's LO-PRO model mounts to the beam rather than a post. It uses a bucket-style attachment, and if your beam is narrower than the bucket, the spec allows you to shim the back to make up the difference. That's a practical real-world accommodation because beams aren't always exactly nominal size. This style is lower-profile and works well when you have a ledger board or beam already in place and just need to adjust the pitch at that connection point.
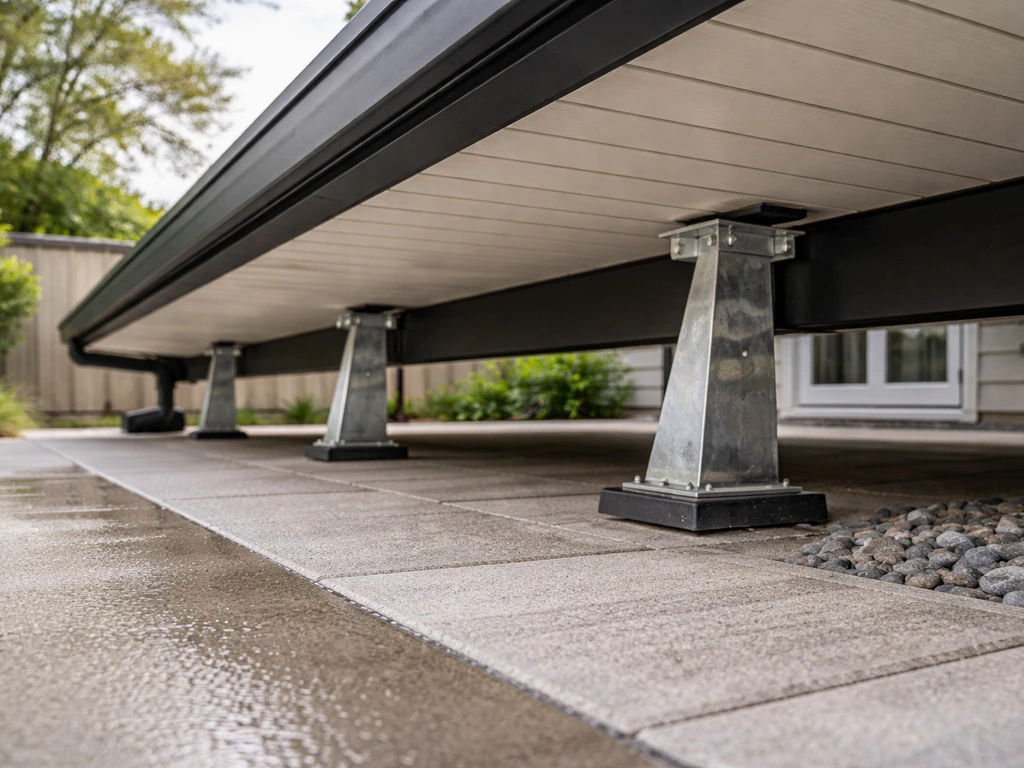
Post mount risers
Post mount kits, also offered by Patio Roof Riser, give you more height flexibility because the total height isn't limited by the hardware itself. Patio Roof Riser’s Patio Roof Riser with Post Mount Kit is offered as a post-mount riser option, providing height flexibility for different elevations Post mount kits, also offered by Patio Roof Riser. It depends on the length of the 4x4 post you use. That makes post mounts better when you need significant elevation, want to maximize headroom, or need a lot of pitch for aggressive water runoff. The trade-off is that they require proper post footings and structural consideration since the post is now a load-bearing element.
Height kits and discrete sizes
SkyLift sells heavy-duty riser height kits in discrete lengths: 18/24 inches and 30/36 inches. That means you're working within defined increments, not infinite adjustability. This is important to understand before you buy. If your needed elevation falls between kit sizes, you'll need to confirm whether you can combine components or use a different approach. Always measure your required height difference before ordering.
Wood risers
Some DIYers use dimensional lumber blocking to raise a patio roof attachment point. This can work structurally when done correctly with proper fasteners and flashing, but it's not engineered or code-approved in the same way as steel riser hardware. Wood is also more vulnerable to rot at the roof penetration point, which is exactly where moisture concentrates. For a long-term fix, steel wins.
Flashing and trim
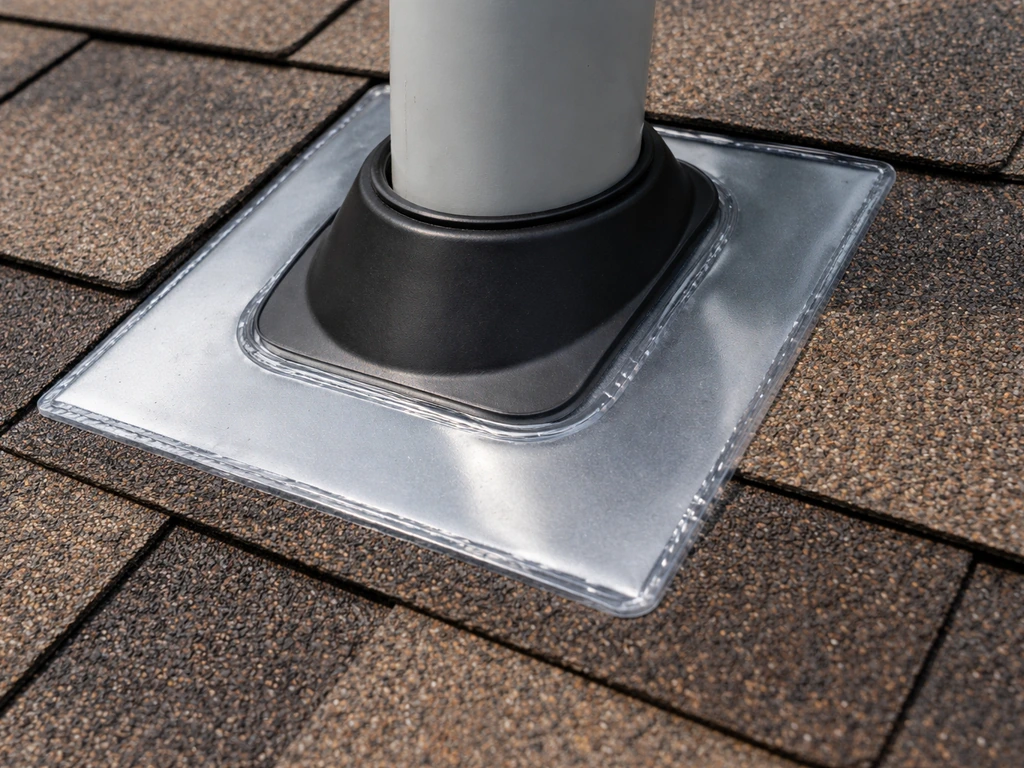
Flashing isn't technically the riser itself, but it's inseparable from the system. SkyLift offers a silicone flashing accessory alongside the standard vent/pipe flashing option. Standard vent pipe flashing fits around the riser post where it penetrates the roof surface. Getting the flashing right is where a lot of DIY riser installs fall short. Water will always find a poorly flashed penetration, which is why both major manufacturers make flashing a core part of their system documentation.
How to choose the right riser for your setup
Before you buy anything, you need four measurements: how much height you need to gain, what mounting surface you're working with, what the structural load will be, and how much clearance you have to work with at the roofline. Getting any of these wrong is the single biggest cause of the fit complaints you'll see in real product reviews.
Height and pitch calculation
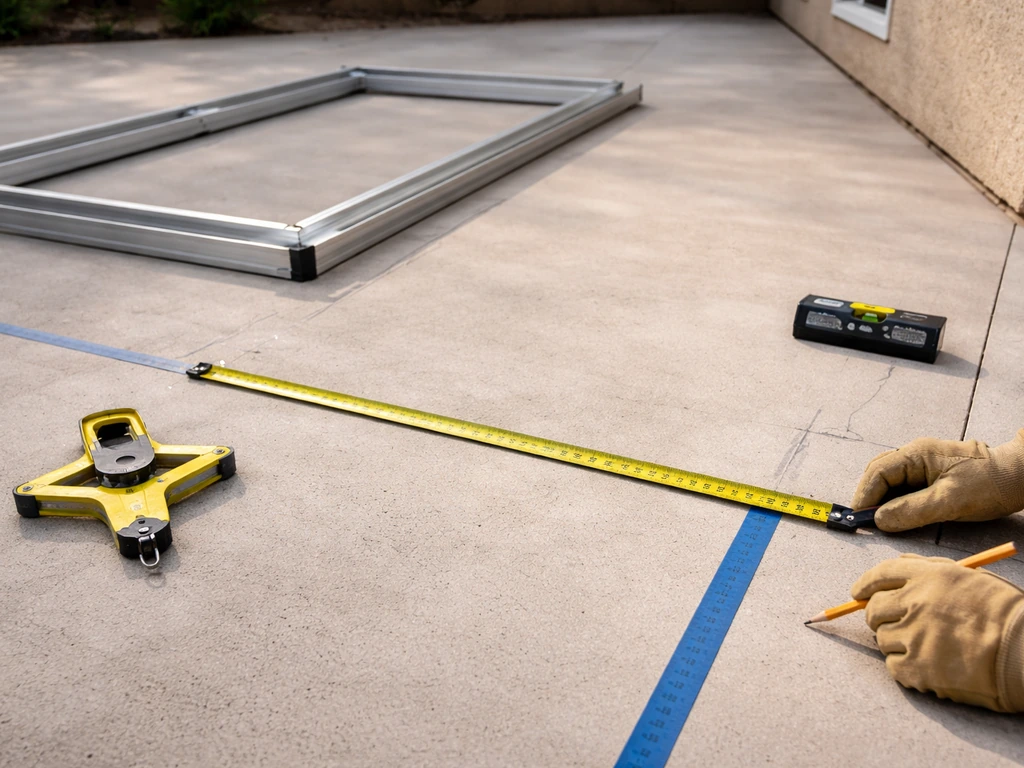
Measure the horizontal span of your patio cover from the house wall to the outer edge. Then decide on your target pitch. For aluminum patio covers, even a modest slope of 1/8 inch per foot improves drainage meaningfully, but most roofers prefer 1/4 inch per foot minimum. Multiply your target slope by the span to get the required rise. For example, a 12-foot deep patio at 1/4 inch per foot needs 3 inches of rise. If you want 2 inches per foot for aggressive drainage, that same span needs 24 inches of total rise, which puts you in SkyLift's 18/24-inch kit range.
Mounting method
Match the riser style to what you have. If there's already a ledger or beam, a beam-mount (LO-PRO style) is cleaner. If you need significant height and have room for posts, go post-mount. SkyLift's standard system mounts to the top plate of the wall and rises above the roof surface, which is a different approach that works well for houses where the patio roof attaches near the eave line.
Load rating and structural requirements
This is where you need to be honest about your project. Patio Roof Riser provides structural calculation PDFs with allowable load data for their configurations. SkyLift's heavy-duty specification documentation explicitly states the system should be designed by a locally licensed professional engineer. That's not just legal cover. It's real advice. If your patio cover is large, in a high-wind zone, or carries any snow load, an engineer review is worth every dollar. Wind uplift is particularly relevant because risers change how the roof sits at the attachment point, which affects how uplift forces transfer.
Clearances and compatibility
Check your local building code for required clearances above the existing roofline. Also confirm that the riser system you choose is compatible with your cover material. SkyLift's standard-duty specs, for instance, list specific compatible applications including polycarbonate covers and trellis support. Not every riser is rated for every cover type or weight. Always pull the spec sheet before ordering.
What real reviews actually tell you (and what to look for)
When you dig into forums, contractor discussions, and product feedback for patio roof risers, a consistent set of themes comes up. If you want to separate marketing from reality, look for patio paint reviews that mention real durability, coverage, and how the color holds up after weathering. If you want the most honest patio shield reviews, focus on reports that discuss drainage results, flashing quality, and how the system held up over time patio roof risers. Here's what matters, and what the complaints usually point to.
| Review Theme | What Good Looks Like | Common Complaint |
|---|---|---|
| Fit and compatibility | Works with standard beam/post sizes, shim options for variance | Bucket or saddle doesn't fit actual beam width, poor contact |
| Adjustability range | Height range covers your needed rise, discrete kits clearly sized | Range too limited, kit sizes jump past what's needed |
| Sturdiness and load rating | Engineered specs, grade 8 hardware, structural calcs available | Flex under load, hardware loosens over time, no load data provided |
| Corrosion resistance | Powder coat finish, 316 stainless option for coastal climates | Rust at fastener holes, finish failing in wet climates |
| Hardware quality | Grade 8 bolt, steel-alloy pins, Simpson Strong-Tie SDS screws | Included fasteners are undersized or missing, stripped threads |
| Installation ease | Clear PDF instructions, logical assembly sequence | Steps assume structural knowledge, hardware doesn't align cleanly |
| Watertightness at penetration | Includes or recommends rated flashing, silicone option available | Flashing not included, leaks around post after install |
| Long-term weathering | Holds pitch under temp swings, no movement after seasons | Pitch shifts, bolts loosen after freeze-thaw cycles |
The most consistent praise for both PRR and SkyLift systems is for their engineering credibility. Reviewers who took the time to read the spec sheets and follow the installation documentation tend to report solid, lasting results. The negative reviews almost always trace back to one of three things: wrong product for the mounting situation, flashing done poorly or skipped, or fasteners not torqued and maintained properly.
Corrosion resistance is a real differentiator if you're near saltwater. Patio Roof Riser's 316 stainless steel option is specifically positioned for coastal environments, and if you're within a mile or two of the ocean, that upgrade is worth the premium. Standard powder coat holds up fine inland but will pit faster in salt air.
DIY vs hiring a pro: honest take
Riser installation is overhead work on a roof, and that combination of height, angles, and structural assembly means the margin for error is small. That said, plenty of competent DIYers have installed these systems successfully. The key question is whether you've done structural roof work before, not just whether you own a drill.
DIY: what you need
For a SkyLift-style installation, you'll need at minimum: a torque wrench, impact driver, 1/4-inch x 3-inch Simpson Strong-Tie SDS screws (as specified in their installation PDF), a level, a chalk line, proper fall protection, and either vent pipe flashing or the manufacturer's silicone flashing kit. The installation sequence is documented in detail by both PRR and SkyLift, and following those PDFs precisely matters. This is not a project where you improvise fastener substitutions.
Time-wise, a single-riser installation by an experienced DIYer typically runs a full day including prep, assembly, and flashing. A full row of risers along a wall ledger for a larger patio cover is realistically a weekend project for two people.
When to call a pro
Hire a contractor or structural engineer if your patio cover is larger than about 200 square feet, if you're in a high-wind or snow-load area, if your house has a complex roofline, or if you've never done overhead structural work. SkyLift's own documentation recommends a licensed professional engineer for their heavy-duty systems, and that recommendation exists for good reason. Getting the riser heights wrong or missing a fastener at an overhead attachment point isn't a mistake that announces itself quietly.
- Always use fall protection: roof jacks, harness, and a spotter
- Work in dry conditions only. Wet roofing material is extremely slippery
- Check local permit requirements before starting. Many jurisdictions require a permit for structural roof attachments
- Never substitute specified fasteners with whatever's in your hardware drawer
- Have a second person present for any overhead assembly step
After install: weatherproofing and what to inspect
Installation is half the job. How you weatherproof the riser connection and what you inspect afterward determines whether the system lasts 5 years or 25.
Flashing the penetration
Every riser that penetrates the roof surface needs to be flashed. Standard vent pipe flashing works if it's properly sealed at the base with roofing sealant and the shingles are woven around it correctly. SkyLift's silicone flashing accessory is worth the extra cost because it creates a more flexible seal that handles thermal movement better than rigid flashing alone. Apply a bead of quality roofing sealant (silicone or polyurethane, not latex caulk) at any flashing laps and around the base of the riser where it meets the roof surface.
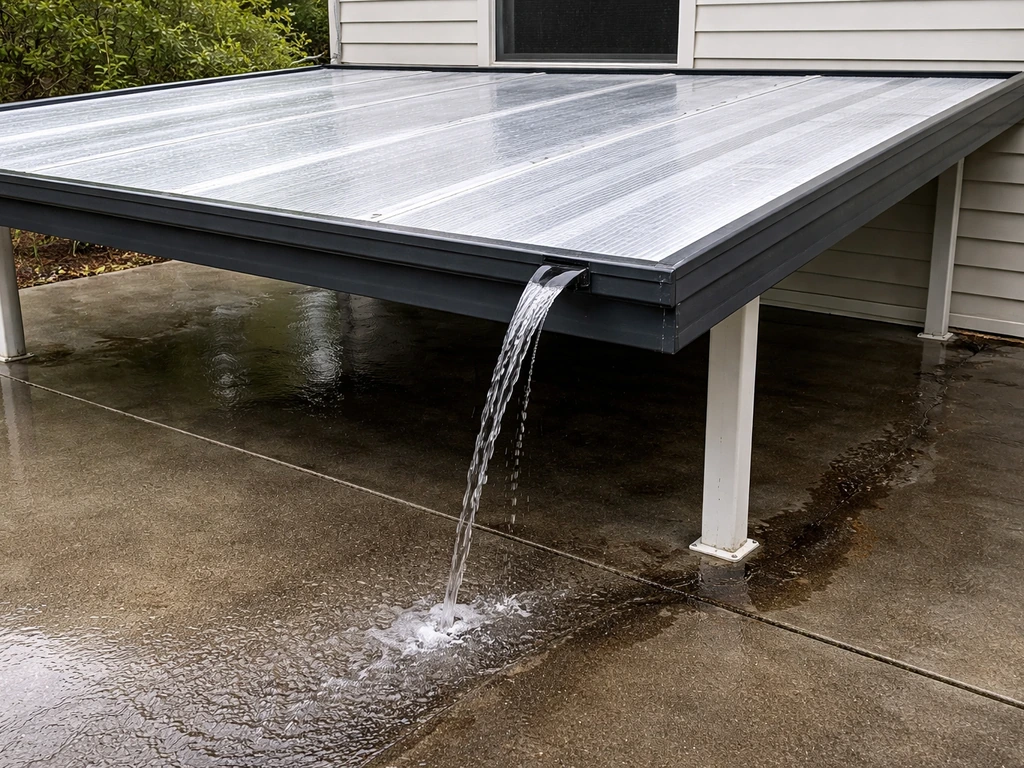
Drainage check
After installation, run a hose on the patio cover and watch where the water goes. If you're aiming for better long-term patio performance spa cover results, the riser still matters because it improves drainage where the cover meets the house. It should sheet off the low edge cleanly without backing up at the wall or pooling near any riser. If you see water collecting around a riser base, your flashing needs immediate attention. This test costs you nothing and can save you a wall repair bill.
Ongoing maintenance
Inspect your risers twice a year: once in spring after freeze-thaw season and once in fall before winter. Check that the grade 8 bolt (or equivalent locking hardware) is still tight. Freeze-thaw cycles can work fasteners loose over several seasons, especially if the original torque wasn't right. Look at the flashing for cracking or lifting at the edges. Re-apply sealant anywhere you see daylight or a gap forming. If your cover is aluminum and the risers are steel, also check for any galvanic corrosion at contact points and apply an anti-corrosion compound if you see white oxidation forming.
For coastal installations using 316 stainless risers, rinse the hardware with fresh water twice a year to clear salt deposits. Even stainless steel benefits from periodic cleaning in high-salt environments. The finish holds, but salt pitting on exposed fastener heads can start a corrosion path if debris accumulates.
Post-install inspection checklist
- Confirm all fasteners are torqued to spec and none have backed out
- Check flashing is fully sealed at the roof surface and all laps
- Run water test to verify drainage direction and no pooling at risers
- Inspect for any movement or flex in the riser assembly under light load
- Verify the cover pitch hasn't shifted (re-check with a level)
- Look for any cracked sealant at the wall connection line
- Document the install with photos for future reference and permit records
If you're thinking about other protective layers for your patio system after getting the roof sorted, the weatherproofing logic that applies to risers and roof connections carries over to the surface and structure below. Keeping water managed at every level, from the roof pitch down to the patio surface sealer, is what makes a patio space genuinely low-maintenance over the long run. If you're also shopping for a patio surface sealer, these patio sealer reviews can help you pick one that's compatible with your finish and weather conditions.
FAQ
Will a patio roof riser fix any patio cover leak?
Yes, but only if the riser system’s purpose is to add pitch and it’s installed as part of a properly flashed, load-rated structural connection. If your leak is coming from a specific flashing seam, penetration, or gutter/edge detail, a riser may not solve it and you could end up lifting the roof while leaving the original water path intact.
Where exactly should I measure the “rise” needed for a patio roof riser?
Measure rise at the exact inner edge where the cover meets the house, not at a random point farther out. Small differences in framing height can create unexpected local low spots, so verify the elevation at both ends of the run and aim for consistent drainage across the span.
Can I set risers to any angle I want beyond the stated pitch range?
You can, but you must treat it like a structural redesign, not an angle adjustment. Changing the bracket pitch can alter load paths and how wind uplift transfers into the wall, so confirm the configuration’s allowable load and fastener schedule (and use an engineer review if the cover is large or in a high-wind zone).
What sealant should I use under the riser flashing, and can I substitute latex caulk?
Avoid it. Latex caulk is prone to pulling away and degrading at roof penetrations. Use the sealant type the manufacturer allows (commonly silicone or polyurethane) at flashing laps and around the riser base, and make sure the surfaces are clean and dry before sealing.
How do I know whether I need a beam-mount (LO-PRO) or a post-mount riser kit?
If the mount style is wrong, reviews often turn negative fast. A beam-mount style is meant for ledger or beam connections, while post-mount kits depend on properly designed and supported 4x4 footings. If you try to force a post-mount into a beam-only setup (or vice versa), you risk poor alignment, incorrect load transfer, or clearance issues.
Do I always need the manufacturer’s flashing, or can I mix flashing parts?
Start with the manufacturer’s flashing method and only then consider accessories. Some silicone flashing options are designed to handle thermal movement better, but you still need to weave surrounding roofing properly and seal the laps. If your roof covering is incompatible, the flashing might not conform tightly enough.
What’s the most common fastener mistake that causes riser problems later?
For the bolt and critical fasteners, rely on the specified torque values and re-check after installation. If you over-tighten, you can damage the hardware or strip into softer materials, and under-tightening is a common cause of loosening over seasons, especially after freeze-thaw cycles.
How do risers hold up in freeze-thaw climates, and what should I inspect more often?
It depends on the riser system and your climate. In freezing regions, you should plan for ice dams and thermal cycling, so inspect flashing edges more closely and run your hose test soon after the first big freeze and again in spring. If you see water backing up at the wall, the issue is usually pitch plus flashing sealing, not just cleaning.
What if my patio cover is aluminum and the risers are steel, is corrosion still a concern?
Yes, but it’s not just a cosmetic issue. Mixing steel risers with aluminum patio covers can create galvanic corrosion at contact points if water stays trapped. Look for white oxidation or pitting at contact areas and use the correct anti-corrosion compound or isolation method recommended for the materials pairing.
How can I tell during the hose test whether the riser pitch and flashing are actually working?
After installation, run the hose test and also do a visual check for water trails. If water pools or sheets poorly at the low edge near the house connection, adjust pitch within the allowed range, then confirm flashing is seated and sealant laps are continuous. Don’t wait for the first heavy storm if you already see pooling.
When should I stop DIY and hire a contractor or engineer for patio roof risers?
Many systems can be installed by capable DIYers, but overhead structural work has a reliability ceiling. If you cannot verify structural load ratings, proper anchoring, and roofline clearance, it’s safer to hire a structural engineer for a quick design check or a contractor for installation, especially for runs over about 200 square feet.
What if my required elevation doesn’t match the riser kit increments exactly?
Avoid assuming the needed elevation will land on a kit’s exact length. SkyLift-style discrete height kits mean you may need to confirm whether components can be combined, or whether a different mount strategy is required. Measure required rise, then map it to allowable kit combinations before ordering.