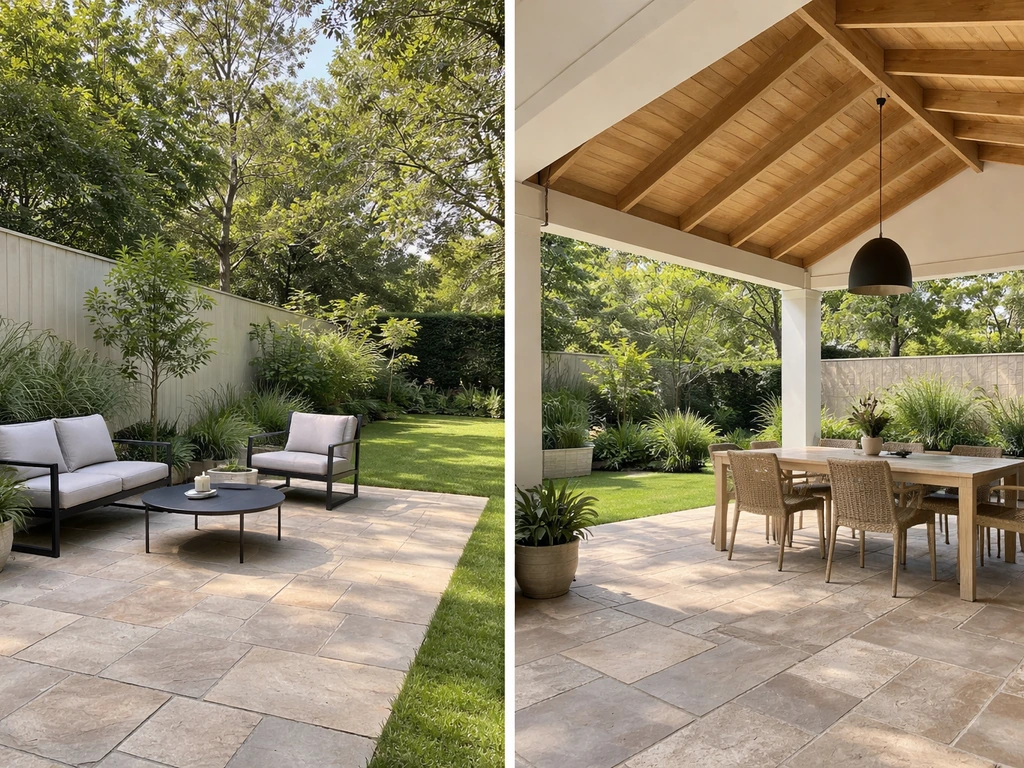
A patio is an open, paved outdoor area attached to or near the house with no permanent roof over it. An alfresco is a covered outdoor living space that is fixed to the house and sheltered under a dedicated roof structure. That single difference, whether there is a proper roof overhead, shapes almost every practical decision you will make: how much you spend, how often you use the space, how you build it, and how it holds up over time.
Patio vs Alfresco: Differences, Costs, and How to Choose

Miles Sutton
12 Jun 2026
What each term actually means
The word 'patio' gets used loosely in a lot of countries, but in Australian builder terminology (where the alfresco concept is most precisely defined), the distinction is clear: an alfresco is a fixed, covered structure attached to the main house, while a patio is attached to the house but not part of the main roof. Think of an alfresco as an outdoor room that happens to lack four walls, and a patio as a paved surface you walk out onto. In the UK and US, 'patio' almost always means an open, hard-surfaced area, often with a separate pergola or shade sail added later if shade is needed. The term 'alfresco' in those markets just means eating or spending time outdoors, not a specific structure.
For the purposes of planning your home, the working definition that matters is coverage. An alfresco has a permanent, integrated roof that ties into the house structure. A patio is open to the sky. Everything downstream of that, cost, permits, usability in bad weather, how the space connects to your kitchen or living room, flows from that single distinction.
Alfrescos are also specifically designed to read as an extension of your indoor living space. The best-designed ones use wide stacker or bi-fold doors so the boundary between inside and outside almost disappears. You can appreciate the covered outdoor zone from the kitchen or lounge even when you are not in it. A patio, by contrast, is more of a destination: you step outside onto it rather than flowing into it.
How the difference plays out day to day
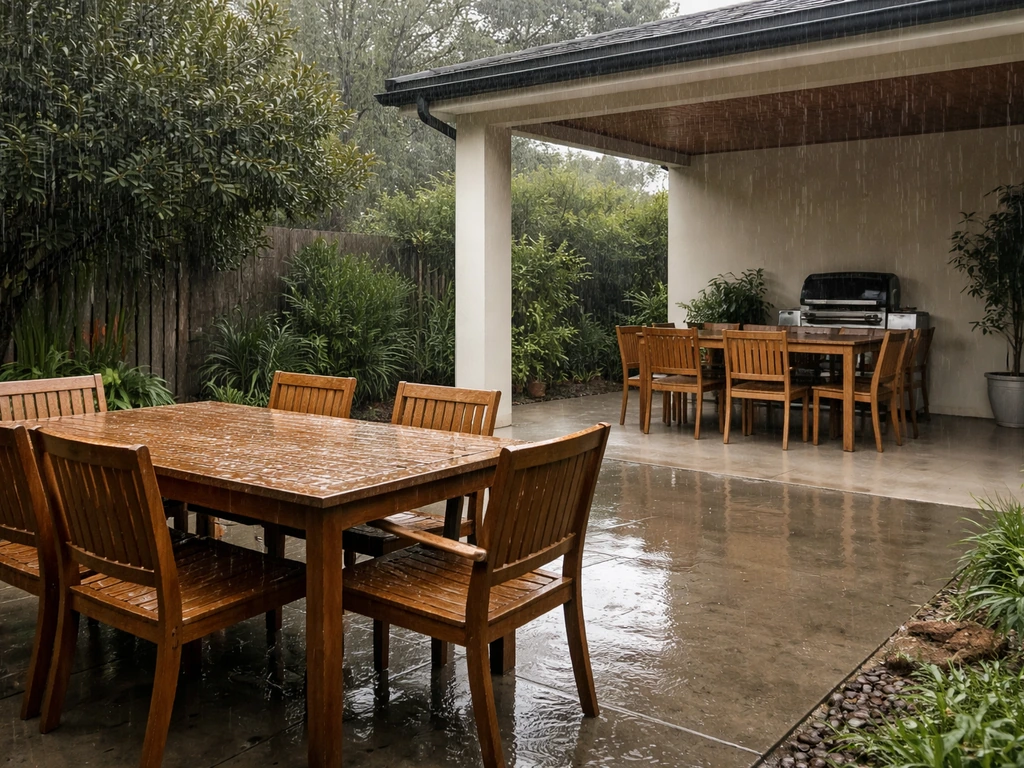
Weather is the big one. An alfresco roof keeps direct rain off your furniture, your guests, and your outdoor cooking setup. You can use it in a light shower, in full summer sun, and in cooler months without committing to full air conditioning or heating. A patio gives you none of that unless you add a separate structure later, which starts to blur the line between the two anyway.
Wind and sun angle matter too. A covered alfresco typically sits on the north or northwest face of the house (in the Southern Hemisphere) or the south-facing rear (in the UK/US) to maximise afternoon shade while keeping winter sun accessible. The roof overhang and orientation can be designed to block harsh summer sun while letting lower winter sun in underneath. An open patio depends entirely on where you place shade sails or pergola structures, which are add-ons rather than an integrated design.
Layout flexibility works differently for each. A patio can be any shape, placed anywhere on the property, and does not require the house structure to support it. An alfresco is constrained to the perimeter of the house because it ties into the roofline or a dedicated structural beam. That means an alfresco almost always sits directly off a living area or kitchen, which is actually a feature rather than a limitation for entertaining. You get a natural flow from indoor cooking to outdoor dining without crossing open ground.
| Feature | Patio | Alfresco |
|---|---|---|
| Coverage | Open to sky | Permanent fixed roof |
| Weather usability | Fair weather only | Year-round in most climates |
| Connection to house | Attached or nearby | Integrated into house structure |
| Design flexibility | High, any location or shape | Limited to house perimeter |
| Indoor-outdoor flow | Stepped access | Seamless via stacker/bi-fold doors |
| Typical use | Casual outdoor space | Dedicated outdoor entertaining room |
| Permit requirements | Lower complexity, varies by region | Often requires planning/building approval |
| Resale impact | Moderate | High, viewed as additional living space |
Costs, complexity, and how long each takes
Patio costs and timelines
For an open patio surfaced in pavers, expect installed costs of roughly $12 to $30 per square foot in the US (2026 figures), or around £90 to £160 per square metre in the UK depending on material. Concrete slabs sit at the lower end (around £60 to £120 per m² in the UK), while porcelain or granite push higher. If you decide a fully covered build does not fit your budget, you can explore patio surface alternatives like porcelain pavers, concrete pavers, or natural stone finishes instead. If you want to add a roof cover over an existing patio later, that adds roughly $20 to $60 per square foot for the cover structure alone, or $50 to $150 per square foot for a fully built covered patio from scratch.
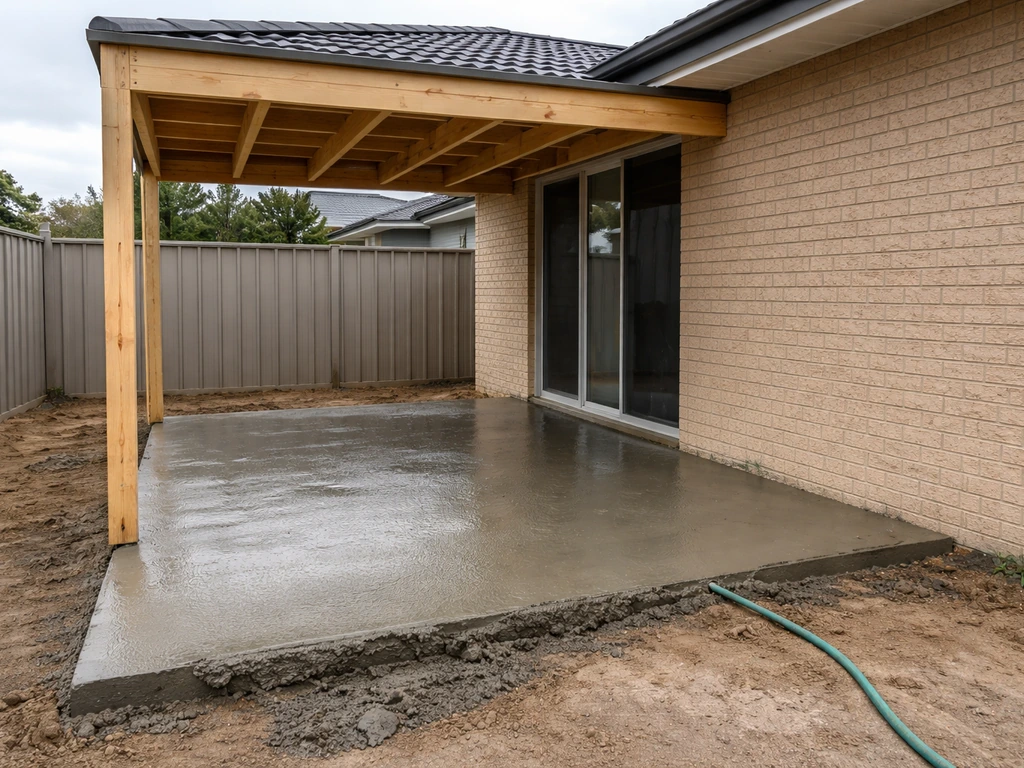
A basic concrete slab patio takes about three to five days of active construction and then a minimum of seven to ten days of curing before you can use it properly. Paver patios in the 200 to 400 square foot range take a competent DIYer roughly two to five days to lay, but that does not include excavation, base compaction, or edge work. Paver installation is not genuinely easy DIY: excavation, a compacted sub-base of at least 100 mm (about 4 inches) of MOT Type 1 or equivalent, correct bedding sand, and precise pattern cutting all require tools and experience that most homeowners underestimate. Add permit processing and contractor scheduling and the total project window is commonly four to six weeks from first enquiry to finished surface.
Alfresco costs and timelines
An alfresco is a bigger financial and construction commitment. In Australia, a mid-range alfresco addition including roofing, posts, concrete slab, and connection to the house typically starts around AUD $15,000 to $30,000 and rises sharply for premium louvered roof systems or larger footprints. In the US, covered patio and pergola structures range from roughly $40,000 to $125,000 for full builds depending on whether you want a basic roof or a fully enclosed outdoor room with screens and utilities. Aluminum roof covering systems run $16 to $68 per square foot installed, with louvered premium systems at the top of that range.
Alfrescos almost always require a professional. The roof structure ties into the house framing or requires engineered posts and beams. Most local councils or building departments require a permit, and in many Australian states the alfresco must be included in the original home design or added as a formal extension. Factor in four to twelve weeks from design to completion depending on council approval timelines and contractor availability.
DIY reality check
A small to medium open patio (under about 300 square feet or 28 square metres) in pavers or simple concrete is a realistic DIY project if you are comfortable with physical labour, have access to a plate compactor, and can manage accurate levelling. An alfresco is not a DIY project in any realistic sense. If your budget is tight, build the open patio yourself now and plan the roof structure as a second stage when you can afford professional installation.
Design and materials: what works best for each
Best materials for an open patio
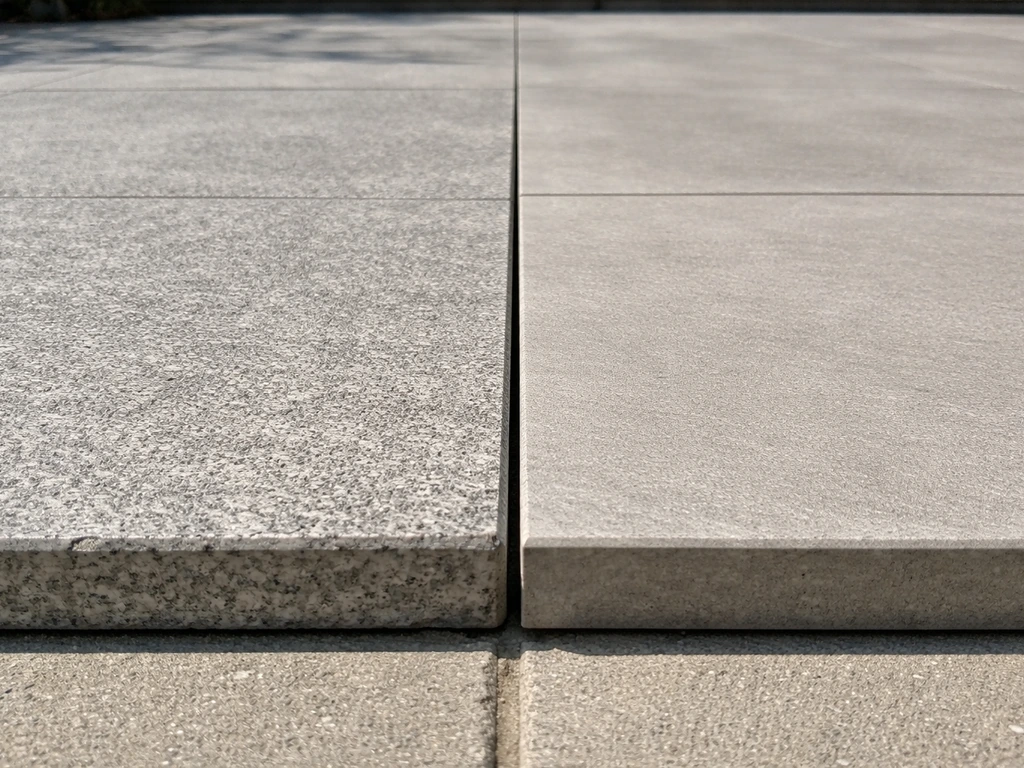
For an open patio that lives fully outdoors, durability and slip resistance are the top priorities. Porcelain pavers (20 mm thick outdoor format) are the current standout choice: they do not need sealing, handle freeze-thaw cycles well in most climates, and resist biological growth better than natural stone. Concrete pavers are a lower-cost alternative and handle traffic well. Natural stone like sandstone or slate looks beautiful but needs sealing in wet climates and can become slippery when covered in algae, particularly in shaded areas. Avoid unsealed terracotta in freeze-prone regions: it absorbs water and can crack badly through winter.
For patio shapes, keep it simple unless you have professional help. Rectangular or L-shaped patios in a running bond or grid pattern minimise cuts. A 90-degree herringbone or basket weave looks great but generates significantly more cut pieces and waste, adding both cost and time.
Best materials for an alfresco
Because an alfresco is covered, you get more material flexibility. Polished or honed concrete slabs work well inside a covered alfresco where rain splash and UV exposure are reduced. Timber-look porcelain tiles are extremely popular in Australian alfresco designs because they deliver a warm indoor feel while still being fully weatherproof if the space does get wet. Large-format tiles (600 x 1200 mm or bigger) suit the spacious, room-like character of an alfresco well.
For the roof structure itself, Colorbond steel or aluminium sheeting is the most common choice in Australian alfrescos: low maintenance, durable, and available in a wide colour range to match the house. Polycarbonate roofing lets light through but tends to be noisier in rain and can discolour over time. Louvered aluminium roof systems (motorised or manual) are the premium option: they let you adjust light and ventilation, and when closed they shed rain completely. They add significant cost but transform usability.
Site planning: getting the practical details right
Drainage
This is the single most important technical detail for both options. Your patio or alfresco surface must slope away from the house at a minimum gradient of 1:80, which is about 12.5 mm of fall per metre. If you are aiming for the safer end, 1:60 (roughly 17 mm per metre) is better in areas with heavy rainfall. Get this wrong and you will have standing water against your foundations, staining, and in cold climates a serious freeze risk where water sits in joints. Excavate to at least 150 mm depth and install a compacted sub-base of at least 100 mm before any surface goes down. This is non-negotiable regardless of whether you are building a simple patio or an alfresco slab.
Orientation and sun
For both a patio and an alfresco, spend a day tracking where the sun falls on your proposed site before you commit to dimensions and position. In Australia, north-facing is the gold standard for alfrescos: you get afternoon shade in summer and warmth in winter. In the UK and northern US, a south-facing position maximises usable sun hours. Whatever orientation you choose, think about where your dining table will sit at 5pm on a summer evening: that is your critical shadow moment.
Utilities and access
If you plan to use your patio or alfresco for entertaining, plan for power from the start. Outdoor receptacles must be GFCI-protected under the NEC in the US (NEC 210.8(F)), and similar requirements apply in other countries. Running conduit before the slab goes down costs almost nothing. Running it after means breaking up finished surfaces. The same logic applies to gas lines for outdoor cooking and data/lighting conduit. Think about where your outdoor fridge, lighting circuit, and speaker cables will run before a single paver is laid.
For accessibility, keep level changes to a minimum. A single step down from the house to the patio surface might seem minor, but it creates a trip hazard at night and a genuine barrier for anyone with mobility challenges. Many alfresco designs use a flush threshold at the door so the indoor and outdoor floor levels match, which is worth planning for from the start even if it adds a small amount of complexity to the drainage fall.
Sizing
A patio for two people having coffee needs about 2.4 x 2.4 metres (roughly 8 x 8 feet). A proper outdoor dining area for six people needs at least 4 x 4 metres (13 x 13 feet) to allow comfortable chair movement. An alfresco designed as a genuine outdoor entertaining room typically starts at around 4 x 5 metres and scales up from there. Under-sizing is the most common mistake: people measure their table and forget the chairs need to pull back, there needs to be walking room around the outside, and a barbecue needs a dedicated zone away from the dining area.
Maintenance and safety
Open patios need more regular maintenance than covered alfrescos because they take the full force of rain, leaf debris, bird droppings, and UV. For porcelain tile patios, sweep regularly and wash with a mild, pH-neutral cleaner. If you use a pressure washer, keep it at low-to-medium pressure and avoid blasting directly into grout lines, which can dislodge jointing sand or damage mortar. Porcelain does not need sealing, but natural stone does: reseal every one to three years depending on the product and how much foot traffic the patio gets.
Shaded, damp areas develop algae and mildew regardless of material, and algae on a smooth patio surface is a serious slip hazard. Treat biological growth with a diluted outdoor algaecide solution and scrub it off rather than just pressure washing it around. Slip resistance matters: when specifying tiles or pavers, look for an R-rating or slip coefficient that suits wet outdoor conditions (R11 or above for outdoor use is a common benchmark). Cobblestones and heavily textured surfaces can be slip-resistant but create trip hazards for elderly users or people with mobility aids.
For an alfresco, the roof structure itself needs periodic checking: clean gutters and downpipes if the roof has them, check that flashing at the house wall junction is sealed, and inspect fixings and structural connections once a year. A covered alfresco accumulates less surface grime than an open patio, but the area under a colorbond or metal roof can feel humid in certain climates, encouraging mould on walls and ceilings. Good ventilation in the alfresco design (open sides, adequate height) is the preventive fix.
How to choose: a practical decision checklist
Run through these questions honestly and the answer will usually be obvious. Most people who think they want an alfresco actually need one; they just have not framed the question that way yet.
- How often do you lose outdoor time to weather? If rain, excessive heat, or UV regularly stop you from using your outdoor space, a covered alfresco will recover that time. If your climate is mild and dry, an open patio is fine.
- What is your realistic budget? Under about $15,000 (or roughly £10,000 to £15,000), you are in open patio territory. Above that, a covered alfresco or at least a patio plus a substantial cover structure becomes feasible.
- Do you entertain regularly? If dining outdoors with guests more than a couple of times a week matters to you, the weather protection and indoor-outdoor flow of an alfresco is worth the extra investment.
- Is your house layout suited to an alfresco? You need an external wall with a door or doors that opens onto the intended site, sufficient setback from boundaries, and a location that will not block light from interior rooms.
- How important is the property value argument? In Australian and many other markets, an alfresco is viewed as additional living space and can meaningfully improve resale value, more so than a basic open patio.
- What is your timeline? If you need the outdoor space ready in the next six to eight weeks, an open patio is achievable. An alfresco requires planning approval in most areas and professional installation, putting completion four to twelve weeks out at minimum.
- Are you planning to DIY? A paver patio is within reach for an able DIYer. An alfresco is not: structural roofing attached to a house requires a licensed builder in most jurisdictions.
If you chose patio: your next steps
- Measure your proposed site and mark it out with stakes and string. Check how it sits in sun and shade at the times you actually plan to use it.
- Check with your local council or building department whether a permit is needed for your size and surface type. Open paver patios often do not need a permit, but rules vary.
- Get three quotes from paving contractors and ask specifically about sub-base depth, the drainage gradient they plan to build in, and what warranty they offer on the finished surface.
- If DIYing, rent a plate compactor and a laser level. Do not try to skip base compaction or estimate fall by eye.
- Plan power and lighting conduit routes before any excavation begins.
- Consider whether you want to leave room or structural provision for a cover or pergola in the future, even if you are not building one now.
If you chose alfresco: your next steps
- Consult a licensed builder or extension specialist early. Ask whether the alfresco roof will tie into the existing roofline or use a separate structural frame, as this affects cost and council requirements significantly.
- Check council planning rules for your area: in Australian states and many UK/US jurisdictions, covered structures attached to the house require a building permit, and height and setback rules apply.
- Decide on door type (stacker, bi-fold, or sliding) at the planning stage, not as an afterthought. The opening width determines how well the alfresco actually connects to your indoor space.
- Get the slab drainage engineered into the design: level-access thresholds are desirable but need careful drainage detailing to avoid water ingress.
- Factor in lighting, power, a ceiling fan, and any gas or water connections during the build rather than retrofitting later.
- If budget is the constraint, price the open patio slab and roof structure as two separate stages so you can commit to stage one now.
Both options can become genuinely great outdoor spaces. The patio wins on simplicity, flexibility, and budget. If you are comparing patio alternatives on a budget, focus on simple layouts, durable low-maintenance materials, and smart shade rather than adding an expensive full roof right away. The alfresco wins on weather protection, indoor-outdoor integration, and long-term usability. If you are still on the fence, visit a display home or showroom with both options on site and spend thirty minutes in each space at different times of day. That usually settles it faster than any checklist. If you are exploring other ways to approach your outdoor area, it is worth looking at the broader range of patio alternatives and alternative materials, including budget-focused options, to see whether a different surface type or hybrid approach fits your situation better. If you want a patio alternative that still delivers a comfortable outdoor surface, consider other layouts and materials that suit your climate and maintenance preferences.
FAQ
Can I build a patio now and add an alfresco-style roof later?
Often, yes. Many homeowners budget for an open patio first, then later add a roof structure that ties into the house. The key caveat is planning drainage and slab framing early, because retrofitting columns and roof ties may require coring into the slab and adding new footings to meet structural and permit requirements.
If I “roof over” my patio, does it count as a new alfresco legally and for inspections?
Yes, but you need to treat it as a different “permitable project” rather than a cosmetic change. Converting an open patio into a covered structure usually triggers engineering, new foundations or load points, and inspections, especially where the roof connects to the house wall or existing foundations.
Do pergolas always count like an alfresco roof for usability during rain?
In most markets, a roof that is partially sheltered by pergola slats is still usually considered an open structure unless it has a dedicated, fixed roof system designed to keep rain off. If your goal is winter usability and furniture protection, confirm the manufacturer rating or the design intent for water runoff, not just “covered” wording.
Are setback rules different for alfresco posts and roof structures compared with an open patio?
You can, but it changes the risk profile. Adding a heavy roof to a patio location may shift loads toward nearby boundaries or require setback compliance. Even if the patio is on your land, roof columns and beams often have different spacing and setback rules than paved surfaces.
Which option performs better in windy yards, patio or alfresco?
Consider wind first. A covered alfresco can create a more enclosed area that catches and redirects gusts, so you want bracing, proper roof height, and side openness designed to avoid buffeting. A patio is more forgiving, because it has fewer wind-catching surfaces above the seating area.
Which one actually requires less upkeep over time, patio or alfresco?
Often neither is fully “no maintenance,” but the type differs. A covered alfresco typically needs periodic gutter, flashing, and mould checks, while an open patio needs more frequent debris removal and joint care. If you have shade plus dampness, expect algae control on patios and ventilation management on alfrescos.
Can I keep the indoor and outdoor floors flush without creating drainage problems?
It depends on the door and floor threshold design. Even with a covered alfresco, you can create a trip hazard if the patio slab is not kept level with the indoor threshold or if drainage fall is wrong at the doorway. Plan a flush or minimal-step threshold and verify the slope still carries water away from the house wall.
What should I prioritize for slip safety on each option?
Yes, and it matters for both comfort and slips. For example, patio surfaces can become dangerously slick under shade and algae growth, and that risk increases if water is not draining correctly. For alfrescos, ventilation and roof splash control reduce dampness, but the floor can still need slip-rated materials and periodic biological treatment.
Where should I plan outlets, lighting, and cable runs so I do not regret it later?
Get electrical conduit and points in before the final paving or slab finish, and plan for weather-rated fixtures and cover plates. Also consider “future zones,” like an outdoor TV, ceiling heaters, or a power point near a bar setup, because adding them later usually means lifting sections of paving or cutting into the slab.
What is a sensible phased approach if I cannot afford the full alfresco build now?
If you are on a tight budget, build to the minimum code-ready drainage and base requirements, then spend on the highest-value improvements next. A common sequence is, first complete the correctly sloped slab or pavers, second improve shading (sail or pergola), third add a roof only if you are using the space in rain or cooler seasons.
How do climate and sun exposure change which patio or alfresco surface materials make sense?
Often, the “right” surface is the one that matches your climate maintenance tolerance. In wet or shaded areas, prioritize slip-resistant, low algae-retention materials and avoid high-porosity stones that require frequent sealing. In hot sun, you may need UV-stable finishes and shade planning, because absorbed heat can make outdoor seating uncomfortable even on tiles.
Will an alfresco make the space too hot in summer or too damp in shoulder seasons?
Usually yes if you want comfort across seasons, but check your design against overheating and glare. A properly oriented alfresco can reduce summer sun, yet if it is too enclosed it can feel hot and humid. Ask your builder to confirm roof pitch for drainage, plus how airflow is created through the open sides or screened openings.