
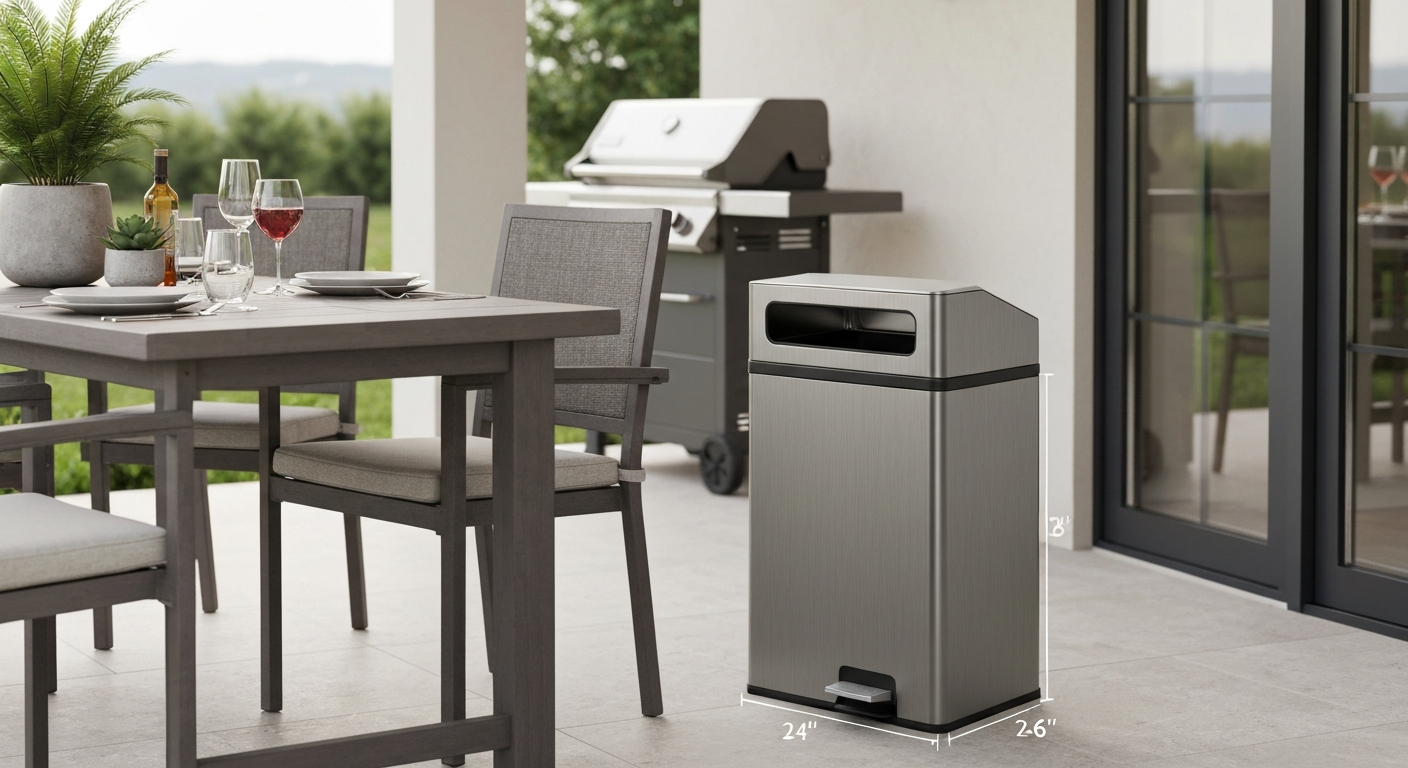
A 13-gallon patio trash can hits the sweet spot for most outdoor seating areas: it holds enough for a full afternoon of entertaining without dominating your space, fits standard kitchen bags you already buy, and stands roughly 24 to 28 inches tall so it's easy to reach from a chair or while standing at a grill. If your patio hosts four to eight people a few times a week, or you just want a tidy spot for everyday drink cups and food wrappers, a 13-gallon bin is almost always the right call.
13 Gallon Patio Trash Can: Buyer's Guide, Sizing & Placement

Miles Sutton
28 Jul 2026
Who this guide is for and what you'll learn
This guide is written for homeowners, renters, and DIYers who want to make a deliberate choice about their patio trash setup rather than just grabbing whatever's on sale. Whether you're outfitting a small balcony, a deck off the kitchen, or a full backyard entertaining area, you'll come away knowing exactly which size and shape to choose, which materials hold up outdoors, how to anchor or place the can so it doesn't tip or walk away, and how to keep it clean and odor-free season after season. I'll also cover lid types, color trade-offs, accessories, DIY enclosure ideas, and real price ranges so you can budget with confidence.
Why 13 gallons is the right size for most patios
Patio trash needs fall into two broad patterns: everyday light use (coffee cups, a few napkins, the occasional snack wrapper) and entertaining use (bottles, cans, food scraps, paper plates for a group). A 10-gallon bin often fills up mid-party and forces you to run a half-full bag inside. A 20-gallon bin is overkill for daily use, takes up real estate on smaller patios, and is awkward to carry when it's full. The 13-gallon size threads that needle: it's the standard US kitchen bag size, which means bags are cheap and always available, and the bin's footprint is compact enough to tuck beside a chair or against a railing without blocking traffic flow.
For a covered porch or a dining patio where you're hosting regularly, a single 13-gallon can positioned near the table handles most of what a party generates. For a pool deck or large backyard with multiple seating zones, you might place two 13-gallon cans strategically rather than one giant bin. That keeps things looking tidier and means no one is walking across the patio to throw something away.
Exact dimensions, shapes, and bag compatibility
Most 13-gallon cans fall in a fairly predictable dimensional range: 24 to 28 inches tall, 14 to 20 inches wide, and 12 to 17 inches deep. Here are a few real-world examples to anchor your expectations. The Simplehuman CW1816 rectangular step can measures 25.7 inches tall, 19.8 inches wide, and 12.8 inches deep. The Rubbermaid 13-gallon kitchen can (FG5L5806 family) comes in at roughly 25.5 inches tall, 17.2 inches deep, and 14.9 inches wide. A standard round or semi-round 13-gallon model (like the Simplehuman Grainger-listed 793G13) measures about 18.75 inches in diameter and 26.5 inches tall. These are all kitchen-category cans that also work well on covered patios and decks.
Before you buy, measure the spot where you plan to put the can. Take the height clearance (under an overhang or built-in bench), the floor width available, and the depth from the wall or railing. A rectangular slim can (roughly 13 by 20 inches) fits in much tighter spots than a round can with an 18-inch diameter, even though both hold 13 gallons.
For bags, stick to the standard 13-gallon tall kitchen bag, which is typically sized 24 inches wide (lay-flat) by 30 to 33 inches tall. The most common spec you'll see on bulk and name-brand bags is 24 inches by 33 inches (61 by 84 cm). That overhang is important: you need enough bag height to fold over the rim or catch on a bag ring so it doesn't slip down when you toss something in. Watch out for budget bags labeled '13 gallon' that are only 24 by 27 inches. The gallon rating is a volume measure, not a guarantee of height, so always check the dimensions on the box. A bag that's too short will constantly fall inside the can.
13-gallon vs other common patio bin sizes
Understanding how 13 gallons compares to the other common options makes the choice a lot clearer. Here's a practical breakdown:
| Capacity | Typical Height | Typical Width/Diameter | Best Patio Use Case | Emptying Cadence (light daily use) |
|---|---|---|---|---|
| 10–12 gal | 18–24 in | 12–15 in | Small balcony, single-person use, side table position | Every 1–2 days |
| 13 gal | 24–28 in | 14–20 in | Standard patio, dining area, entertaining up to 8 people | Every 2–4 days |
| 20 gal | 28–32 in | 16–22 in | Large deck, frequent parties, poolside | Every 3–5 days |
| 32+ gal | 30–36 in | 20–24 in | Commercial patio, high-traffic entertaining, garage staging | Weekly or event-based |
The 10 to 12-gallon range is worth considering if you're looking at a small patio trash can for a compact balcony or a tight corner. But if you host guests even occasionally, you'll be running bags more than you'd like. The 20-gallon jump is a meaningful increase in footprint: those cans are often 5 to 8 inches taller and 4 to 6 inches wider, which matters in tight seating arrangements. For most homeowners, 13 gallons is the one size that works for both everyday and entertaining use without compromise.
Size and shape comparison at a glance
| Model Type | Approx. Dimensions (H × W × D) | Common Material | Common Lid Type | Outdoor Suitability |
|---|---|---|---|---|
| Rectangular step can (e.g., Simplehuman CW1816) | 25.7 × 19.8 × 12.8 in | Brushed stainless steel or plastic | Hinged soft-close | Covered patio; check SS grade for open exposure |
| Semi-round step can | 25–26.5 × 14–19 in (varies) | Plastic (PP/ABS) or steel | Hinged with foot pedal | Covered or lightly exposed patio |
| Round swing-top | 26.5 in tall, ~18.75 in dia. | Plastic or powder-coated steel | Swing/flap lid | Covered patio; add weight for wind |
| Slim/tall rectangular | 28–30 × 10–13 × 10–13 in | Plastic or metal | Open top or hinged | Tight spaces; wind susceptibility is higher |
| Decorative hideaway/enclosure | 24–30 × 14–18 × 14–18 in | Wood composite, resin, bamboo blend | Hinged cabinet door | Open or covered; check moisture resistance |
| Step can with locking lid | 25–27 × 14–18 in (varies) | Plastic (PP/ABS) | Hinged locking | Good for pest-prone or windy patios |
Materials and finishes: what actually holds up outdoors
Plastic (HDPE, PP, ABS)
Most entry-level to mid-range 13-gallon cans are plastic, and that's not a bad thing if the plastic is UV-stabilized. Un-stabilized polypropylene or HDPE will go chalky, brittle, and cracked within a season or two of direct sun exposure. Look for products that specifically mention UV stabilization or UV-resistant resin. Quality manufacturers compound their plastics with blank" rel="noopener noreferrer">hindered amine light stabilizers (HALS) and UV absorbers, which can extend outdoor life to five or more years. ABS plastic looks more premium and takes texture well, but it's generally less UV-resistant than HDPE or PP unless specifically stabilized. For a covered patio, any decent plastic can will last. For full sun exposure, insist on UV-rated resin.
Powder-coated steel
Powder-coated steel cans look sharp and feel solid, and a good exterior-grade powder coat (polyester TGIC or fluoropolymer systems with a proper pretreatment like zinc phosphate) will resist rust and UV fading for several years. The weak point is chips and scratches: once the coating is broken, bare steel rusts quickly outdoors. Keep an eye on the base and any seams where water can collect. For patios with moderate exposure, powder-coated steel is a great-looking, reasonably durable choice. For oceanside or high-humidity environments, consider the next step up.
Stainless steel
If you want a metal can that genuinely holds up outdoors with minimal maintenance, look for 304-grade (18/8) stainless steel rather than 430-grade. Grade 304 has significantly better corrosion resistance in wet and humid environments. Grade 430 (ferritic) is cheaper and still fine indoors or in dry, sheltered spots, but it can develop surface rust staining on an open patio over time. The trade-off with stainless is fingerprints, smudges, and cost. Brushed finishes hide smudges better than polished. Expect to pay more, but a 304 stainless can on a covered porch can last a decade with minimal fuss.
Wood composite, bamboo blends, and resin wicker
These decorative options are designed to look like furniture rather than a trash can, and they can genuinely blend into patio decor. Most use a plastic inner liner (the actual can) inside a wood composite, teak, bamboo, or resin wicker outer shell. The inner liner is what matters for waterproofing; the outer shell needs UV-stable finish and, for real wood, annual sealing. These are best suited to covered patios or dry climates. In wet climates or direct rain, unsealed wood composite will swell, crack, and degrade. Resin wicker shells are more forgiving. These styles cost more and require more upkeep, but the visual payoff on a well-designed patio is real.
Color choices: gray vs black and everything else
Color matters more outdoors than indoors. Research consistently shows that black surfaces absorb significantly more solar energy than lighter colors, reaching temperatures roughly 6 to 12 degrees Celsius hotter than white or light-gray surfaces under direct sun. For a trash can, that extra heat accelerates odor generation from food waste and can speed up UV degradation of the material itself. On a sunny patio, a black patio garbage can will smell worse on a hot day than the same can in gray or tan.
That said, black is the most popular color for patio cans because it hides staining, matches dark furniture frames, and shows fewer smudges. Gray is a practical middle ground: it absorbs less heat than black, shows less dirt than white, and pairs with nearly any patio palette. For a balance of lower heat absorption and good dirt camouflage, consider a gray patio trash can as a practical, versatile choice. Lighter colors like white or beige look crisp but show every smudge and stain. Matching your can color to your existing furniture, planters, or railing color is worth doing on an entertainer patio. For a less visible utility spot, just pick gray or charcoal and don't overthink it.
Lid types: which one actually makes sense for your patio
The lid is the single most important feature on an outdoor trash can. Without one, you're inviting insects, birds, raccoons, and wind-scattered trash into your patio space. Here's how the main options stack up:
| Lid Type | Pros | Cons | Best For |
|---|---|---|---|
| Hinged soft-close | Keeps odors in, stays shut, durable hinge | Requires hands to open | Everyday use, covered patios |
| Foot pedal (step can) | Hands-free, hygienic, great for entertaining | Moving part can wear or corrode outdoors | Dining areas, entertaining, food waste |
| Swing/flap lid | Easy one-handed use, no moving parts | Doesn't seal well, poor for pest/odor control | Low-odor waste, casual use |
| Locking lid | Best for pests and animals, wind-proof | Inconvenient for frequent use | Raccoon/pest areas, overnight storage |
| Hinged cabinet door (hideaway) | Aesthetic, completely conceals bin | Slower access, higher cost | Entertainer patios, visible locations |
For most patio situations, a hinged lid with a foot pedal is the ideal combination: it seals well enough to contain odors between uses, it's hands-free when you're carrying plates, and the step mechanism keeps you from having to touch the can at all. If you want that combination, look for a patio garbage can with lid that includes a sturdy pedal and a gasketed rim to improve odor control and pest resistance. If raccoons or other wildlife are a problem in your area, add a locking lid or a can with a latch. Swing-top lids are convenient but genuinely poor at odor control and offer almost no pest resistance.
Placement and integration into your patio design
Placement is something a lot of people get wrong: they tuck the trash can in an awkward corner that nobody walks near, and then guests end up leaving trash on the table. The can needs to be within three to five feet of wherever food and drinks are being consumed or served. For product recommendations and sizes that work well in these spots, see our guide to choosing a trash can for patio use. Near the grill, beside the dining table, or at the end of a serving bar are all natural spots. Think about traffic flow: the can should be accessible without crossing the main seating zone.
On a well-designed patio, you want the can to be visible enough to use but not the first thing you see. A position beside a planter, against a railing, or in the corner of a dining zone all work. If sightlines matter to you, a decorative enclosure or a can that matches your furniture color will blend in far better than a stark white bin in the middle of your outdoor living room. For more design ideas and examples, see the garbage can patio guide. For a dining table setup, placing the can at the end of the table (rather than the center) keeps it accessible without dominating the view.
Anchoring, mounting, and securing your can
A 13-gallon can is light enough to blow over in wind or tip if someone bumps it. On a deck or hard patio surface, there are a few practical ways to stabilize it. Freestanding cans can be weighted down by placing a flat stone or paver slab inside the bottom under the bag. For a more permanent solution, L-bracket wall mounts hold the can against a fence or exterior wall and are easy to install with a drill and a few screws into wood framing or masonry anchors. Some decorative hideaway enclosures have built-in weighted bases or can be bolted to a deck surface through their base frame.
For anti-theft or high-wind situations (especially in commercial or shared patio spaces), steel cable anchors threaded through the can's handle or base ring and locked to a deck post are a simple, cheap fix. If you're mounting to concrete, use sleeve or wedge anchors rated for the load. For wood decks, 3-inch structural screws into joist blocking will hold a bracket securely. A wall-mounted bracket keeps the can completely off the floor, which is especially useful on small balconies where floor space is tight.
Weatherproofing, UV resistance, drainage, and seasonal care
An outdoor trash can collects water if it isn't covered or isn't draining properly. Most quality outdoor cans have a small drain hole near the base, but many kitchen-style cans don't. If yours doesn't have drainage and sits in an uncovered spot, rainwater will pool inside under the bag and create a smelly, mosquito-breeding mess. You can drill a 3/8-inch hole in the base of most plastic cans yourself. For metal cans, use a step drill bit and apply a rubber grommet to prevent rust at the hole edge.
UV resistance claims on product listings should reference actual testing standards like ISO 4892-2 (xenon-arc weathering) or ASTM G155 equivalent methods if you're buying a can for full-sun exposure. In practice, 'UV-resistant' on a budget can often means very little. If the product page doesn't specify stabilized resin or a UV-rated coating, assume it's not rated for years of direct sun.
For winter storage in cold climates, bring plastic cans inside or into a garage once temperatures start dropping below freezing regularly. Plastic becomes brittle at low temperatures, and a full bag left in a frozen can overnight can crack the shell when you pull it out. Metal cans can stay outside if they're powder-coated and the coating is intact, but I'd bring them in anyway to protect the lid mechanism and prevent moisture seizing. Before storing, clean and dry the can thoroughly.
Pest control, odor management, and lid sealing
Food waste is the main driver of outdoor trash can odor and pest attraction. The simplest approach: line the bottom of the bag with a layer of crumpled newspaper or a dryer sheet to absorb liquid, and use a tight-fitting lid. For raccoons specifically, a swing-top lid is basically an open invitation. You need either a locking latch, a bungee cord over the lid, or a dedicated wildlife-resistant can. Raccoons are strong and persistent, so a lightweight hinge alone won't stop them.
For insects, the seal between the lid and the can body matters. Cans with a rubber or foam gasket on the lid rim are noticeably better at keeping flies and yellow jackets out than cans with a simple friction fit. If your current can doesn't have a gasket, you can add a self-adhesive foam weatherstripping tape around the lid rim for a few dollars. Baking soda sprinkled in the bottom of the can (under the bag) absorbs odors between cleanings. Commercial trash can deodorizer tabs that stick inside the lid also work well and last a few weeks each.
Maintenance routines: cleaning, deodorizing, and winter prep
A 13-gallon patio trash can needs more frequent cleaning than an indoor kitchen can because food and drink spills happen more often outdoors and the sun accelerates odor. Here's a realistic schedule:
- Weekly: Wipe down the exterior with a damp cloth. Check the lid mechanism and gasket for debris.
- Every 2 to 4 weeks (or when visibly soiled): Rinse the inside with a garden hose. Scrub with a diluted dish soap solution or a 1:10 bleach-to-water mix for odor and disinfection. Rinse thoroughly and let air dry completely before replacing the bag.
- Monthly: Check for cracks, chips in coating, or rust spots on metal cans. Touch up powder coat with outdoor spray paint if needed.
- Seasonally (spring and fall): Deep-clean, inspect anchors and mounting hardware, and lubricate any pedal mechanisms with silicone spray (not WD-40, which attracts dirt).
- Before winter storage: Clean and dry thoroughly. Remove the bag liner. Store upside down or with the lid propped open slightly to prevent moisture buildup inside.
For bag fitting: always use a bag rated for 13 gallons with a 24-inch lay-flat width and at least 30-inch height. Fold the overhang over the rim or hook it on a built-in bag ring. A bag that's secured at the rim won't sink when you toss in a heavy item, which is the most common cause of a mess inside the can.
Accessories and liners worth having
- Fitted liner inserts: Rigid plastic inner liners (sold separately for some Simplehuman and Rubbermaid models) protect the can body and make cleaning much easier. Look for liners specific to your model.
- Replacement lids: Many manufacturers sell replacement lids and pedal assemblies separately, which extends the life of an otherwise good can instead of replacing the whole thing.
- Bag rings and dispensers: A built-in or add-on bag ring holds the bag open and secures it at the rim. Some models have a bag storage compartment in the base.
- Cable anchors and anti-tip stands: Stainless steel cable with a combination lock threads through the handle and attaches to a post or railing. Weighted base rings (sold for freestanding cans) add stability without permanent mounting.
- Deodorizer tabs and baking soda dispensers: Clip-on charcoal or baking soda deodorizer units that mount inside the lid are inexpensive and effective for a month or so each.
- Decorative sleeves and enclosure panels: Wicker sleeves, cedar panel kits, or corrugated steel wraps can transform a plain plastic can into something that looks intentional in your patio design.
- Wall-mount brackets: Powder-coated steel brackets designed to hold a standard 13-gallon can upright against a wall or fence, with a mounting plate that accepts lag screws or masonry anchors.
DIY and retrofit options
If you want the can to look like part of your patio rather than an afterthought, a custom enclosure is one of the most impactful DIY projects you can do. The basic approach: build a three-sided slatted box from cedar or pressure-treated lumber with a hinged front panel or lift-off top. Size the interior to fit your 13-gallon can with an inch or two of clearance on each side for airflow and easy removal. A cedar slat enclosure takes about half a day to build, costs $40 to $80 in materials, and looks like furniture.
For retrofit lids: if your current can has a damaged or missing lid, replacements are available directly from the manufacturer for major brands. For off-brand cans, a universal-fit hinged lid ($10 to $20 at hardware stores) or even a custom-cut piece of marine-grade plywood with a piano hinge will work. To add pest resistance to a can that doesn't have a locking mechanism, bungee cords over the lid are quick and cheap, or you can add a simple hasp latch to a flat-top can lid. For wall mounting, a basic L-bracket kit costs under $15 at any hardware store and handles the job for a standard patio can.
Buying guide: what to pay, where to prioritize, and where to save
Here's a realistic look at what 13-gallon patio-suitable trash cans cost at the time of writing:
| Price Range | What You Get | Best For |
|---|---|---|
| $15–$35 | Basic plastic can, simple hinged or swing lid, no UV rating stated | Covered patios, budget setups, short-term use |
| $35–$70 | UV-stabilized plastic or powder-coated steel, step pedal, better lid seal | Most patio and deck situations |
| $70–$130 | Brushed stainless or premium powder coat, soft-close hinge, locking option | Entertainer patios, visible placement, longer-term investment |
| $130–$250+ | Decorative enclosure, wood/bamboo composite, premium hardware | High-end patio design, furniture-matching aesthetic |
Where to prioritize spending: the lid mechanism and the material. A cheap pedal breaks in a season outdoors; a cheap plastic body degrades in the sun. Where you can save: skip accessories bundled by the manufacturer (bags, deodorizers) and buy those separately in bulk. Warranty is worth checking: brands like Simplehuman offer 10-year warranties on their step cans, which genuinely matters for an outdoor purchase.
Feature priorities: entertaining vs everyday use
Not every patio needs the same can. Here's how to match features to your actual use case:
| Use Case | Top Priority Features | Nice to Have | Less Important |
|---|---|---|---|
| Entertaining (parties, dining) | Foot pedal, tight-sealing lid, attractive finish, matching color | Locking lid, decorative enclosure, large capacity | Exact dimensions, drain hole |
| Everyday light use | Durability, easy cleaning, low maintenance material | Foot pedal, UV stability for sun exposure | Premium aesthetics, locking lid |
| Pest-prone area (wildlife) | Locking lid, heavy base or anchor, metal construction | Gasket seal, wall mount | Color, step pedal |
| Small balcony or tight space | Slim profile (rectangular), wall-mount option | Foot pedal, light weight | Large capacity, decorative shell |
Pros and cons of common 13-gallon model types
Step cans (foot-pedal hinged lid)
- Pros: Hands-free, hygienic, good lid seal, wide variety of finishes and colors available
- Cons: Pedal mechanism can corrode or break with heavy outdoor use; moving parts need occasional lubrication
Slim or tall rectangular cans
- Pros: Minimal footprint, fits tight spaces like railings or narrow side walls
- Cons: Tips over easily in wind; narrow opening can be awkward for larger waste items
Round open-top cans
- Pros: Cheapest option, easy to empty, no moving parts to break
- Cons: No odor or pest control, wind scatters contents, not suitable for food waste
Decorative hideaway or enclosure-style cans
- Pros: Best aesthetic, looks like patio furniture, can anchor to deck surface
- Cons: Highest cost, slower access, outer shell needs maintenance (sealing for wood types), heavier
Where to buy and when to bring in a pro
Big-box home improvement stores (Home Depot, Lowe's) carry a reliable range of 13-gallon cans from Simplehuman, Rubbermaid, Sterilite, and Glad at competitive prices, and you can see the actual size in person before buying. Online marketplaces (Amazon, Wayfair, Target) have a wider selection and are where you'll find most of the decorative and enclosure-style options. Specialty patio and outdoor furniture stores sometimes carry higher-end decorative enclosures and can help you match finishes to existing furniture.
For most 13-gallon patio can installations, a professional installer isn't necessary. However, if you're building a custom enclosure as part of a larger deck or patio renovation, or if you need a masonry anchor into a concrete pad for an anti-theft installation, it makes sense to have that work done by whoever is handling the patio project. A general contractor or patio installer can integrate a trash can enclosure into built-in bench or storage designs at minimal extra cost if the project is already underway.
Image suggestions for this guide
- Product shot: top-down view of a 13-gallon step can with the lid open and a standard 24×33-inch bag properly fitted over the rim
- Placement example: a 13-gallon can positioned beside a patio dining table, within arm's reach of seating, with a planter grouping to one side
- Installation diagram: wall-mount L-bracket setup showing anchor points, bracket orientation, and can position relative to a fence post or exterior wall
- Maintenance step photo: hosing out the interior of a plastic can on a patio or driveway with dish soap solution visible
- Comparison shot: side-by-side of a round open-top can, a step can, and a decorative enclosure-style hideaway at roughly the same scale
- Close-up: lid gasket seal on a locking-lid model, showing the foam or rubber perimeter seal that improves pest and odor resistance
- Anchoring diagram: base-to-deck bolt mounting and cable anchor options illustrated side by side with hardware callouts
Quick buying checklist
- Measure your placement spot: height clearance, floor width, and depth from wall or railing
- Decide on lid type based on use (entertaining = foot pedal; pest area = locking; tight space = hinged)
- Confirm the material is rated for your sun exposure level (UV-stabilized plastic, 304 stainless, or powder-coated steel)
- Check that the color makes sense for heat absorption and aesthetic match
- Verify bag compatibility: 13-gallon bags in 24×33-inch size will fit all standard 13-gallon cans
- Look for drain hole if the can will be in an uncovered area
- Check warranty length, especially for step-can mechanisms
Placement and anchoring checklist
- Position within 3 to 5 feet of primary dining or serving area
- Keep out of main traffic path while remaining easily accessible
- Confirm the base is level and stable on the patio surface
- For wind-prone spots: add a base weight, cable anchor, or wall-mount bracket
- For deck mounting: screw bracket into blocking between joists, not just decking boards
- For concrete pads: use masonry anchors or expansion bolts rated for outdoor use
- For covered patios: ensure lid can fully open without hitting an overhead structure
Maintenance checklist
- Wipe down exterior weekly with a damp cloth
- Rinse and scrub interior every 2 to 4 weeks with diluted dish soap or bleach solution
- Let dry completely before replacing bag
- Lubricate pedal mechanism seasonally with silicone spray
- Inspect for cracks, chips, or rust spots monthly; touch up as needed
- Replace gasket seal if it becomes compressed or cracked
- Deep-clean and dry before seasonal storage
- Store plastic cans indoors or in a garage during freezing temperatures
- Check anchoring hardware each spring for loosening or corrosion
FAQ
Title and meta description to use for the article
Title: How to Choose, Place, Install & Maintain a 13‑Gallon Patio Trash Can — Complete Buyer’s Guide Meta description (<=160 chars): The practical guide to selecting, placing, weatherproofing, and maintaining a 13‑gallon patio trash can for patios and small outdoor seating areas.
Why choose a 13‑gallon trash can for a patio or small outdoor seating area?
A 13‑gallon can balances capacity and footprint: large enough for a day or two of normal patio use (food scraps, napkins, small cups) yet compact enough to tuck beside seating or under an outdoor counter. It reduces emptying frequency versus a 5–10 gal can while avoiding the bulk and wind/placement challenges of 20–32 gal cans used for larger gatherings.
Exact, typical dimensions and real‑world capacity — will standard 13‑gallon/kitchen bags fit?
Typical dimensions (ranges from retail models): Height: 24–28 in (61–71 cm); Width/Diameter: 14–19 in (36–48 cm); Depth (oval/rectangular): 12–19 in (30–48 cm). Example: simplehuman rectangular 13.2 gal — H 25.7 in × W 19.8 in × D 12.8 in. Real‑world capacity: about 13–13.5 US gallons (49–51 L). Standard 13‑gal bags sold as 24 in lay‑flat × 30–33 in tall (24×33″ most common) are the correct size—always check bag box width and height because two “13‑gal” bags can have different heights affecting overhang and tie‑off.
How does a 13‑gal compare to other common patio bin sizes? (quick comparison)
Comparison (typical ranges): - 5 gal: Height 10–17 in — best for bathrooms/corners, frequent emptying. - 10–12 gal: Height 18–24 in — small kitchens or intimate patios. - 13 gal: Height 24–28 in; footprint modest — best for small outdoor seating, single-table entertaining. - 20–32 gal: Height 28–36 in; large footprint — for high‑use areas/parties or multi‑household bins. Choose 13 gal when you want daily/overnight capacity without large visual/physical footprint.
What materials and finishes are best for outdoor patio use?
Common materials and outdoor suitability: - Plastic (HDPE/PP/ABS): lightweight and inexpensive. Use only UV‑stabilized formulations (HALS + UV absorbers) for multi‑year outdoor life. Choose thick‑wall, exterior‑rated models. - Stainless steel: best corrosion resistance when 304 grade; 430 is lower cost but can corrode outdoors, especially near salt. - Powder‑coated steel/galvanized: durable if the coating is exterior grade (polyester/TGIC or fluoropolymer) and pretreatment is good; watch edge chips and rust. - Wood/bamboo blends: attractive and blends into design; require sealant and regular maintenance; avoid untreated wood outdoors. Recommendation: For exposed patios, choose UV‑stabilized plastic or 304 stainless steel or a well‑finished powder‑coated metal. Use enclosures or covers for wood blends.
How do color choices affect outdoor performance and odor?
Color impacts heat absorption and visible fading: dark colors (black/dark gray) absorb more solar heat and can run several °C–10s °C hotter in sun, raising internal temperatures and accelerating odors and microbial growth. Dark finishes also show UV fading/oxidation sooner unless pigment + UV stabilizers are used. Lighter or reflective colors stay cooler and reduce odor generation; they may show dirt more easily. For sunny patios, favor light‑to‑medium tones or UV‑stable pigments and seek products with manufacturer UV‑weathering claims (ISO/ASTM test references).