
A patio warning is any visible sign, structural symptom, or code-triggered condition that tells you your patio has become unsafe or non-compliant and needs action before someone gets hurt. That might be a crack spreading across a concrete slab, a railing post that wobbles when you push it, pavers that have heaved and created a tripping edge, or a raised deck edge with no guard at all. Some warnings are cosmetic and can wait a weekend. Others, like a loose ledger connection on a raised patio or an unprotected drop of more than 30 inches, need to be addressed immediately, sometimes the same day you notice them.
Patio Warning: Safety Guide for Homeowners & Renters

Miles Sutton
22 Jul 2026
SEO Title and Meta Description
Title: Patio Warning Signs: A Complete Safety, Inspection, and Repair Guide for Homeowners
Meta Description: Learn what every patio warning sign means, how to inspect and fix hazards, when to call a pro, and which safety products to use. Full guide with costs.
What a "Patio Warning" Means for Homeowners and Renters
The phrase "patio warning" covers two overlapping ideas. The first is a physical hazard: something about the patio's condition that creates a realistic risk of injury to people using the space. The second is a regulatory or code trigger: a condition that makes the patio non-compliant with building codes, HOA rules, or permit requirements, regardless of whether anyone has been hurt yet. Both matter, and often the same defect qualifies as both.
For homeowners, a patio warning is a prompt to inspect, document, and repair. For renters, it is grounds to notify your landlord in writing and, if the issue is serious enough, to contact your local housing authority. Landlords are generally required to maintain safe common and outdoor areas. A raised patio without compliant guardrails, for example, is a code violation that a landlord cannot simply ignore after it has been reported.
The stakes are real. Falls from elevated surfaces are among the most common causes of serious residential injuries. The International Residential Code (IRC) Section R312 requires guards on any open-sided walking surface where the vertical drop exceeds 30 inches within 36 horizontal inches of the edge. That rule exists because patios and decks at that height or higher present genuine fall risk, not just theoretical risk.
Quick Action: When to Take Immediate Steps
Not every patio problem needs you to drop everything right now. But some do. Here is a practical way to think about warning severity so you can prioritize correctly.
| Severity Tier | Examples | Suggested Timeline | Immediate Action |
|---|---|---|---|
| Critical (same day) | Missing or collapsed guardrail on raised patio, exposed live wiring, structural post failure, active water intrusion into electrical | Fix or restrict access within hours | Block off the area, post a visible warning, call a licensed contractor |
| High (within 48–72 hours) | Railing post wobbles more than 1 inch, multiple cracked/heaved pavers at entry, standing water near electrical outlets, visible rot at post base | Repair or professionally assess within 3 days | Limit use, add temporary barriers, document with photos |
| Moderate (within 2 weeks) | Single loose paver, minor surface crack under 1/8 inch wide, GFCI outlet cover missing, single loose baluster | Schedule repair in current week | Mark hazard with tape or a plant pot as a visual cue, order materials |
| Low (seasonal maintenance) | Surface staining, minor efflorescence, fading sealant, small drainage slope issue not near electrical | Address at next maintenance cycle | Note in your maintenance log, monitor for progression |
The tier that trips people up most often is High. A wobbly railing post does not look dramatic, but IRC load requirements call for guards to resist a concentrated lateral load of 200 lbf (roughly 200 pounds of sideways force) at any point along the top rail. A post that wobbles under hand pressure is already failing that standard. Treat it as urgent.
Common Patio Warning Signs
Structural Cracks and Sagging
Hairline cracks in concrete (under 1/16 inch wide) are usually shrinkage cracks and are cosmetic. Cracks wider than 1/8 inch, cracks that run through the full depth of a slab, or cracks accompanied by vertical displacement (one side higher than the other) suggest a soil settlement or drainage problem underneath. Any slab section that visibly sags, bounces slightly when you walk on it, or has separated from an adjacent structure by more than 1/4 inch needs structural assessment before repair.
Loose or Heaved Pavers
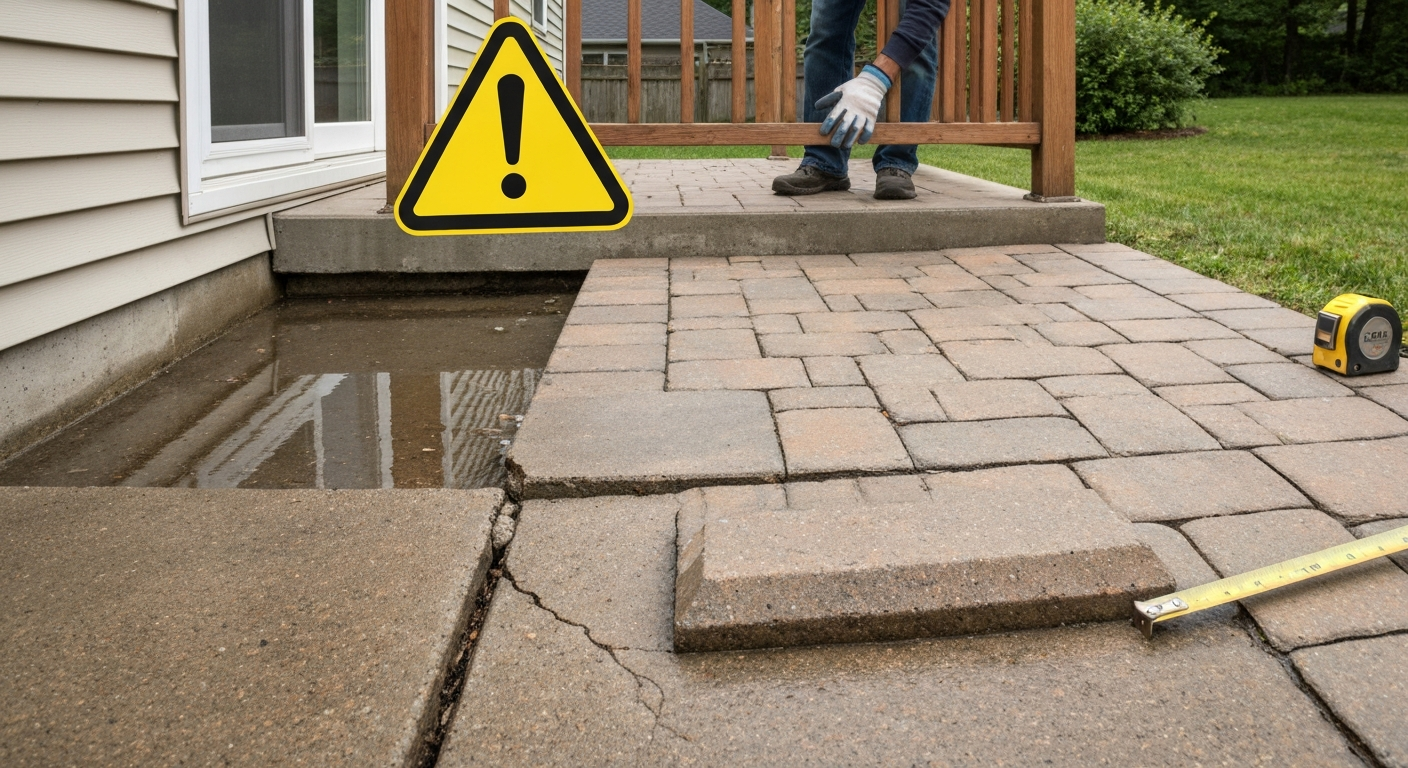
A paver that rocks, tilts, or sits more than 1/4 inch above its neighbors is a trip hazard. The ANSI/TCNA A326.3 standard uses 0.42 as the minimum wet Dynamic Coefficient of Friction (DCOF) for level surfaces expected to be walked on when wet. Loose or uneven pavers effectively drop well below that threshold and create both slip and trip risk, especially for older adults and children.
Trip and Slip Hazards
Beyond pavers, common slip hazards include algae or moss buildup on smooth stone or concrete, worn sealant on a polished surface, and a patio surface that drains toward the house rather than away from it. Any level change greater than 1/4 inch with no transition should be treated as a trip hazard.
Railing and Gate Failures
Railing failures include wobbling posts, corroded or cracked balusters, top rails that flex under moderate pressure, and gates that no longer latch properly. IRC requires that the openings between a walking surface and the required guard height not allow the passage of a 4-inch sphere. If a child can fit their head or body through a gap, the spacing is non-compliant. For patio safety gates specifically, a self-closing, self-latching gate mechanism that meets the same height and spacing requirements as the surrounding fence or railing is the standard to aim for.
Water and Drainage Problems
Standing water on a patio after rain should drain away within 24 to 48 hours maximum. Persistent pooling, water running toward the house foundation, or saturated soil directly under the patio edge all indicate a drainage grade problem. Over time, this causes frost heave, undermines footings, and accelerates concrete deterioration. The standard minimum drainage slope for patio surfaces is 1/8 inch to 1/4 inch per foot away from the structure.
Insect and Rot Damage
Rot and insect damage are primarily concerns for wood patios and pergola structures, but they can also affect the wood substructure of a raised patio. Probe any post base, beam end, or ledger board with a screwdriver. If it sinks in more than 1/4 inch without real resistance, the wood is compromised. Hollow-sounding wood tapped with a hammer, surface tunneling patterns, or frass (sawdust-like debris) near posts all indicate insect activity and need professional assessment.
Lighting and Electrical Issues
Outdoor electrical problems are among the most underestimated patio hazards. Under NEC 210.8, all outdoor receptacles at dwelling units must have GFCI protection. NEC 406.9(B) also requires that outdoor receptacle enclosures have extra-duty "while-in-use" weatherproof covers that keep the cover closed even with a plug inserted. Fixtures mounted overhead or in-grade must be listed for wet locations per NEC Article 410. Signs of electrical problems include outlets that have no GFCI, outlets with standard (not in-use) covers, flickering lights, discoloration or burn marks around fixtures, and any water intrusion near an electrical panel or junction box.
Weather-Related Risks
Extreme weather creates temporary but serious patio hazards. Ice on patio surfaces drops surface friction well below safe thresholds. High winds can dislodge unsecured patio furniture, umbrellas, and lightweight pergola panels, turning them into projectiles. After any storm event, treat your patio as a hazard zone until you have done a quick walk-around inspection. Pay special attention to any overhead structure, electrical components, and railings.
How to Inspect Your Patio: Step-by-Step
NADRA (the North American Deck and Railing Association) recommends a formal inspection at least once per year, with an additional quick check after any major storm. I do mine every spring, before the season starts, plus a 15-minute walk-around after any wind event over 50 mph. Here is the sequence I follow.
- Clear the patio completely. Move all furniture, planters, and rugs so nothing hides the surface or structural elements.
- Inspect the surface. Walk the entire patio slowly, feeling for movement or rocking under foot. Use a straight edge (a level works well) to check for lips or height differences between pavers or slab sections greater than 1/4 inch.
- Check drainage. Use a garden hose to wet the surface and watch where water flows. It should move away from the house at a minimum 1/8-inch-per-foot slope.
- Test every railing post. Grip each post at the top and push firmly side to side and front to back. Any movement greater than 1/4 inch needs investigation. Apply roughly 50 lbs of force (lean into it) and check whether the base connection holds.
- Inspect infill and balusters. Run a 4-inch-diameter object (a tennis ball works) along each section of railing infill. If it passes through any opening, the spacing is non-compliant.
- Check the gate (if present). Verify it self-closes from any open position and that the latch engages without being manually positioned.
- Probe wood components. Use a screwdriver to probe post bases, beam ends, and ledger boards at 6-inch intervals. Note any soft spots.
- Inspect electrical. Verify all outdoor outlets have in-use weatherproof covers and test GFCI outlets using the test/reset buttons. Check that all visible wiring has intact insulation and that no fixtures have moisture staining or corrosion.
- Look at anchor points. For raised patios, inspect where the ledger board meets the house and where posts meet footings. Look for rust, cracking, or gaps.
- Document everything. Photograph any defect you find with a tape measure in frame so you have a record of the size and location.
After each inspection, sort your findings into the four severity tiers described above and create a simple repair priority list. A written record also helps if you ever sell the property or need to make an insurance claim.
Troubleshooting Checklist: Cause, Severity, and Short-Term Safety Measures
| Warning Sign | Likely Cause | Severity | Short-Term Safety Measure |
|---|---|---|---|
| Railing post wobbles at base | Fastener corrosion, post-base rot, or loose anchor bolt | High | Restrict access, install temporary brace, assess within 48 hours |
| Cracked concrete slab (>1/8" wide) | Soil settlement, freeze-thaw cycles, or drainage failure underneath | Moderate to High | Fill temporarily with flexible sealant, monitor width weekly |
| Raised/rocking pavers | Sand base erosion, root intrusion, or drainage-caused washout | Moderate | Mark edges with tape or a visible pot, re-set within 2 weeks |
| Standing water near house | Insufficient slope or blocked drain | Moderate | Create temporary diversion channel, redirect with sandbags if needed |
| GFCI outlet trips repeatedly | Moisture intrusion, wiring fault, or overloaded circuit | High | Turn off breaker to that circuit, call a licensed electrician |
| Visible rot at post base | Prolonged moisture contact, absent or failed post base hardware | High to Critical | Temporarily prop affected structure, do not load; call contractor |
| Baluster spacing too wide (>4") | Original install non-compliant or balusters have shifted | High (children present) | Zip-tie or cable-tie as temporary measure, repair within 1 week |
| Ice on patio surface | Inadequate drainage slope, shading preventing drying | Critical (winter) | Apply non-chloride de-icer, add traction mat, do not use until clear |
| Flickering outdoor lights | Loose connection, failing fixture, or moisture ingress | Moderate to High | Turn off circuit, check wet-location listing on fixture, call electrician if wiring issue |
DIY Repair Steps: What You Can Safely Fix Yourself
Resetting Loose or Heaved Pavers
Tools you will need: a pry bar or flathead screwdriver, rubber mallet, stiff brush, polymeric joint sand, a spray bottle, and a level. Cost of materials: roughly $15 to $40 for a 50-lb bag of polymeric sand, which is enough for a typical 100 to 200 square foot area.
- Remove the affected paver(s) by prying gently from a joint edge.
- Scrape or vacuum out the existing sand base and add fresh coarse sand or paver base material to achieve a flat, level substrate.
- Check the level across adjacent pavers before setting. Aim for a consistent 1/8-inch-per-foot slope away from the house.
- Reset the paver and tap it firmly into place with a rubber mallet.
- Sweep polymeric joint sand into all surrounding joints, then mist lightly with water to activate the binding agent.
- Allow to cure for 24 hours before foot traffic.
Filling Concrete Cracks
For cracks between 1/16 inch and 1/4 inch wide with no vertical displacement, a self-leveling polyurethane or epoxy crack filler works well. Clean the crack with a wire brush and blow out loose debris with compressed air, then apply the filler per the manufacturer's instructions. Sanded concrete caulk in a color-matched shade runs about $8 to $15 per tube. For cracks wider than 1/4 inch or with any step displacement, stop here and call a professional. Those require evaluation of the sub-base.
Replacing a Single Loose Baluster
Tools: drill, appropriate bit for your railing material, replacement baluster, screws or hidden fasteners per the railing manufacturer's guide. Check the manufacturer's installation instructions first (brands like Trex publish downloadable installation PDFs) to confirm the correct fastener type and spacing for your specific product. Remove the damaged baluster, transfer the measurements, cut the replacement to match, and fasten per the published spec. This is a straightforward DIY job that takes 20 to 30 minutes per baluster.
Replacing an Outdoor GFCI Outlet Cover
An in-use weatherproof outlet cover costs between $8 and $20 at any hardware store. Turn off the circuit at the breaker, swap the cover plate, and restore power. Confirm that the cover closes fully even with a plug cord running through it. This is the entire scope of what a homeowner should do themselves on an outdoor outlet. Any wiring issue inside the box requires a licensed electrician.
Improving Surface Traction
If algae, moss, or a worn sealant coat is making a patio surface slippery, start with a proper cleaning using a stiff deck brush and a diluted oxygen bleach solution (follow product dilution directions), then rinse thoroughly. Once dry, apply an anti-slip additive mixed into a fresh coat of concrete or paver sealer. These additives are typically aluminum oxide or fine silica particles and cost $10 to $30 per packet, enough for one sealer batch covering 200 to 400 square feet.
When to Hire a Professional
Some patio repairs sit clearly in the DIY category. Others have enough structural, electrical, or code complexity that attempting them without professional expertise creates more risk than the original problem. Here is where I draw the line.
- Any work involving the ledger board connection between a raised deck/patio and the house structure. This connection needs to meet prescriptive anchor requirements and Simpson Strong-Tie or equivalent anchor products must be installed with correct embedment depths and torque values per ICC-ES evaluation reports. Getting this wrong can cause the entire structure to pull away from the house.
- Post footing repair or replacement on a raised patio. Footings must be sized and placed to local frost-depth requirements. This is a structural calculation, not a guessing exercise.
- All electrical work beyond swapping outlet covers. Any wiring, new circuit installation, or repair of a tripped GFCI that does not reset needs a licensed electrician. NEC violations on outdoor circuits are a fire and electrocution risk.
- Guard or railing systems on any raised patio where the drop exceeds 30 inches. These must meet the IRC R312 guard requirements (36-inch minimum height in most residential jurisdictions, 42 inches under IBC and some state amendments like California), and the load performance requirements (200 lbf concentrated lateral load on the top rail) need to be met by the installed product and anchorage.
- Any patio showing signs of structural rot or insect damage. A contractor or structural engineer needs to assess how far the damage extends before repairs begin.
- Permit-required work. If your project requires a permit (raised patios above 18 to 30 inches depending on your jurisdiction, enclosures, or structural modifications), the permit process typically requires a licensed contractor or at minimum a homeowner with approved plans.
- Drainage regrading that involves removing or altering more than a few inches of existing grade near the foundation.
Typical Professional Cost Ranges (2025–2026 Estimates)
| Task | Typical Cost Range | Key Factors Affecting Price |
|---|---|---|
| Railing replacement (per linear foot, installed) | $60–$150/LF | Material choice (aluminum, composite, glass), height, post spacing |
| Post footing repair or replacement | $200–$800 per post | Frost depth, access, concrete volume, permit requirements |
| Ledger board replacement/re-anchoring | $500–$2,000+ | Extent of rot, siding type, anchor hardware, local labor rates |
| Full patio structural assessment (engineer) | $300–$800 | Size of structure, report complexity, local market |
| Outdoor electrical circuit / GFCI upgrade | $150–$500 per circuit | Panel proximity, conduit required, number of outlets, labor rate |
| Concrete slab repair (grinding/leveling/mudjacking) | $500–$3,500 | Area size, severity of settlement, access for equipment |
| Paver base reset (full area) | $4–$12 per sq ft installed | Area size, existing edging, sand vs. concrete base, debris removal |
| Drainage regrading (minor to moderate) | $500–$2,500 | Linear feet of grading, drain installation, landscape restoration |
These ranges are estimates based on typical residential projects in average-cost U.S. markets as of mid-2026. Your actual cost will vary based on region, material choice, and site-specific conditions. Always get at least two itemized quotes and ask the contractor to identify any permit requirements before work begins.
Patio Safety Products: Gates, Fences, Locks, Netting, and Railings
Once you have identified and addressed immediate hazards, the next step is making sure the right permanent safety products are in place. For more on containment and fall-prevention options, see patio safety netting for recommended materials, mesh sizes, and installation tips. See our patio safety fence guide for options, code tips, and installation best practices. Each product category addresses a specific type of risk, and choosing the wrong one (or skipping one entirely) leaves gaps. This section covers the practical specs and use cases for each. For more on selecting and installing the right products, see our detailed patio safety recommendations.
Patio Safety Railings
Railings and guards are the foundation of raised patio safety. For detailed product specs, code requirements, and installation tips, see our patio safety railings guide. IRC R312 sets the residential minimum at 36 inches of guard height when the walking surface drop exceeds 30 inches. Many jurisdictions and the IBC require 42 inches. If you are in California or another state that has adopted stricter residential amendments, verify your local requirement before buying or installing anything. Baluster spacing must not allow a 4-inch sphere to pass through. Top rails must resist a 200 lbf concentrated lateral load. If you are specifying a metal system, ASTM E985 is the relevant industry standard for structural and deflection criteria.
For material selection, aluminum powder-coated systems offer the best combination of corrosion resistance, code-compliant load performance, and low maintenance. Composite rails (like Trex) look great but require following manufacturer installation specs precisely, including post spacing limits, to maintain their structural rating. Glass infill panels provide unobstructed views but need to be specified with tempered or laminated safety glass and verified load-rated hardware. Wood is the most DIY-friendly but needs annual maintenance and is most vulnerable to the rot and moisture issues that trigger patio warnings in the first place.
Patio Safety Gates
A gate is only as good as its hardware. For any patio that borders a pool area, elevated edge, or is used by young children, the gate needs to be self-closing from any open position and self-latching to a height that a child under 5 cannot easily reach, which generally means the latch is at least 54 inches above the ground or on the pool side of the gate. The gate itself must match the height and baluster-spacing requirements of the surrounding fence or railing, not just approximate them. Hinges should be corrosion-rated for outdoor use, and the latch mechanism should be tested monthly.
Patio Safety Fences
Patio perimeter fencing defines the boundary of the space and can serve as the primary fall protection on a grade-level patio that borders a steep slope or drop. For fencing used as a guard on an elevated surface, the same IRC and IBC height and spacing requirements apply as for railings. For privacy and boundary fencing on grade-level patios, the structural requirements are less stringent, but post footings should still be below local frost depth and any metal components should be hot-dipped galvanized or powder-coated for outdoor durability.
Patio Safety Locks
Locks on patio doors and gates serve two different functions. A patio door lock prevents unauthorized entry into the home and is a security product. A gate lock on a pool or elevated patio fence is a safety product designed to prevent unsupervised access by children or vulnerable adults. For safety locks, choose products that are key-operated or require fine motor skills a child cannot replicate, and inspect the mechanism at least twice a year for corrosion or mechanical wear. Magnetic key locks designed for child-resistant gates typically cost $25 to $80 and are straightforward to install.
Patio Safety Netting
Safety netting is most commonly used on elevated patios and balconies where a conventional railing system alone does not fully close off the risk, particularly in homes with cats, small dogs, or toddlers who might squeeze through or under a railing. It is also used under raised decks to prevent people or animals from falling into the gap between the deck surface and grade. Look for UV-stabilized polyethylene netting rated for outdoor use with attachment hardware that anchors through the railing structure, not just around it. Opening size in the netting should be small enough to retain what you are trying to contain, typically 1.75 to 2.75 inches for pet netting and tighter for infant protection.
Safety Product Comparison
| Product | Primary Risk It Addresses | Key Spec to Verify | Typical DIY Cost (materials) | Pro Install Needed? |
|---|---|---|---|---|
| Safety railings/guards | Fall from raised edge | 36" or 42" height, 4" max spacing, 200 lbf top rail load | $30–$100/LF (aluminum or composite) | Recommended for raised patios; required for permit jobs |
| Safety gate | Unsupervised child/pet access to hazard zone | Self-close, self-latch, height and spacing match fence | $80–$250 per gate | DIY possible with correct hardware |
| Perimeter fence | Boundary definition, fall prevention at slope edge | Post depth below frost line, guard height if elevated | $15–$60/LF (aluminum or vinyl) | DIY possible; permit may be required |
| Safety lock | Unauthorized or unsupervised access | Child-resistant mechanism, corrosion rating | $25–$80 per lock | DIY |
| Safety netting | Pet/child containment, under-deck gap closure | UV-rated, opening size ≤2.75", secure attachment points | $50–$200 for typical section | DIY with proper anchoring hardware |
| GFCI outlet protection | Outdoor electrical shock hazard | Class A GFCI, NEC 210.8 compliance, in-use cover | $15–$40 per outlet (cover + device) | Licensed electrician for wiring work |
Raised Patio Safety and Edge Protection
Raised patios deserve their own focus because height changes the entire risk profile. For specific design, guardrail, and edge-protection recommendations, see raised patio safety. At or above 30 inches of vertical drop, a fall is likely to cause serious injury. The IRC trigger point of 30 inches is measured at any point within 36 horizontal inches of the edge, so a patio that sits on a slope where part of the edge is at 28 inches and another section is at 32 inches still triggers the guard requirement. Design your edge protection for the worst-case drop point, not the average.
Toe boards are an additional protective element sometimes required or recommended where tools, furniture legs, or objects could slide under a railing infill and off the edge. A 3.5-inch-minimum toe board along the base of the guard can prevent this. On commercial or higher-traffic raised patios, many specifications also call for intermediate guardrail elements that resist infill loads of at least 50 lbf on any one square foot of area.
Post anchorage on raised patios is the most failure-prone element in the entire system. Posts anchored through surface-mount hardware into concrete or wood need to be installed with the correct anchor type, embedment depth, and torque per the anchor manufacturer's ICC-ES evaluation report. See Hilti technical guidance and anchor design resources (Hilti engineering Q&A / anchor design references) for embedment, cure, and torque requirements and PROFIS design tools. Simpson Strong-Tie's prescriptive anchor products (like the DTT deck tension ties) and Hilti adhesive anchors (HIT-RE / HIT-HY series) both publish explicit embedment and torque requirements that must be followed precisely. A surface-mount post base installed with the wrong fasteners or shallow embedment is the leading cause of railing post failures.
Code, Permits, and Talking to a Contractor
The single most important thing to know about patio permits is that your local Authority Having Jurisdiction (AHJ) sets the actual rules, and those can differ significantly from the model IRC. Seattle, for example, requires a construction permit for any deck more than 18 inches above grade, which is 12 inches lower than the IRC's 30-inch threshold. New York City requires professional plans and permit approval before any deck or balcony construction, mandates 42-inch safety railings, and enforces a maximum 5-inch spacing between rails or posts. California has widespread 42-inch residential guard requirements. None of these are covered by simply reading the IRC.
Before any significant patio repair or new installation, call your local building department or check their website for: the permit threshold for elevated structures (height above grade that triggers a permit), required guard height and infill spacing in your jurisdiction, whether a licensed contractor is required for permitted work, and what drawings or documentation are needed for plan review.
When you hire a contractor, ask these specific questions: Are you licensed and insured for structural work in this jurisdiction? Will this project require a permit, and will you pull it? What anchor specification are you using for the post bases, and do you have the ICC-ES report for that product? Can you provide a reference for a similar raised patio project completed in the last two years? A contractor who cannot answer these questions clearly is a contractor worth passing on.
Your Patio Safety Checklist
Use this as a printable reference for your annual inspection or any pre-season check. It covers the full range of patio warning categories discussed in this guide.
- Surface: No pavers raised more than 1/4" above adjacent units; no cracks wider than 1/8" with step displacement; drainage slope 1/8"–1/4" per foot away from house
- Slip resistance: Surface clean and free of algae/moss; sealant intact; traction additive applied if surface is polished or smooth
- Railings: All posts firm with less than 1/4" movement under hand pressure; no baluster spacing allows a 4" sphere; top rail height is 36" minimum (verify 42" if required locally); top rail resists moderate lateral force without flex
- Gates: Self-closes from any open position; latch engages automatically; latch height and mechanism are child-resistant if gate borders a pool or elevated edge
- Raised patio edges: Guard height meets local code; toe boards in place if required; post base anchors inspected for corrosion and movement
- Wood components: Probe test at post bases, beam ends, ledger; no soft spots; no visible rot, tunneling, or frass
- Electrical: All outdoor outlets have GFCI protection and in-use weatherproof covers; all fixtures are wet-location listed; no tripped GFCI that does not reset; no visible corrosion, burn marks, or exposed wiring
- Drainage: No standing water 48 hours after rain; no water pooling near house foundation or electrical outlets
- Netting/barriers: Intact and secured if in place; no openings larger than specified for its protection purpose
- Permit status: Any structural change or elevated patio verified with local AHJ for permit requirements
FAQ
SEO title and meta description for the patio warning article
Title: Patio Warning: What It Means and a Complete Safety Guide for Homeowners & Renters Meta description (under 160 characters): Understand patio warnings, identify hazards, inspect safely, and fix or hire pros—complete safety, product specs, codes, costs, checklist.
What is a “patio warning” and why should homeowners and renters take it seriously?
A "patio warning" is any sign, notice, or observed condition that indicates the patio may be unsafe or requires attention. This includes visible structural problems (cracks, sagging), trip/slip hazards, railing or gate failures, drainage or water damage, insect/rot damage, electrical/lighting issues, and weather-related risks. For owners and renters, ignoring these warnings can result in injury, liability, property damage, accelerated deterioration, failed inspections, or code violations. A patio warning can be a verbal notice (from a property manager), a written citation (from an inspector), or a homeowner's observation that triggers immediate or scheduled remediation.
What are the common patio warning signs to look for during a quick visual check?
Common warning signs: structural cracks in concrete or pavers (widening or through-cracks), sagging or deflection of raised patio surfaces or joists, loose or shifted pavers/tiles, uneven surfaces and trip hazards, standing water or poor drainage, spalled or crumbling concrete edges, deteriorated ledger connections (for attached patios/decks), wobbly or loose railings and gates, missing or corroded fasteners, insect or rot decay in wood members, exposed or improperly protected outdoor electrical outlets/fixtures, inadequate lighting creating night hazards, inadequate guard height or infill spacing on raised patios, and surface slipperiness when wet. Note and photograph each symptom and mark urgency (see warning timeline answer).
How to perform a structured patio inspection (step-by-step checklist and frequency)?
Inspection frequency: visual monthly quick check; full inspection twice a year (spring and fall); after major storms or seismic events do an immediate check. Step-by-step inspection protocol: 1) Prepare: safety glasses, gloves, flashlight, tape measure, hammer (tap test), moisture meter (optional), camera. 2) Surface check: walk the area looking for cracking, heaving, loose pavers, or slippery finishes. Measure deviations >1/4" over 10' for decking as a flag. 3) Edges and raised areas: measure guard height, check infill spacing, look for missing toe boards or edge rot. Note any vertical drop >30" (see code) that requires a guard. 4) Structural elements: inspect ledger (attached patios), posts, joists, beams for rot, rust, or loose anchors. Tap wood for hollow or soft spots. 5) Fasteners and connections: check bolts, lag screws, nails, anchors for corrosion or looseness. Test railings for lateral deflection. 6) Drainage and grading: locate standing water, slope issues toward structure, clogged drains. 7) Electrical and lighting: verify fixtures are wet/damp‑location listed, receptacles are GFCI protected, covers are weatherproof while‑in‑use. 8) Insect/rot: inspect undersides and close to soil for carpenter ant/termite signs, fungal staining, or soft wood. 9) Safety products: verify gates latch, safety netting intact, fences firmly anchored. 10) Document and date findings, take photos, and categorize as immediate, short-term (days-weeks), or long-term (months).
What are the warning timelines — when does a problem require immediate action vs scheduled repair?
Immediate action (fix within 24–72 hours): large cracks with settlement exposing rebar, significant sagging or failure of raised edge, loose railing or post that yields under hand pressure, exposed live electrical wiring or non‑functional GFCI, large areas of standing water causing immediate slip or structural concern, visible collapse or active insect damage undermining support. Short-term (days–weeks): loose pavers, small but widening cracks, minor corrosion on critical fasteners, malfunctioning gate latches, lighting gaps that increase nighttime risk. Routine/monitor (weeks–months): cosmetic hairline cracks, routine resealing, minor surface spalls, paint touch-ups. Prioritize items that risk injury or rapid degradation.
What DIY safety fixes are appropriate for homeowners, and when should a contractor be hired?
DIY-appropriate tasks: - Replace broken/loose pavers and re-level small areas with sand/compact base. - Apply joint sand or polymeric sand to stabilize pavers. - Add non‑slip coatings/traction strips to smooth surfaces (choose wet‑DCOF rated products). - Tighten or replace surface fasteners (non‑structural), replace deck boards, treat and seal wood surfaces, clean and clear drains, install weatherproof outlet covers and test/replace GFCI devices (if competent with basic electrical safety). - Install self‑closing gate hardware and simple latch replacements. Professional-required tasks: - Repair or replace structural elements: joists, beams, ledger remediation or replacement, major sag correction. - Anchor replacement requiring concrete torque/adhesive anchors (use ICC‑ES guidance and torque specs). - Major electrical work beyond replacing an outlet (permit and licensed electrician recommended). - Design and construction of new guard systems on raised patios where code compliance, loading, or engineering is required. - Widespread insect/rot remediation involving structural replacement. - Obtaining permits or addressing altered load paths; hire an engineer or licensed contractor. If in doubt about structural capacity or code compliance, hire a pro.